
apellefigliodapollo
-
Posts
94 -
Joined
-
Last visited
-
Days Won
1
Reputation Activity
-

 apellefigliodapollo got a reaction from dhh3 in Dash Kit
Any shot of the dash kit? I'm curious like heck
-
 apellefigliodapollo got a reaction from dj cowboy in new recall issued today for 2012-2015 journeys
151.476 vehicles involved in Europe (Fiat Freemont)
-
apellefigliodapollo got a reaction from dhh3 in new recall issued today for 2012-2015 journeys
151.476 vehicles involved in Europe (Fiat Freemont)
-

-
 apellefigliodapollo got a reaction from onecrazyfoo4u in Chipped paint...and RUST
great work
the tape matches perfectly the color!
-
 apellefigliodapollo got a reaction from 11journeybama in Chipped paint...and RUST
great work
the tape matches perfectly the color!
-
 apellefigliodapollo reacted to pacman in DRL on high beams
Thank you again. I think I'm going to use this option on high beams, it will be my DJ's next gift.
-
 apellefigliodapollo got a reaction from Potlicquor in DRL on high beams
The high beams option is almost plug and play if you use the extensions an the ebay relay
-
apellefigliodapollo got a reaction from Potlicquor in DRL on high beams
That's the result under the hood... looks almost factory, doesn't it? ;-)
The second shot shows how i've used the extensions
red arrow=oem high beam wire
white arrow=where the relay wire is crimped to the the extension
-
apellefigliodapollo got a reaction from Potlicquor in DRL on high beams
@pacman
i see you are from spain...
you should buy this from ebay it's an unexpensive solution, the installation is very easy and it works fine!
I bought two H11 and HB3 extension, so you can connect the relay whithout touching the OEM wires...
FOR DRL ON FOG LIGHTS (very unexpensive)
you need a relay like this (i think you can find it, for a couple of US bucks, in every shop of electrical stuff)
then connect the wires from the relay to the positive of the two wires of the fog lights and the positive of one low beam (so the relay have the signal to switch off the fog lights)
this is the electrical diagram:
CREDITS for the idea:
italian fiat freemont forum
-
apellefigliodapollo got a reaction from Potlicquor in DRL on high beams
I have a very unexpensive solution to share for drl on (led) fog lights too... just a relay and a couple of cables.
just a couple of days...
-
apellefigliodapollo got a reaction from Potlicquor in DRL on high beams
I'll post photos and details
just a little patience, i'm out for work for a couple of days and my freemont is in my garage at home
(Anyway, finally i could use the lights swich in the "auto" position. When you start the engine the high beams are dimmed. When you turn on the lowbeams, the dimmed high beams turns off and so on... it works like oem drl)
-
apellefigliodapollo got a reaction from Potlicquor in DRL on high beams
Relay on high beams
dimmed to 30%
8 seconds after engine start, DRL turns on
when i fire the low beams DRL turns off
No loss of high beam functions
the switch low beams ->DRL and DRL ->low beams is immediate
A smAll video
-
apellefigliodapollo got a reaction from Potlicquor in DRL on high beams
Used 2 HB3 and one H11 extension connectors
to let the oem wires untouched
the relay cables are crimped to the extension
-
apellefigliodapollo reacted to redtomatoman in Simple Engine Bay Modification
I posted some pictures in my redtomatoman photo gallery of adding a grille emblem to my engine cover. It looks pretty cool and adds to the engine dress up kit that I have installed. I used the snap-on honeycomb grille type as that's what I happened to have. If I was to do this again I'd definitely use the push-on type with the metal push caps on the back. I used 3M tape to secure it in place. My initial plan was to drill the holes in the engine cover so that the emblem would "snap" in place in addition to the 3M tape. Turns out the shape of the snap-on pieces on the back of the emblem are tapered and this affected how big the holes had to be so it wouldn't "snap" into place. I had to drill and re-drill the holes until it would fit into place. I hope the 3M tapes holds and stands up to the engine bay temps. Time will tell. . .
It looks clean and is solid today, so I'm hopeful. I'd love to hear comments.
Peace.
-
apellefigliodapollo reacted to dhh3 in Reverse Light Wires
The inside tail light modules are simple to take off. Open the gate, and you will see 2 plastic rivets. There are notches in the head. Use a small screwdriver to pull the rivet out. Then pull the whole plastic piece out. You can then pull the whole lamp module towards you - there are two pins that fit in rubber washers. Then, you can see the colors of all of the lights in the module. Fun, huh!
-
 apellefigliodapollo got a reaction from Journeyman425 in Hit this weekend...
if you have the chrome grille (and you like it)
standard headlights is the right choice!
-
apellefigliodapollo got a reaction from dhh3 in Hit this weekend...
if you have the chrome grille (and you like it)
standard headlights is the right choice!
-
 apellefigliodapollo got a reaction from Journey_SeXT in Windows Tinted
In Italy tinting front windows is illegal too
-
 apellefigliodapollo got a reaction from Powerz69 in MD2S projector retrofit with Apollo 2.0 shroud.
well done
looks good!
-

-

-
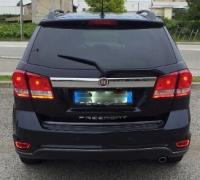
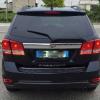
 apellefigliodapollo got a reaction from Dodge Journey Guide in chromed
here's my freemont...
before and after adding some little chrome trims an a bit of plastidip on front grille
-
 apellefigliodapollo got a reaction from mdamien0138 in Chrome body side molding
i've installed chrome lower window trims
-
apellefigliodapollo reacted to onecrazyfoo4u in chromed
How many cans of plastidip did it take to do the grill/bumper/mirrors? Did you have to prime or clearcoat it or anything? Or just the plastidip color?