

John/Horace
-
Posts
2,040 -
Joined
-
Last visited
-
Days Won
220
Content Type
Profiles
Forums
Gallery
Everything posted by John/Horace
-
https://www-motor1-com.cdn.ampproject.org/v/s/www.motor1.com/news/537475/2022-dodge-journey-reveal/amp/?amp_js_v=a6&_gsa=1&usqp=mq331AQIKAGwASCAAgM%3D#aoh=16330272518402&csi=0&referrer=https%3A%2F%2Fwww.google.com&_tf=From %1%24s&share=https%3A%2F%2Fwww.motor1.com%2Fnews%2F537475%2F2022-dodge-journey-reveal%2F
-
I’m thinking rear taillights wiring harness could be a bear to untangle ?. https://jalopnik.com/no-car-mod-will-ever-be-as-good-as-this-1847746009
-

09 dodge journey wont drive at all
John/Horace replied to Robert clutton's topic in Engine & Transmission
If he took the ditch, it’s possible one of the cooling lines was damaged and fluid leaked out. Transmissions need fluid to create motion via torque converter. Start out checking fluid level if you have a dipstick.2.4 or 3.5 should have one. -
I don’t think dealer can really be blamed, most likely unfortunate coincidence. Electronics can fail at almost any time. Try unhooking battery or camera fuses and see if camera reboots. There are times when a repair involves leaning all over parts of car, or disturbing adjacent parts doing a repair. Like radiator and a/c condenser when one one of them is changed out. Or partial repairs to exhaust system’s. Stuff gets brittle with age and sometimes it’s unavoidable to have collateral damage. Mechanics will sometimes stay away from some repairs on older high mileage cars for this reason.
-
Here is a 5% discount code. They are easy to find if this one expires. Paste it in the “how did you find us” box on the payment screen. 184887257150009699
-
Large time savings too. I have pressed bushings into a few control arms and sub frames before, can get awkward. Even with a 50 ton press at work, I had to get creative to not damage arm while installing bushings. We are in the rust belt with these cars, spraying inside control arms with Rustcheck or Formula 3000 helps a bit. But rusty suspension parts can come apart tying to replace worn bushings as well. Keep an eye on front lower ball joints; Journeys have a tendency to go through them. Use joints with grease fittings if possible, last forever with a few shots of grease once a year.
-
2011 Journey wont start
John/Horace replied to Ojkc's topic in Alarms, Keyless Entry, Key Fobs, Locks & Remote Start
Not likely key security system acting up if one click occurring. Although key switch has internal contacts which could be worn. Jumping contacts at starter relay under hood bypasses all security stuff and key switch and tests just starter by itself. Two bad starters not very likely IMO. If you have corrosion showing on main power/ground connections under hood, clean them. But low amperage power or ground wires more likely issue. -
Pressing in bushings on control arms can be a pain. Do you have access to a large hydraulic press and have you ever used one before. Also need to repaint rusted control arms primer and top coat. Road salt eats up suspension parts. I don’t work for Rockauto, but it is hard to beat their prices on a lot of parts. Moog included.
-
2011 Journey wont start
John/Horace replied to Ojkc's topic in Alarms, Keyless Entry, Key Fobs, Locks & Remote Start
With a remote battery set up like the Journey there are extra ground and power connections under hood. If I was having starting issues, cleaning up the extra connections under hood would be a good idea. Sometimes ground connections are mounted on painted surfaces. It. never hurts sanding off paint and getting bare metal and putting a thin coat of dielectric grease on both power and ground contacts. Battery connections should never have green corrosion. -
Engine RPM surge when coming to a stop
John/Horace replied to DodgeaWrench's topic in Engine & Transmission
Nice to see your detailed pics and a solution to the transmission problem. More intimidating to work on then the rest of the car sometimes. I lifted the signature quote from some southern US guy on another forum. A little blasphemes, but it made me smile too. Sometimes you need a laugh. -
Glad you got it sorted out. I fix my adult kids cars often as well; NACAR pit stop repairs not always fun. They don’t live at home. I prefer puttering along without dead lines or pressure. Then it’s kinda fun. O2 sensor fit seems to a problem on lots of cars, very frustrating. I’ve even had dealer supplied O2 not fit. But I have had great results from NTK sensors performance over all. For O2 sensors I have a three piece socket kit that fits a lot of weird applications. Harbour Freight type China kit that real mechanics cringe at. But with a bit if MAP gas in a pinch, always does the job without damaging the insert fitting weld or threads. Rust belt northern cars are always more of a challenge, no matter what kind of mechanic you are. Cheers, you are in the home stretch.
-
Test The Sensor Circuit Hall Effect sensor: Start by checking the ground side of the circuit. To do this, connect a DMM set to DC volts between the battery positive terminal and sensor ground terminal on the harness side of the connector. If there is a good ground, you should get a reading of about 12 volts. Next, check the 5-volt reference side of the circuit by connecting a DMM set to volts between the battery negative terminal and the sensor reference terminal on the harness side of the connector. Turn the Check the ground side of the circuit. To do this, connect DMM set to DC volts between the battery positive terminal and sensor ground terminal on the harness side of the connector. If there is a good ground, you should get a reading of about 12 volts. If not, the circuit will need to be diagnosed and repaired. Test The Oil Control Solenoid Remove the solenoid connector. Use a digital multimeter set to ohms to check the internal resistance of the solenoid. To do this, connect the meter between the solenoid B+ terminal and the solenoid ground terminal. Compare the resistance measurement to the factory repair specifications. If the meter displays a reading out of specification, or out of limits (OL) indicating an open circuit, the solenoid should be replaced. It's also a good idea to remove the solenoid to visually inspect the screen for metal debris. Check The Oil Control Solenoid Circuit Check the power side of circuit: Remove the solenoid connector. With the vehicle ignition on, use a digital multimeter set to DC volts to check for power at the solenoid (usually 12 volts). To do this, connect the negative meter lead to battery negative terminal and the positive meter lead to the solenoid B+ terminal on harness side of the connector. The meter should read 12 volts. If not, the circuit will need to be diagnosed and repaired. Check the ground side of the circuit: Remove the solenoid connector. With the vehicle ignition on, use a digital multimeter set to DC volts to check for ground. To do this, connect the positive meter lead to battery positive terminal and the negative meter lead to the solenoid ground terminal on harness side of the connector. Command the solenoid on with an OEM equivalent scan tool. The meter should read 12 volts. If not present, the circuit will need to be diagnosed and repaired. Check the timing chain and VVT actuators If everything checks out up to this point, the problem may be with timing chain, corresponding, or VVT actuators. Remove the necessary components to access the timing chain and actuators. Check the chain for excess play, broken guides and/or tensioners. Check the actuators for visible damage, such as worn teeth. Read more at: https://www.obd-codes.com/p000b Copyright OBD-Codes.com
-
Engine RPM surge when coming to a stop
John/Horace replied to DodgeaWrench's topic in Engine & Transmission
The green rubber grommet on gang elec connector was reused.? Fluid level is well below that during operation it looks like. -
People forget the significance of the thermostat temp rating, cut and pasted from thermostat description is an important detail. Its the start to open temp, so not really the exact operating temp. The dash analogue needle sweep gauge is more useful than the instantaneous digital number in the cluster. It Can be misinterpreted some times. MAHLE / CLEVITE TI23795 {Click Info Button for Alternate/OEM Part Numbers} Includes Thermostat; Includes Gasket or Seal Info Start to Open Temperature: 95 C
-
Won't start, AWD light comes on
John/Horace replied to jdentinger's topic in Electrical, Battery & Charging
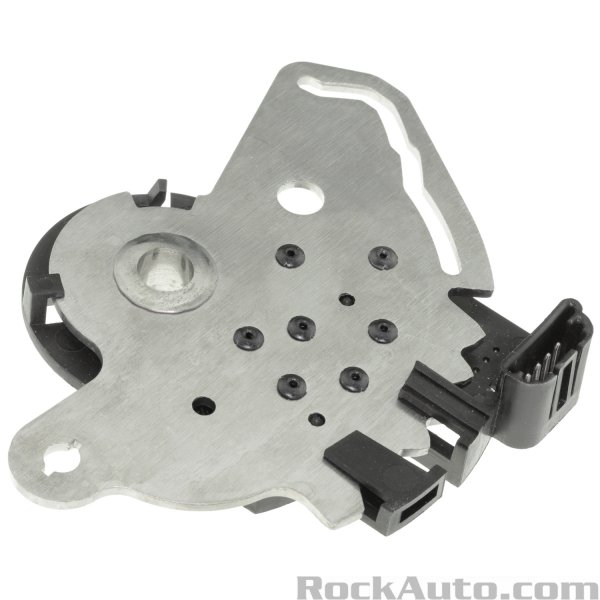
Good info for the site. One of oil pans removed to do it.? Mopar oem part is $50-ish plus shipping. https://www.rockauto.com/en/catalog/dodge,2014,journey,3.6l+v6,3300354,electrical-switch+&+relay,neutral+safety+switch+/+range+sensor,4584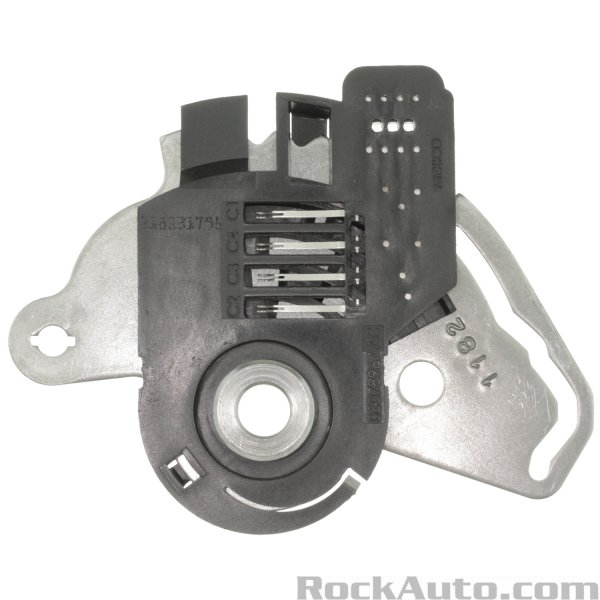
-
Nice thought but...warranty’s not the same for the neighbours to the north. Usually it’s 60k kilometres or 5 years bumper to bumper, power train is 100k or five years. Extended warranty would go a bit longer. Ten year coverage I think would be diesel engine type of thing. Much smaller, less competitive market, companies offer less...because they can. Dealerships also like to focus on fine print for claims. So exact oil change records etc are often demanded. Consumer’s have less power generally. Unless you are a lawyer, of course. I think owner should have shopped around and found more competitive quote for repair. Probably with auto recylcer parts.
-
Compression on cylinder 4 would be useful information. When you did oil cooler housing (like a lot of us also had to do) you had upper and lower manifolds removed. it’s a good idea to replace both sets of gaskets at same time, the old gaskets get crushed a bit. Air leak from bad intake manifold seal can create a cylinder misfire code sometimes.
-
Another possibility is the intake manifold seals, on cylinder 2 either upper or lower could bad. Not that expensive to change. Look closely for cracks or damage to the plastic manifolds when they are off. Car accidents sometimes damage manifolds. Extra air from bad seal or cracks can cause cylinder misfire issues. When people change the plugs they often reuse these seals; can get you later.
-
That’s great news, sounds like you dodged a bullet. Just to be clear, Its critical all three timing marks line up exactly. Belt sometimes looks ok without damage, but tensioner gets weak and belt jumps a few teeth. I use yellow paint marker and a mirror when checking timing marks. Fuel pump test can be tricky, some cars have a schrader valve on fuel rail for a pressure gauge to snap on to. I haven’t seen one on Journey. So special in line mechanics test gauge would have to be hooked up to confirm correct pressure. If pump is working some what you will hear it cycle on with key for a few seconds, then stop when it is pressurized. You will smell gas when cranking car and it will sputter and run a little bit with even a small amount of gas from weak fuel pump. Once battery is recharged, scan for engine codes if it’s still not starting.
-
Won't start, AWD light comes on
John/Horace replied to jdentinger's topic in Electrical, Battery & Charging
As you are driving, if the battery stops getting charged. The ecm will start to shut down systems like the radio and climate control to keep power for critical stuff lights and engine cooling fan. Lots of though goes into it. -
Won't start, AWD light comes on
John/Horace replied to jdentinger's topic in Electrical, Battery & Charging
Welcome to forum, no start can be frustrating. Weird warnings often go together with low voltage, that is a reasonable assumption. My wife has an awd, I’m not aware of it being able to prevent starting from a fault. Charge battery for a few hours and make sure no interior lights or plug in stuff is drawing continuous power. If possible get battery/alternator load tested some where. Make sure connections under hood from battery are clean and corrosion free. If you buy a new battery for install, charge it as well before using it, they normally don’t arrive with a full charge. -
Question about overnight usage of 12V accessory
John/Horace replied to tdottrucker's topic in Electrical, Battery & Charging
Power draw 4 amps, is a lot. Restart half way through the night and run car for 10 mins, or it will be flat by morning IMO. Our batteries new I think are 65 amp hours full. . But capacity drops over time with some batteries useless after 3 years. Shouldn't drop battery below 12 volts or you start to damage the plates. So usable energy is no where near near 65 amps. Journey are sensitive to low batteries; push button start is a one shot relay system; not like the old style slow crank holding key on set ups. Could plug in a large lithium booster pack (10-12k milli amps) on vehicle for the night, another option. Running regular lead batteries flat and boosting is hard on them, I try to avoid it when ever possible. Deep cycle batteries are designed for this type of use. Let us know how it works out. I love learning from other people’s mistakes. ? -
You need to line up crank pulley at top dead centre, notch on pulley lined up at mark on lower timing cover. Both intake and exhaust cams will also have a timing mark on pulley and matching spot on head casting. All three timing marks should be right on together. Out by one tooth or more and car won’t run, timing out of range. Hopefully it’s not a belt issue. Lots of other stuff to check like fuel pump, if belt is still ok.
-
Welcome to site. Great first post. Lots more caravans on the road compared to journeys so donor vehicles should be plentiful. People fixate on displacement for easy swaps. It’s map versus maf emissions set up, or integrated exhaust manifold in cylinder head (Journey) versus separate manifold; that can create issues. People blow up the 3.5’s when not changing belt, so maybe more demand for them.
-
Passive entry door handle
John/Horace replied to richdon's topic in Alarms, Keyless Entry, Key Fobs, Locks & Remote Start
The drivers door has a control module mounted behind inside cover, with a large ten-ish pin jack, IIRCC. Its tied into mirrors, BCM etc. . Module that not pricy, but wiring is likely more complex than 2 wires. Check a upull yard for a damaged door harness/module and compare it to your existing door.