DodgeaWrench
-
Posts
67 -
Joined
-
Last visited
-
Days Won
13
About DodgeaWrench
Recent Profile Visitors
3,106 profile views


-
 2late4u reacted to a post in a topic:
Highest Mileage Journey... Who's in it for the long haul?
2late4u reacted to a post in a topic:
Highest Mileage Journey... Who's in it for the long haul?
-
5rebel9 reacted to a post in a topic:
Highest Mileage Journey... Who's in it for the long haul?
-
Highest Mileage Journey... Who's in it for the long haul?
DodgeaWrench replied to jeffhoward001's topic in Owner Impressions
I just joined the 200K club (miles) for the first time. I've had 180's before, but finally turned a two. 😁 2014 DJ SXT 3.6 FWD Normally we would have traded this car for a new by now, but I'm having trouble accepting the prices on new cars (bronco sport, escape, equinox, blazer, ...). Dodge has nothing and I'm not a Jeep guy. So we've been holding out. The DJ is in the top 2 of the best cars we ever owned. It was definitely the right car, at the right time, at the right price, for us (new in 2014). Another reason for holding out buying new is I really like the 3.6 6 banger engine in the DJ. Its just smoooooth, with enough extra when needed. New cars are 4 bangers with turbo, and even a 3 cylinder. No way can I own a 3. (Anything with a 6 cylinder options out at far more than I want to spend.) Its had several of the typical DJ issues: been through 2 thermostats, power steering hoses and cooler, TCC solenoid, the front allusive squeak, and I think I'm due to replace the oil cooler for a second time. Relatively speaking these are minor problems and I've learned to do the repairs myself. I'm going to shoot for at least another 3 years so its due for a second round of maintenance: trans fluid, plugs, battery, serpentine, PVC, and tires. It is getting a bit bouncy too. We'll see... Hopefully I haven't cursed myself by speaking nicely about the car (spoken as I spin 3 times, face north, make a cross with my fingers, and spit into the wind to thwart off gremlins.) -
DodgeaWrench reacted to a post in a topic:
HAPPY CANADA DAY !
-
2late4u reacted to a post in a topic:
Location of sun sensor wiring?
-
Maybe as an alternative, prior to owning the DJ, we were a GM family and at least several of the last GM cars we owned had the daytime running lights (DRL). The headlights were always on as an additional safety feature. When we got our 2014 DJ it did not have DRL nor the automatic headlight functionality. Not having to have had to manually turn headlights on at night for decades, living in suburbia, I would forget to tun them on and I was often driving the DJ at night without the headlights on. Frustrated, I started down the path you are going. I think (?) daytime lights are required in Canada therefore maybe even an option I could have had turned on at the dealer... maybe. I didn't care to go down the rabbit hole with a dealer [search this forum for "daytime running lights"]. I also didn't want to gain the "dashboard experience" you have with your radio (I'm impressed). I just wasnt in the mood to open it up for mounting a sensor and/or wiring. I did eventually find that just by replacing my headlight switch (purchased a used one on eBay) with and headlight switch for the auto headlight functionality, due to a lack of a sensor, my headlights are on whenever the car is running, giving me daytime running lights! Therefore I no longer have to remember to turn my headlights on. In short, it doesn't answer your question about wiring, but as a quick alternative if you already have the switch, pop it in. NO tools necessary to do so (push, twist, pull, unclip,...), and you could call it a day with DRL. You are in Canada, yes? Curious, aren't DLR's required in Canada? If so, why/when would the auto headlight feature be used? Good luck with your project.
- 1 reply
-
- 1
-
-
khnitz reacted to a post in a topic:
Engine RPM surge when coming to a stop
-
DodgeaWrench reacted to a post in a topic:
power steering flush
-
DodgeaWrench reacted to a post in a topic:
coolant flush
-
DodgeaWrench reacted to a post in a topic:
coolant flush
-
DodgeaWrench reacted to a post in a topic:
Updates and the infamous 'one click no crank' issue
-
DodgeaWrench reacted to a post in a topic:
Steering pump saveable or better to replace
-
Summer Solstice reacted to a post in a topic:
Checking Battery / Alternator Voltage
-
Dean H reacted to a post in a topic:
Checking Battery / Alternator Voltage
-
5rebel9 reacted to a post in a topic:
Checking Battery / Alternator Voltage
-
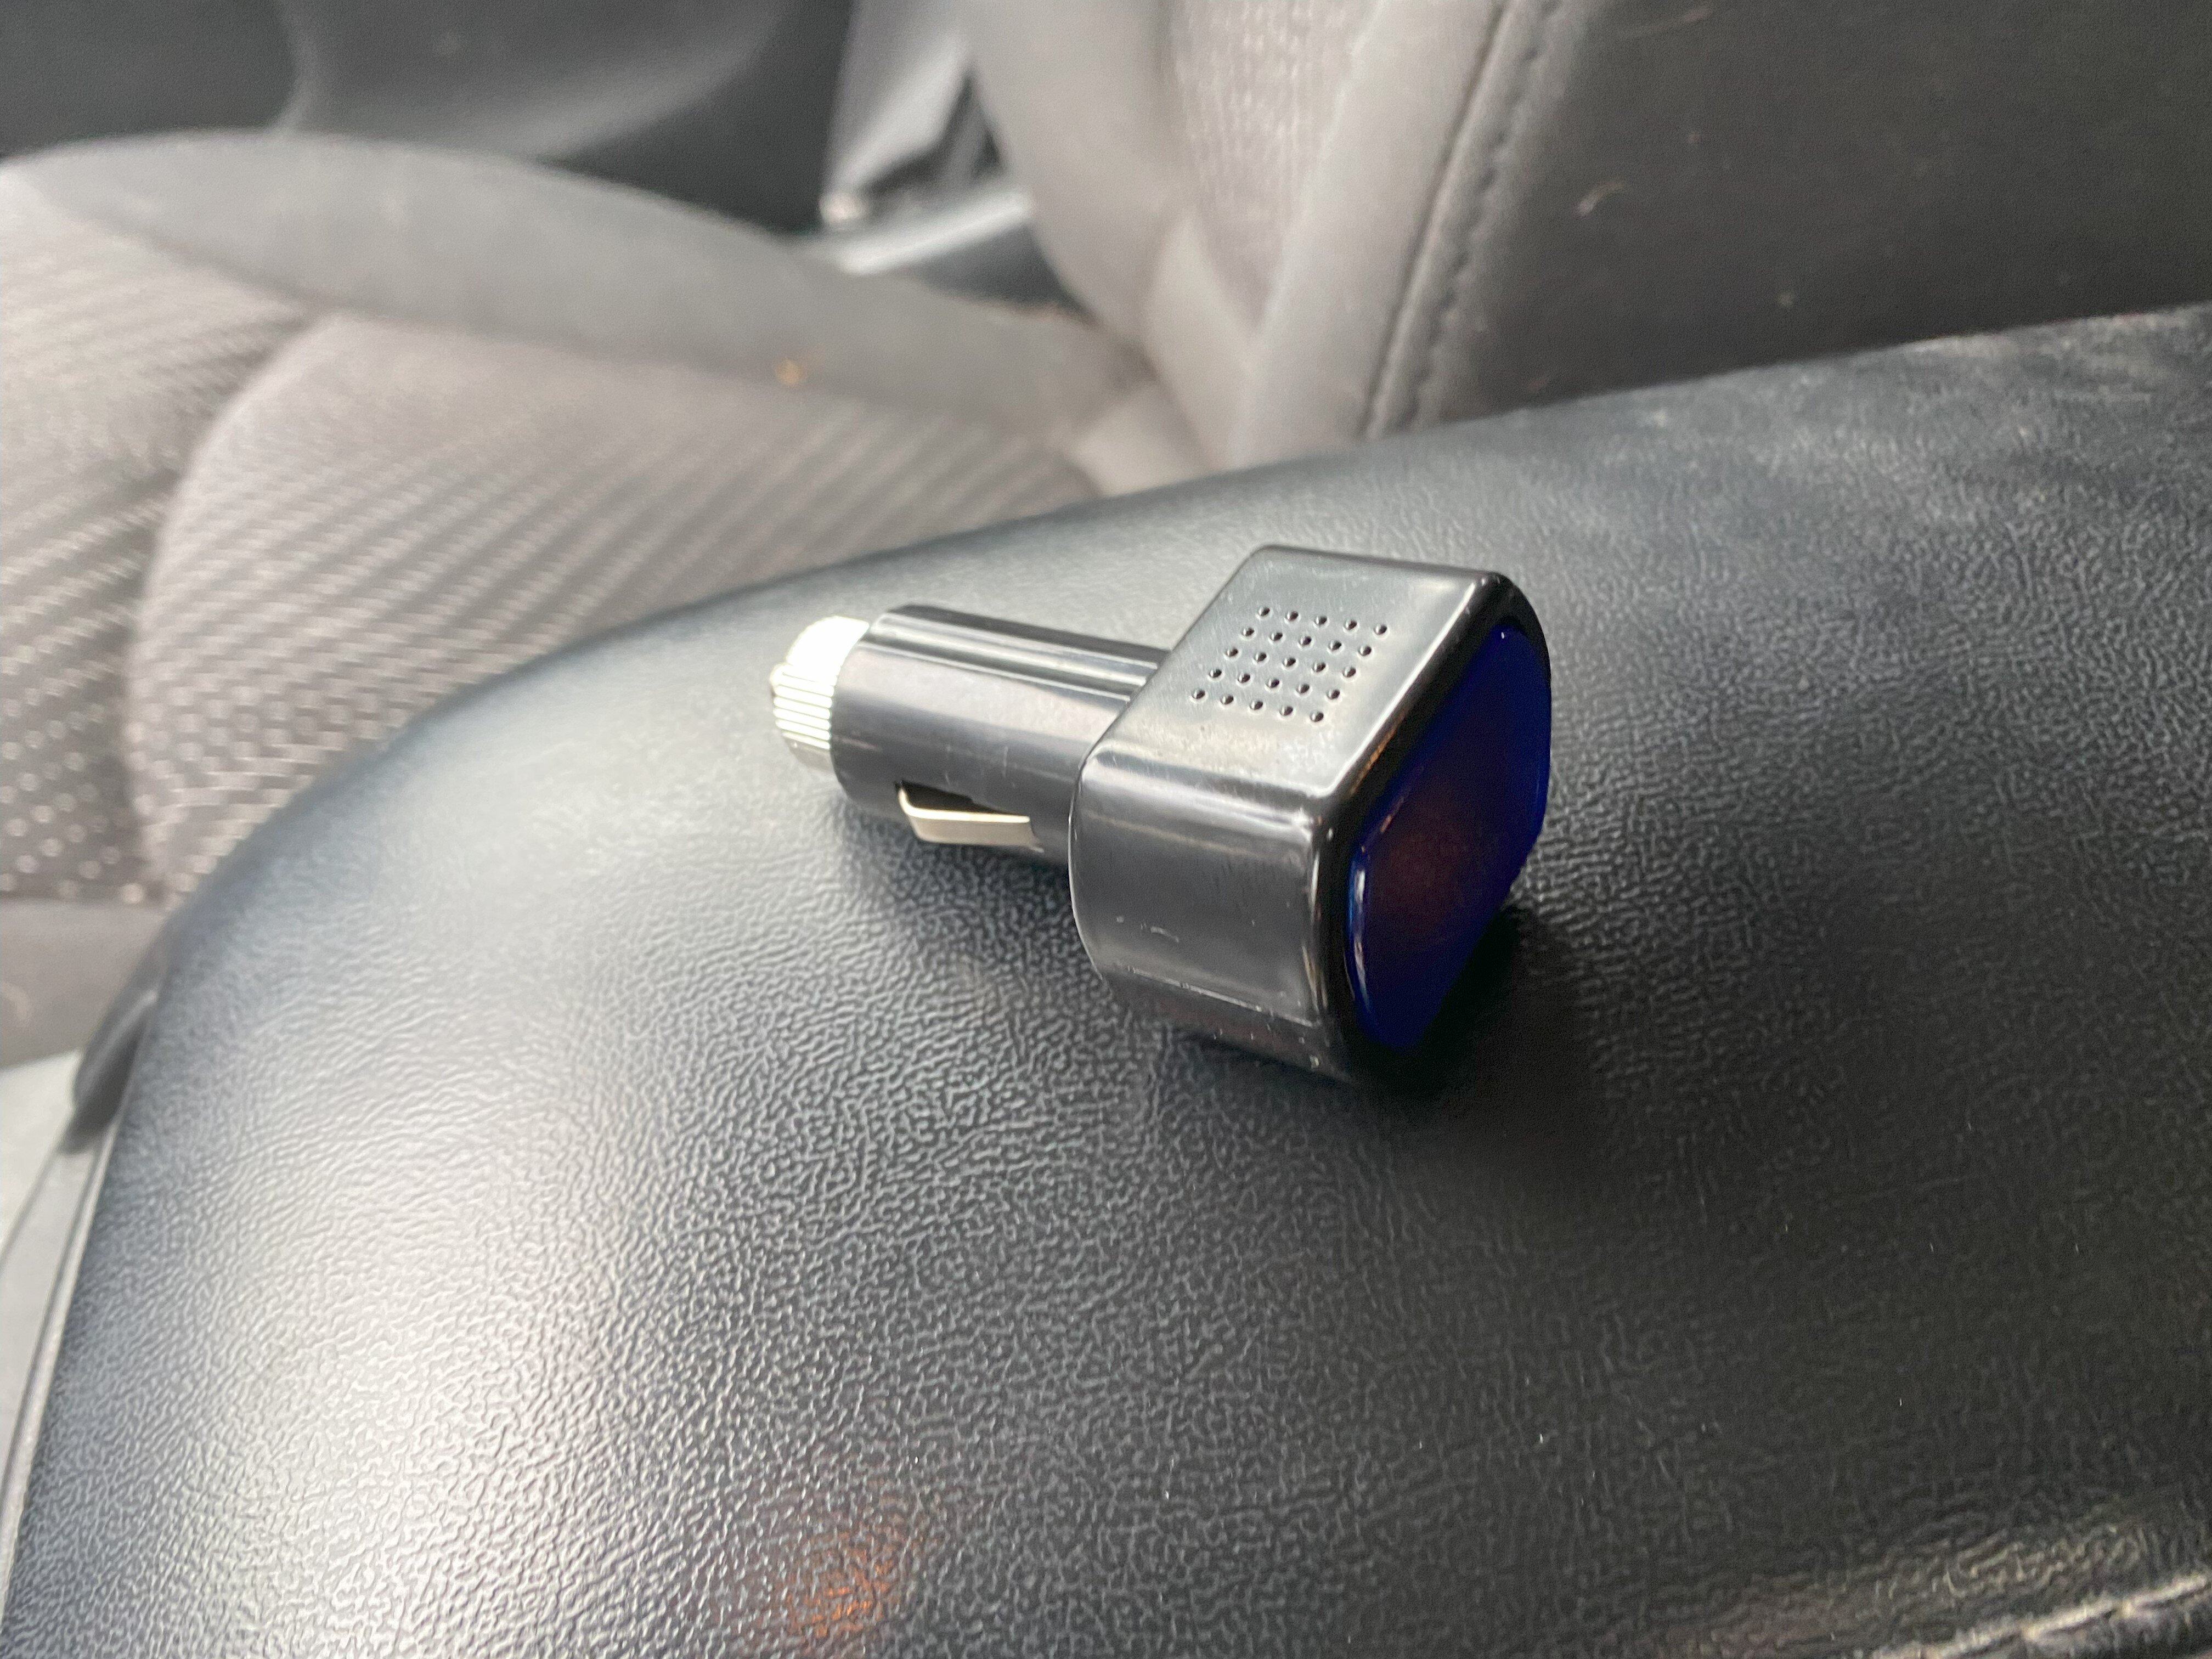
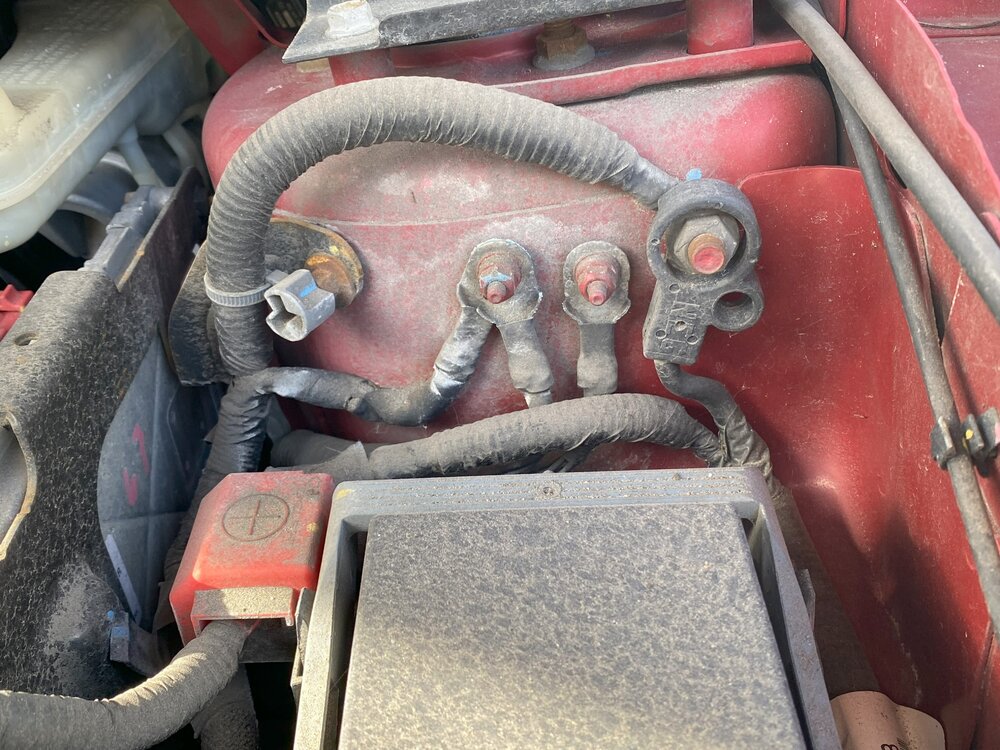
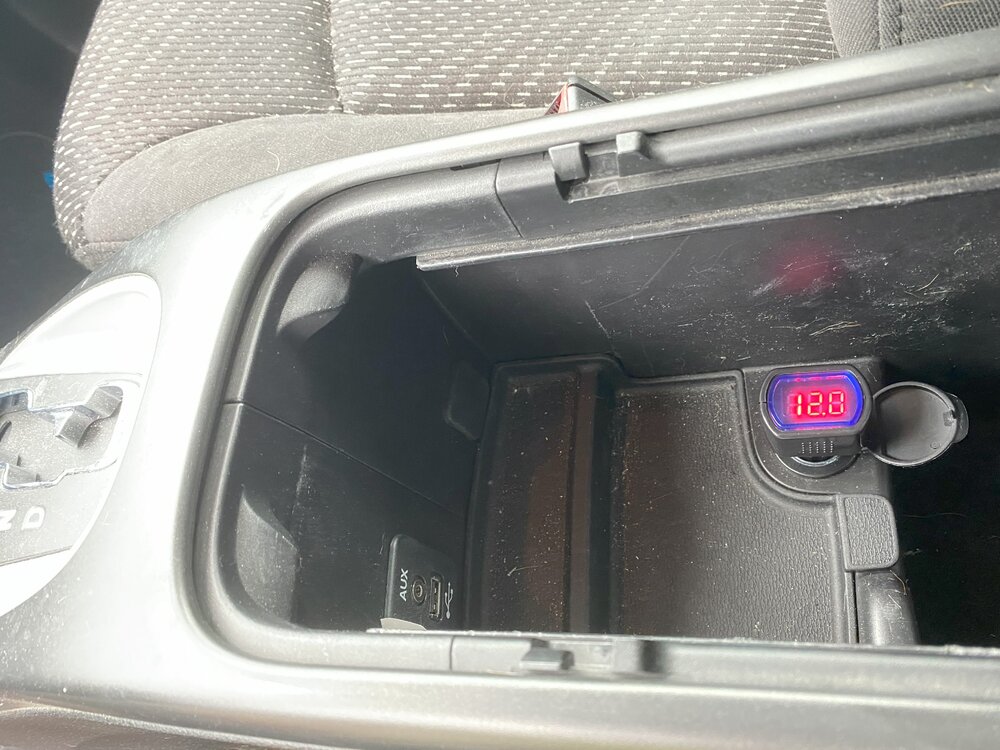
I'm not having any electrical issues at the moment so I hope I'm not cursing myself for discussing this. ? [disclaimer: The pictures below really make my car look grossly filthy. Must be the light, because its really not that bad. ?] While working through a dead battery and parasitic drain on a family member's car (non DJ), I came across these voltage meters that plug into power outlets. They are cheap and easy to use to check and/or monitor the battery and alternator charging voltage. Add one onto your next Amazon order, about 7-8 bucks. To keep in other cars, I bought four for $13. I'm pretty good with a meter, but these are great for a quick check or those who aren't mechanically / meter minded. There are 3 power outlets in my 2014 DJ. Only the one in the console storage between the seats is hot with the car off. With the car off, testing here is a quick battery voltage test. Should be near 12 volts (below pic). My DJ does not have an Amperage or Voltage gauge. With the car engine running (below pic), this will give an indication of the alternator voltage. Should be 14+. You can leave it plugged in while driving to monitor. QUESTIONS: Should the need ever arise (I hope not), to test for parasitic draw using a voltage meter, on the DJ, instead of climbing under the wheel well to get to the battery, under the hood, can I disconnect the positive side here, under the red "+" cover (below pic), to put a meter in series with the electrical system? (Its winter here. To cold to try, so I figured I'd ask instead.) When testing for parasitic draw on the non DJ, I had to wait at least 15 minutes for the car to finish completely shutting down after turning the car off. Is that the same with the DJ? (Normal draw on the non DJ was 3-5 amps right after turning off the vehicle, then after 15 minutes, it would drop to .5. ) Thanks.


-
John/Horace reacted to a post in a topic:
Have to love the extreme cold!
-
DodgeaWrench reacted to a post in a topic:
Have to love the extreme cold!
-
Have to love the extreme cold!
DodgeaWrench replied to 5rebel9's topic in Electrical, Battery & Charging
"it made noises I hadn’t heard before" It was a few degrees below 0F here. Mine occasionally makes a noise in cold weather, but for those few days, in that cold, it S C R E A M E D! -
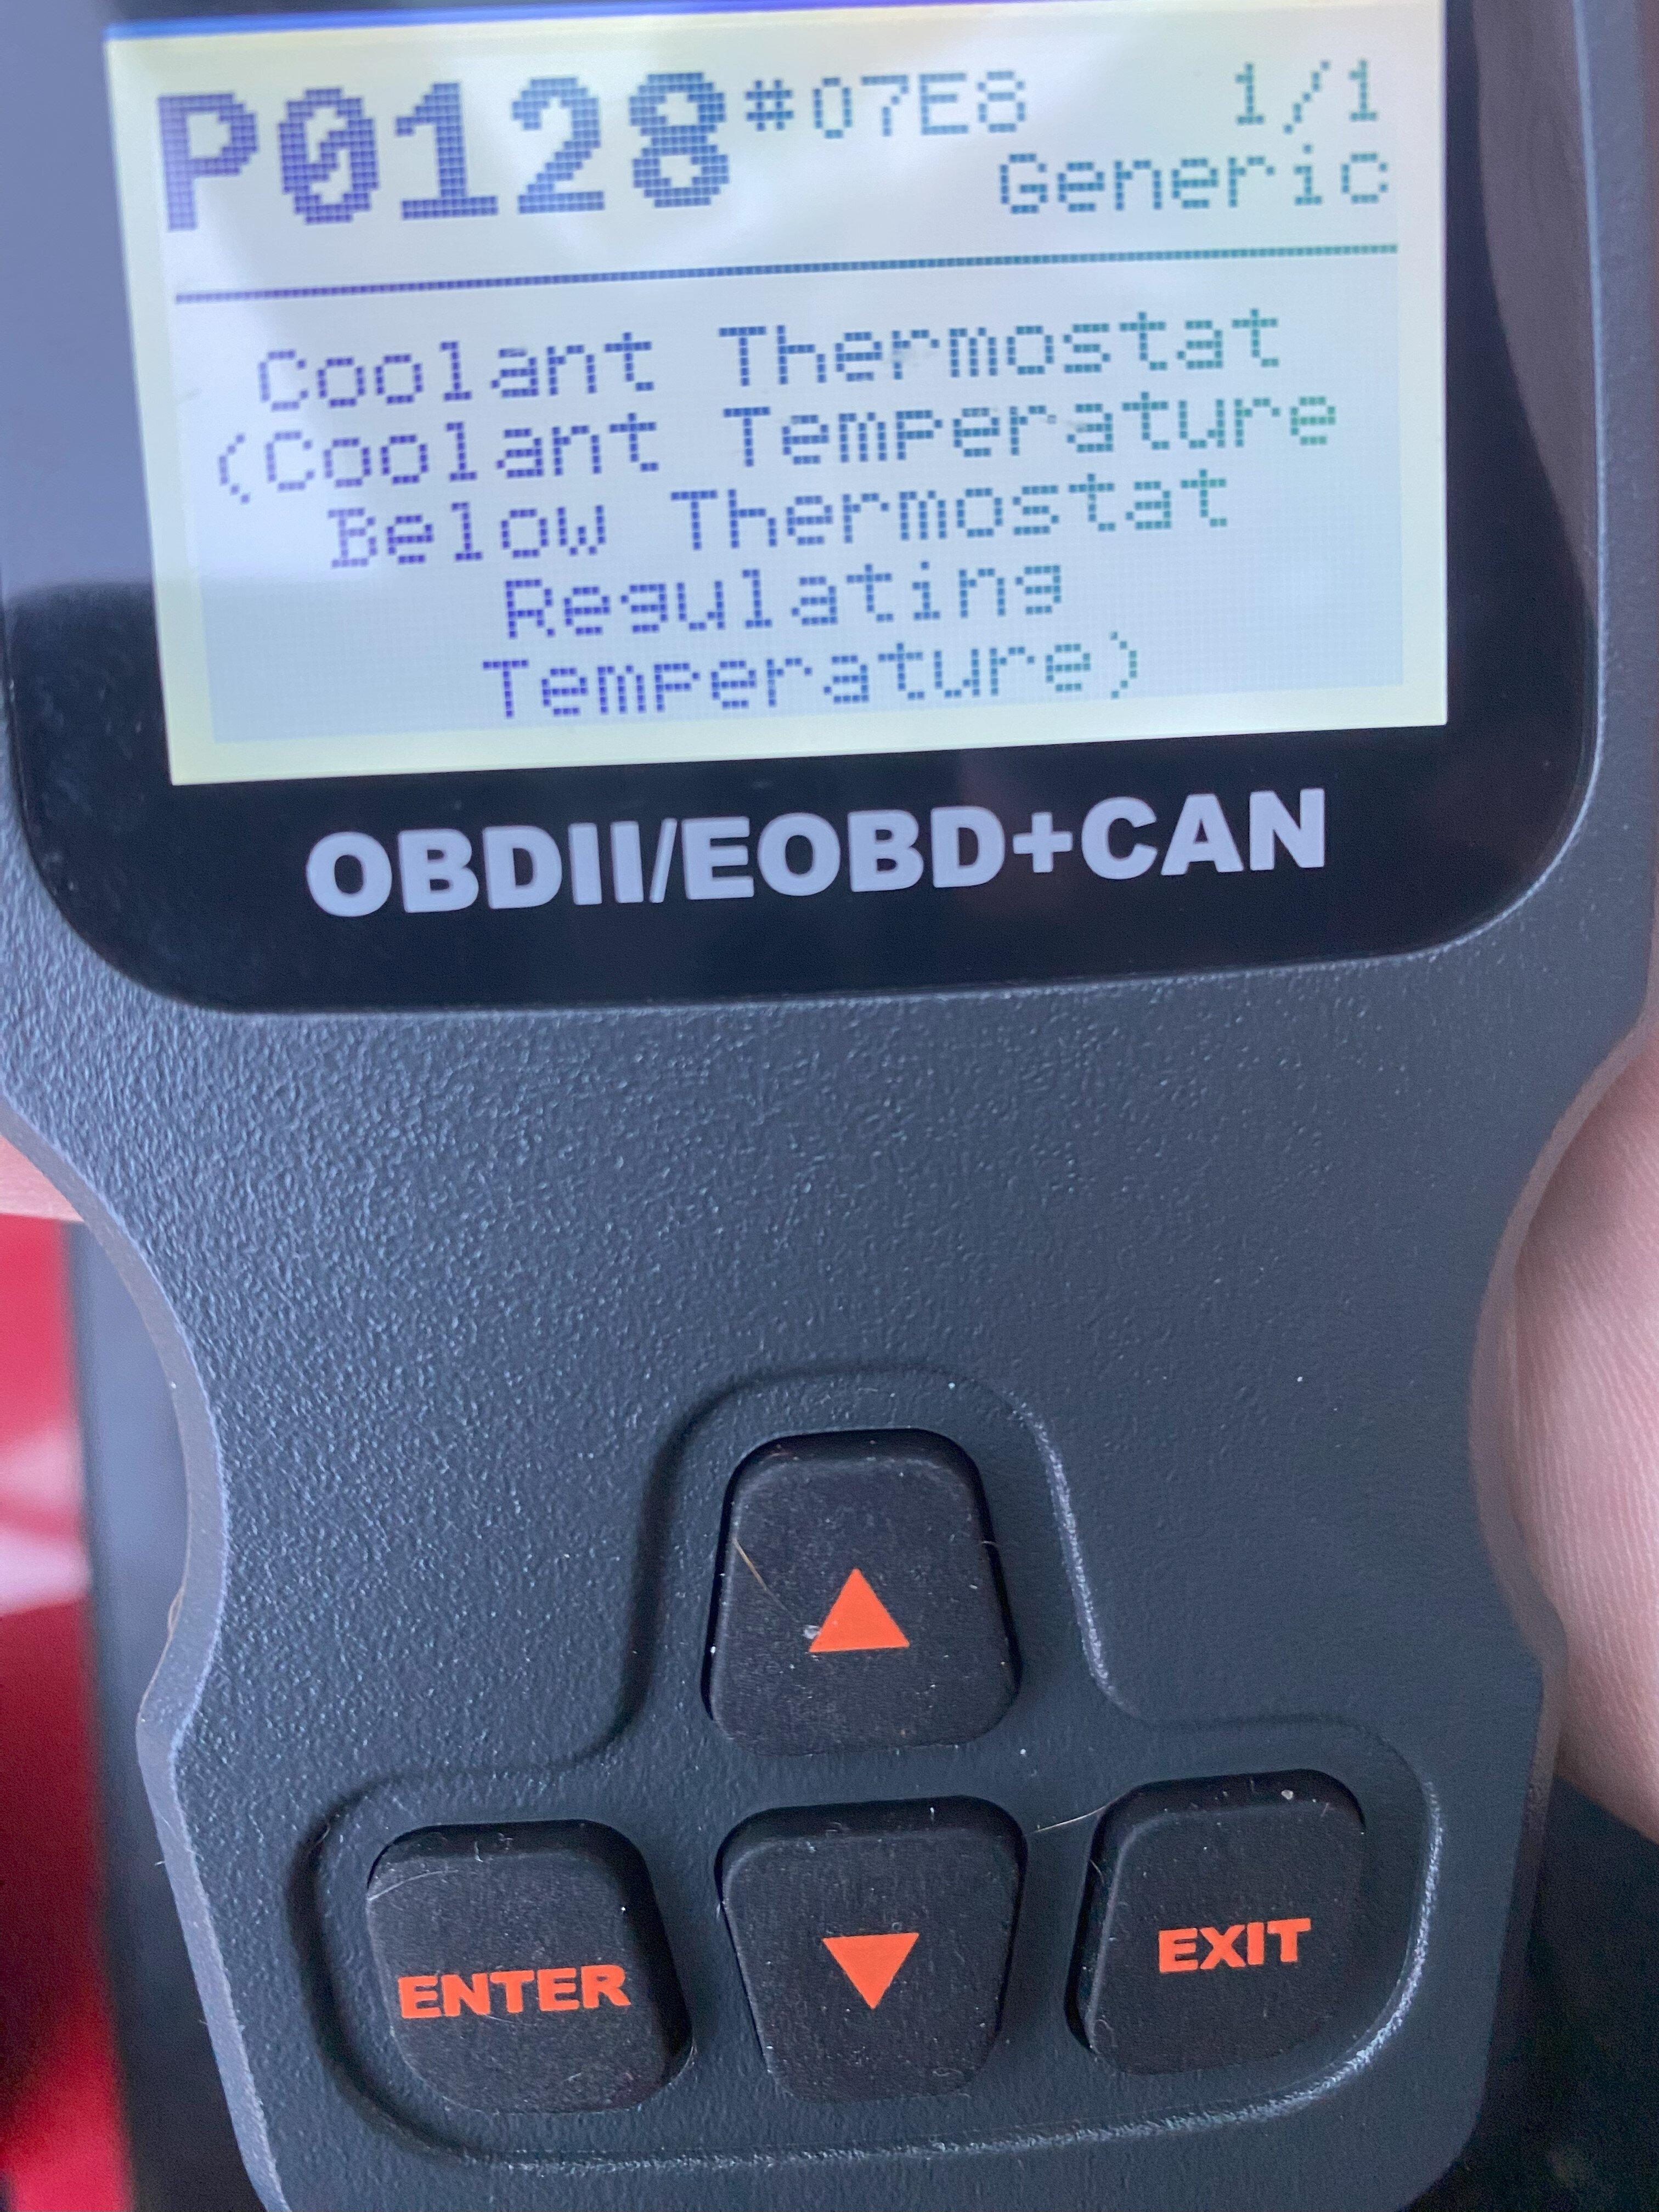
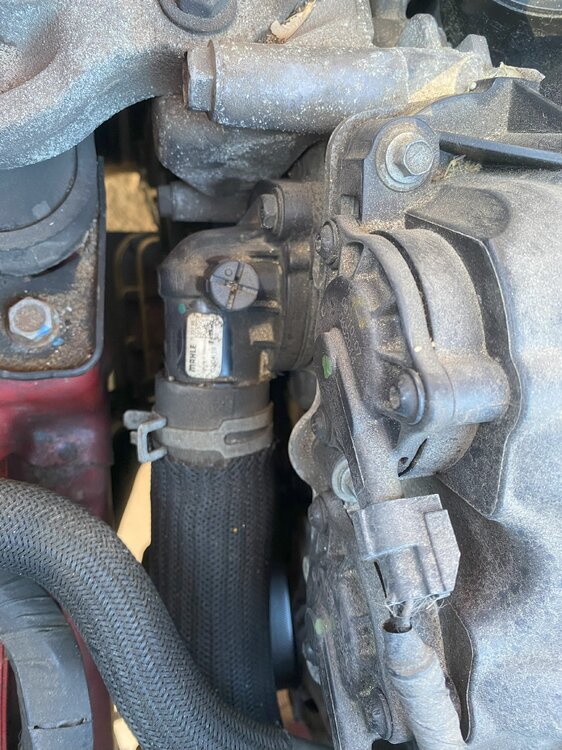
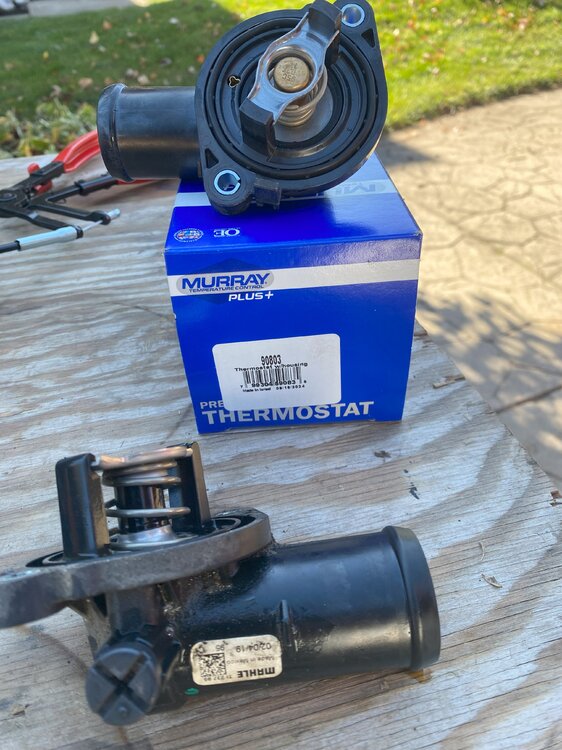
[2014 DJ 3.6 177k miles] Solid yellow check engine light came on. Code P0128 - Coolant Temperature Below Thermostat Regulating Temperature. This occurred once before, approximately 5 years ago, so I had a clue as to what was happening. While taking a "test" drive, I toggled through the display to show coolant temperature. Coolant temperature would not rise above mid-180 Fahrenheit. (My understanding is that it normal should be above 200-ish). Time for another thermostat. As repairs go, replacing the thermostat is one of the easier repairs to do (2 10mm bolts and a spring clamp, easy access). Having a spring clamp tool (on a cable type) makes it a breeze. As mentioned, mine was replaced once before at 109K miles Jan-2020 $260.00 (repair shop, not dealer). A Mahle brand thermostat was installed. I went to a repair shop instead of doing it myself as it was the middle of winter and I do repairs in the driveway. This time it is a beautiful fall weekend to take advantage of, with winter soon to knock on the door. No time to order an OEM. I went to the local auto parts store and purchased a Murray brand thermostat $19.00. After the swap, the code was reset and a small test drive afterwards had the temps rising into the low 200's with the check engine light stayed off. Next is to watch for leaks. I'll post a follow-up in about a week. The old thermostat in location The new

-
P000D P0018 P0175 P0300 - check your oil first
DodgeaWrench replied to DodgeaWrench's topic in Engine & Transmission
To follow-up, it's been a week and the DJ has been running normal since the oil change (to replenish the low oil level). I'm calling this fixed. The oil level between changes has never been an issue before. I'll have to monitor it more often to determine if something else is a miss or if it's just getting up there in miles and starting to burn a little oil. -
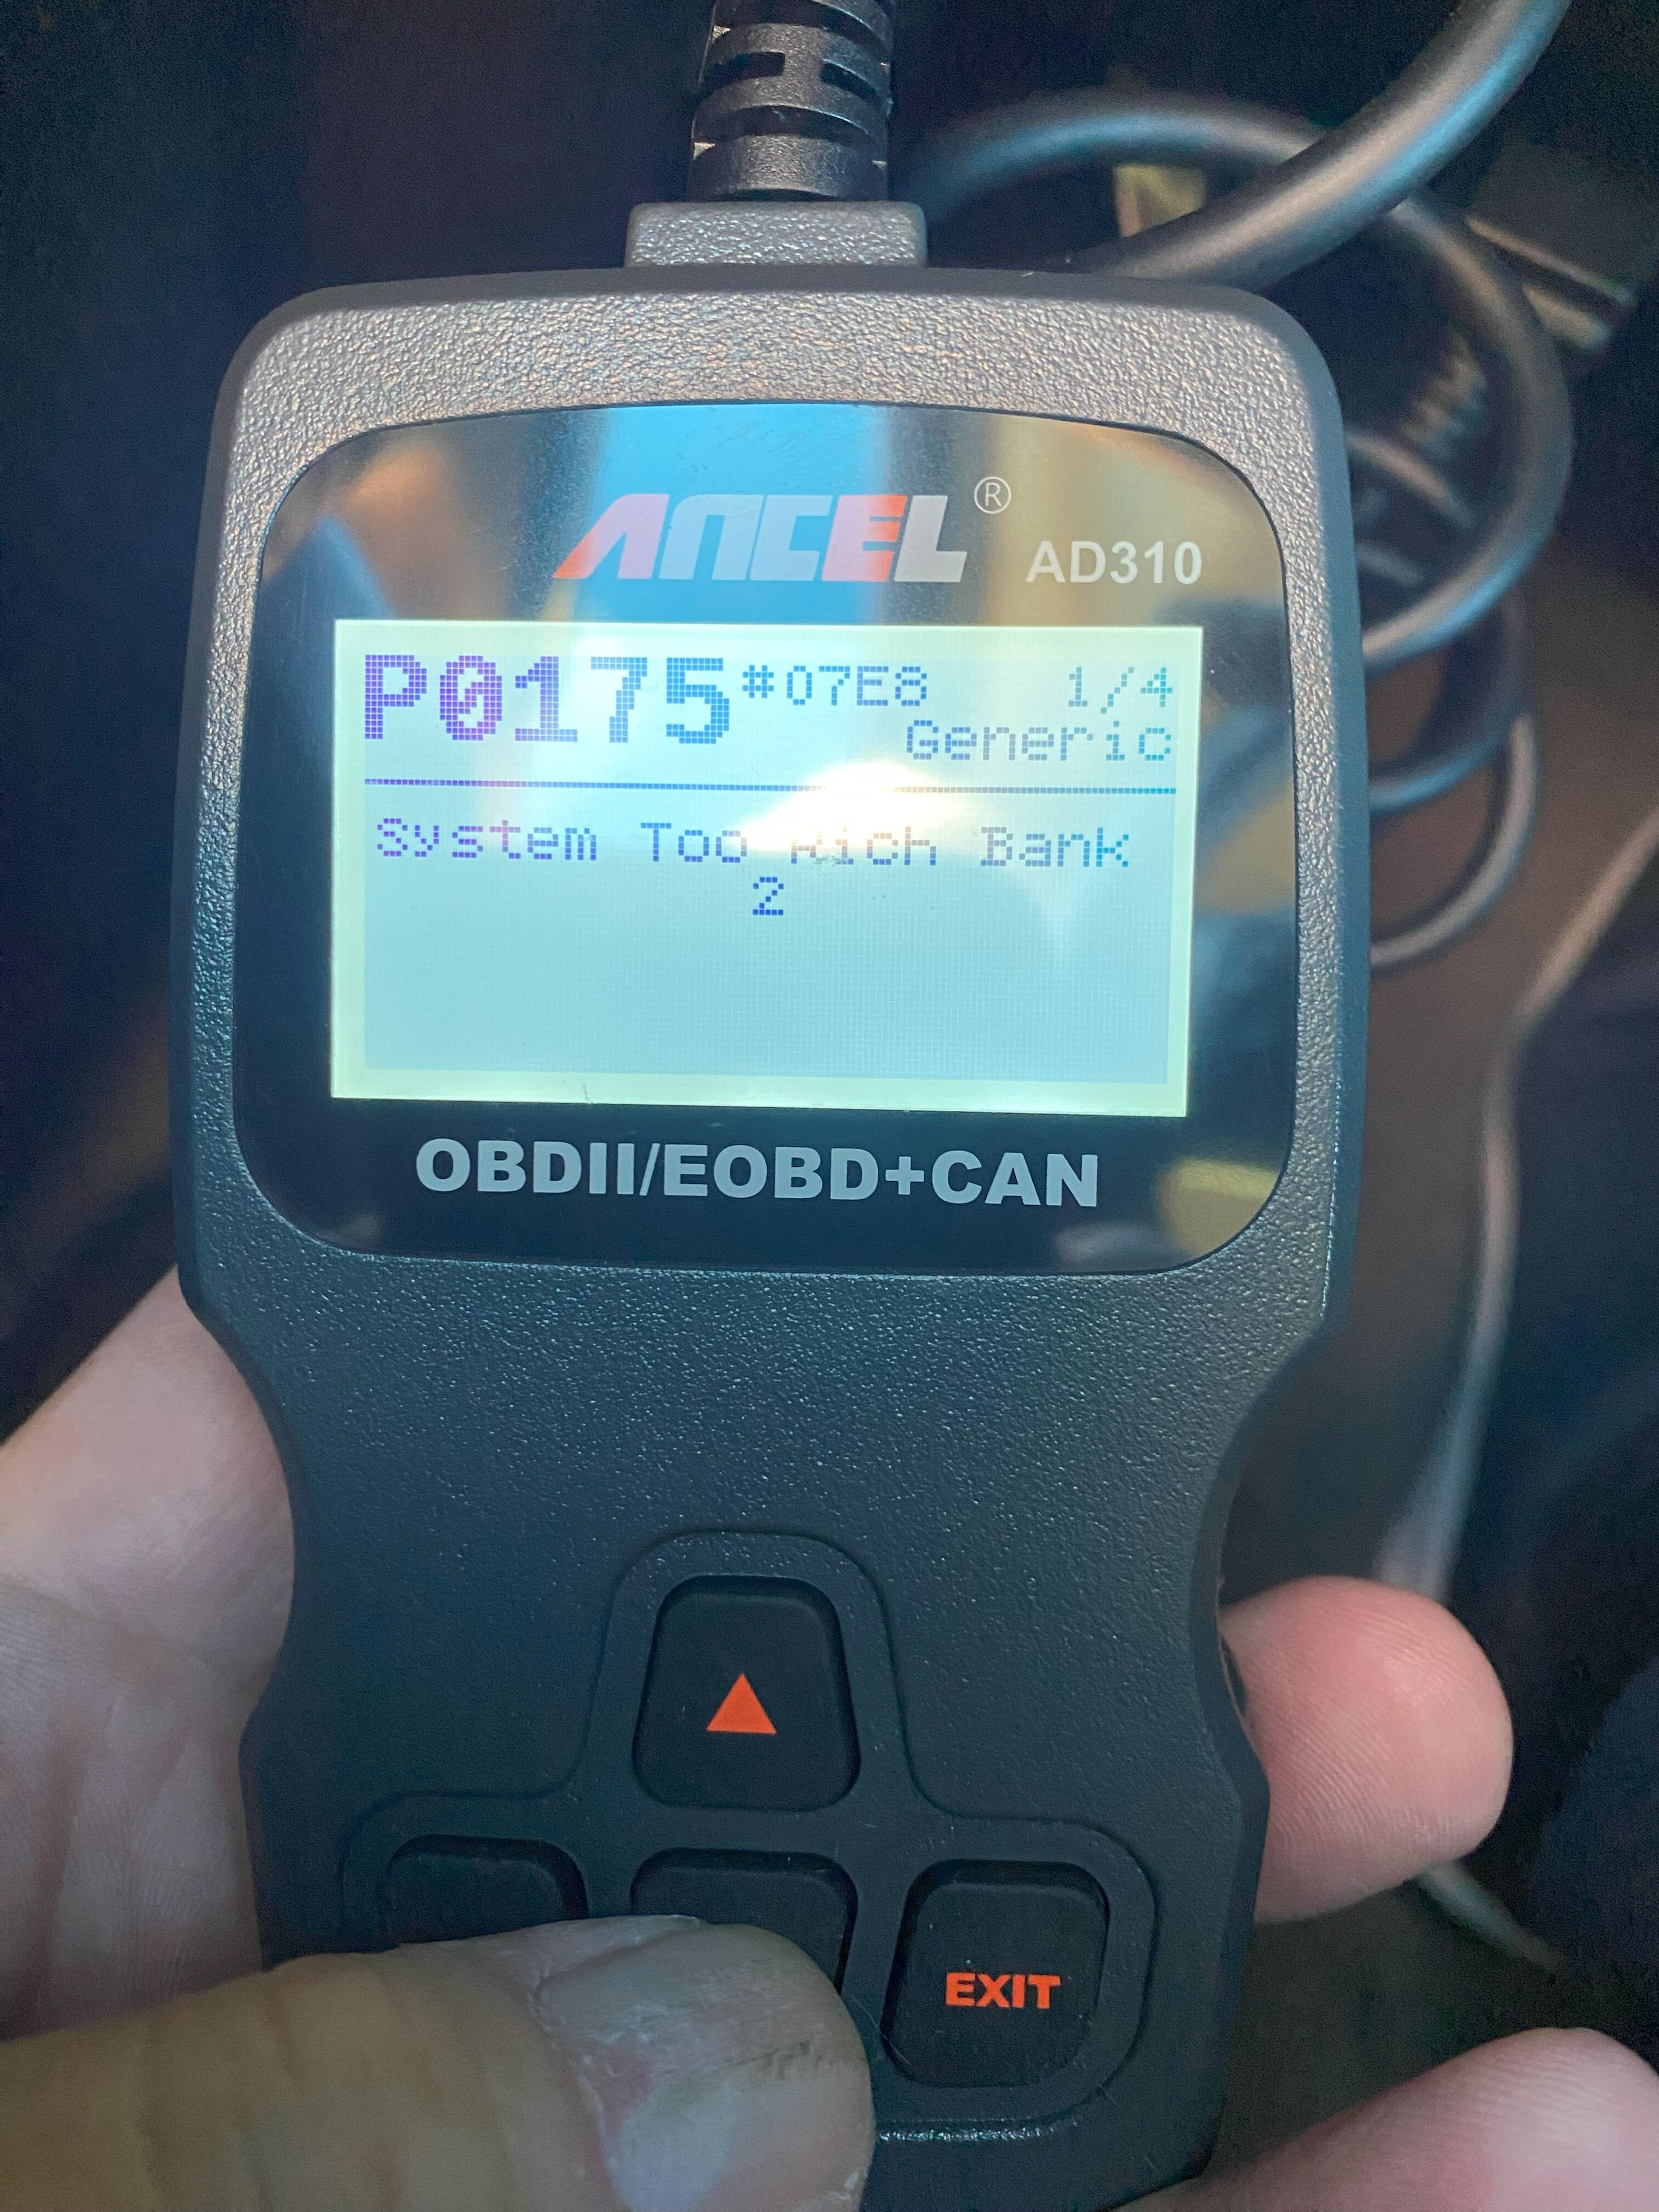
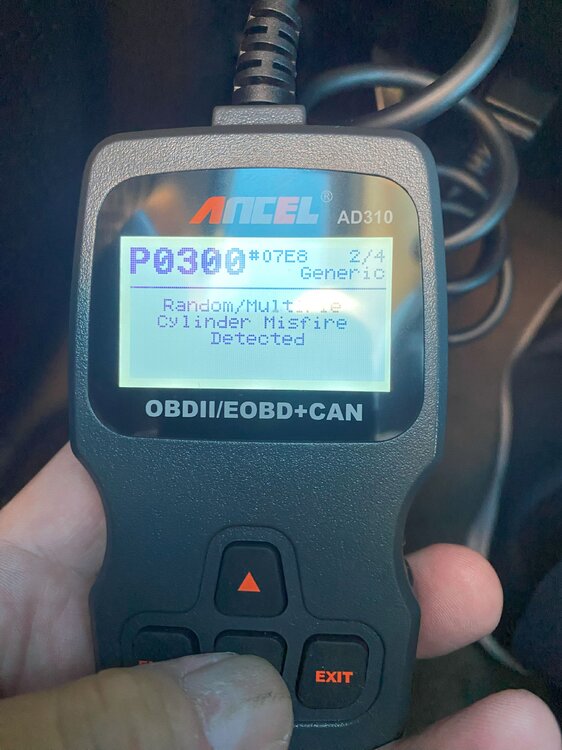
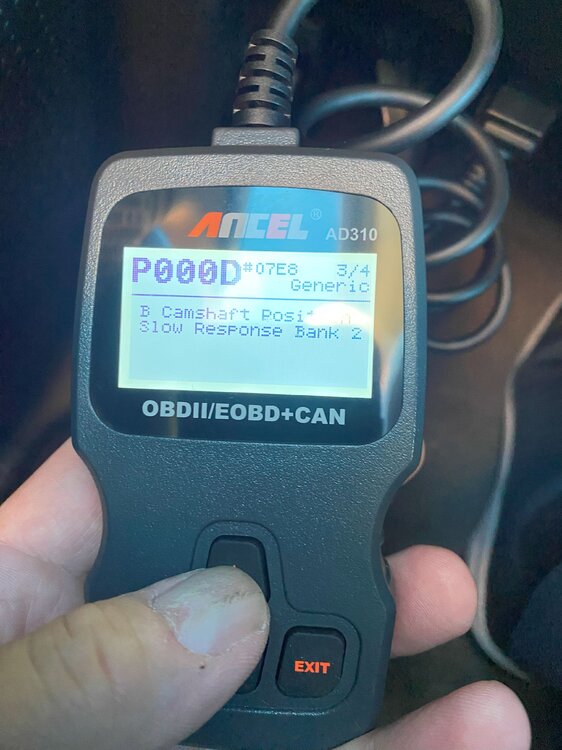
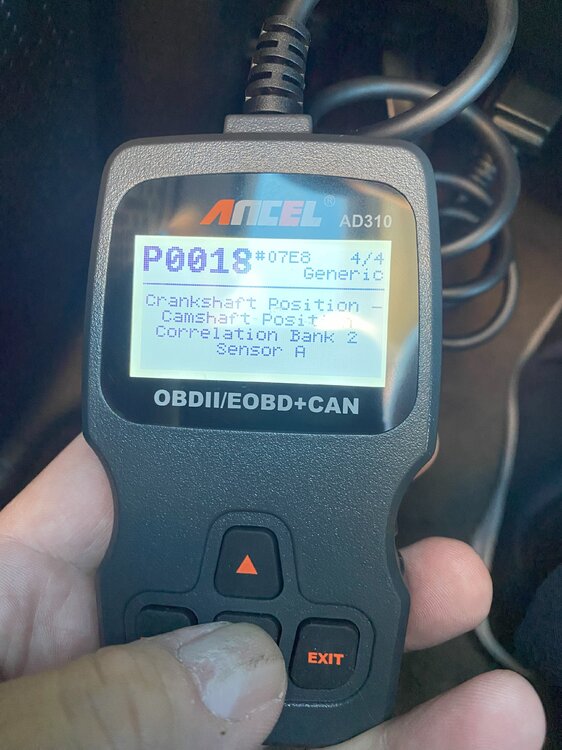
Driving first thing this morning, after about a mile, I feel a slight missing occurring. For another mile, I wasn't sure if it was road bumps or engine. Then it got worse... No doubt... The engine was missing / running rough, and continued to get worse. The check engine light started flashing. The engine stalled when I came to a red light, but restarted. Stalled again turning into a parking lot, but again restarted. I stopped to read the codes ( I carry an ODBII reader), restarted, turned around, and said a prayer to hope to get home without a tow. The car is now in limp mode and I cant exceed 25mph. I slowly and safely make it the few miles home. On parking the car, the exhaust smelled (fuel) rich. CODES: P000D - Camshaft Position Slow Response Bank 2 P0018 - Crankshaft Position - Camshaft Position Correlation Bank 2 Sensor A P0175 - System Too Rich Bank 2 P0300 - Random/Multiple Cylinder Misfire Detected I spent time with my friend, YouTube, researching how the check, test, and evaluate, this series of codes. To cut to the chase, at least one of the videos had a checklist with CHECK THE OIL LEVEL / OIL QUALITY at the top of the list, and to start with an oil change. I checked the level and I was over a quart low. I was due anyway for a change, so I changed the oil / filter, and crossed my fingers. On measuring the oil drained, I was down almost 2 quarts. WTF! Putting the car onto the ramps before the change, it continued to run like ?. After the change, smooooooooth. I then reset the codes and check engine light went off. Took it for a several mile spin, and no issues, no codes, no check engine. I'm in disbelief and still can't accept that a low oil level would create this type of issue. I've got places to go (drive) tomorrow and will be a good confirmation of the repair. I'll report back. Anyone experience similar? 2014 DJ 3.6 FWD 176674 miles 7k miles since previous oil change 6 quarts and filter used on this change Regardless of successful repair or not, the next question is what happened to the oil? There are no leaks. I definitely will be checking the oil level more regularly now.

-
 Tiver43809 reacted to a post in a topic:
Brake Fluid leak front by bumper
Tiver43809 reacted to a post in a topic:
Brake Fluid leak front by bumper
-
Brake Fluid leak front by bumper
DodgeaWrench replied to Tiver43809's topic in Brake, Chassis & Suspension
Possibly power steering fluid? There is a separate P/S cooler in front of the radiator, at the bottom of the radiator. Check your P/S fluid level. Although if it was P/S fluid, and had lost that much fluid, the P/S pump would be making a noticeable whining/growling noise. -
Another possibility is if something fell into the latch (like a pebble) and is preventing the tailgate to latch completely. I had similar symptoms when my tailgate window shattered. Some broken glass pieces fell into the latch, preventing it from latching completely. With all the doors and tailgate were shut, the indicator on the dash indicated the tailgate was not closed, yet it was latched shut (at least partially anyway). I slammed it shut multiple times, and it would latch each time, but the indicator remained on. I removed the latch mechanism, shook it around, used compressed air, and glass chucks fell out. After reassembly, the dash indicator went extinguished. Unless the tailgate interior panel was removed (mine was to replace the window) I wouldn't have a clue how something could fall into the latch. I've never done it, but with the latch out, the electrical part of the latch should be fairly easy to test with a meter. Also vice versa, I would think that if you unplugged the wires (connector) from the latch and used a jumper between the wires to simulate a closed latch, the indicator on the dash would go out, confirming your wiring is good. If it is the latch that needs replacing, and if its $$$, try a junk yard. Good luck.
-
2late4u reacted to a post in a topic:
Forum Upgrade: 28 Feb 2024
-
Forum Upgrade: 28 Feb 2024
DodgeaWrench replied to Journey Guide's topic in Forum Help and Suggestions
Hello Admin. Just dropping a note to say I appreciate all the work you/team put into keeping this site active and relavant. This site has immensly helped me maintain my 2014 DJ, saving time and $$$. Please continue the great job. (I also appreciate all the input/responses to my inquiries from those in the know and those who respond sharing their experiences.) THANK YOU. Wyandotte MI?? Im just up the river a ways. Its on my list to one of these days, check out the river front park(s) in Wyandotte. -
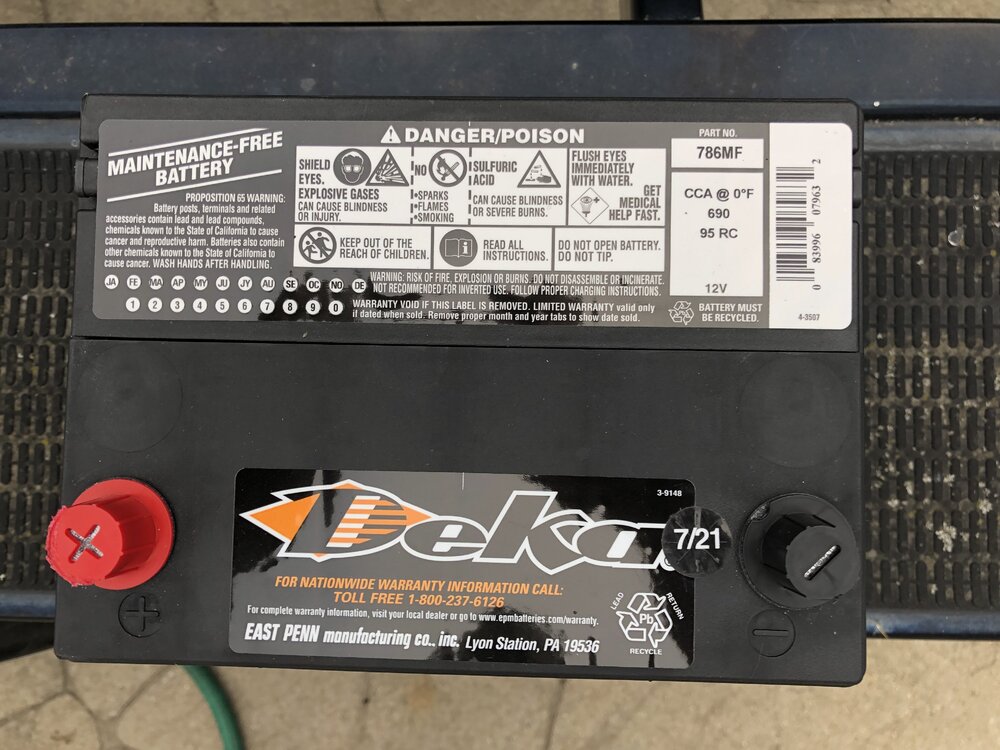
Ive had great results with Deka batteries. Made by East Penn in the USA. I use them as replacements in my cars and toys.
-
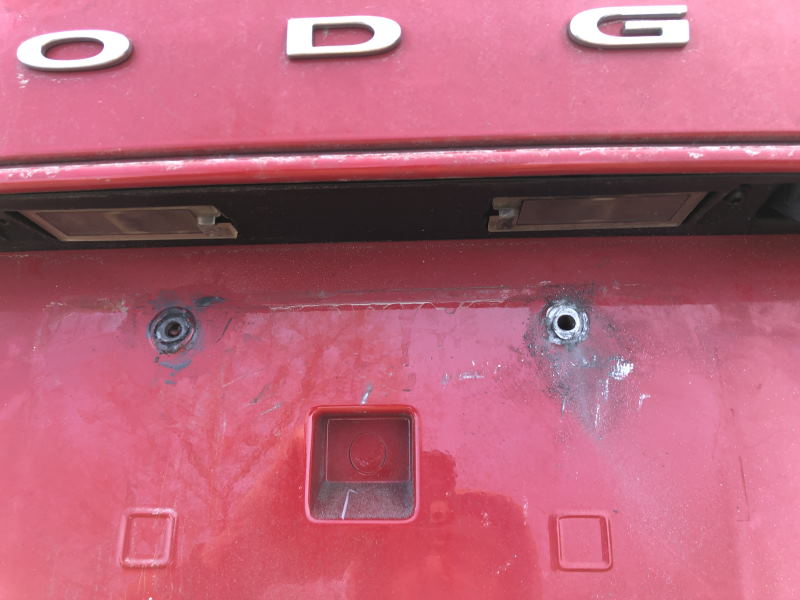
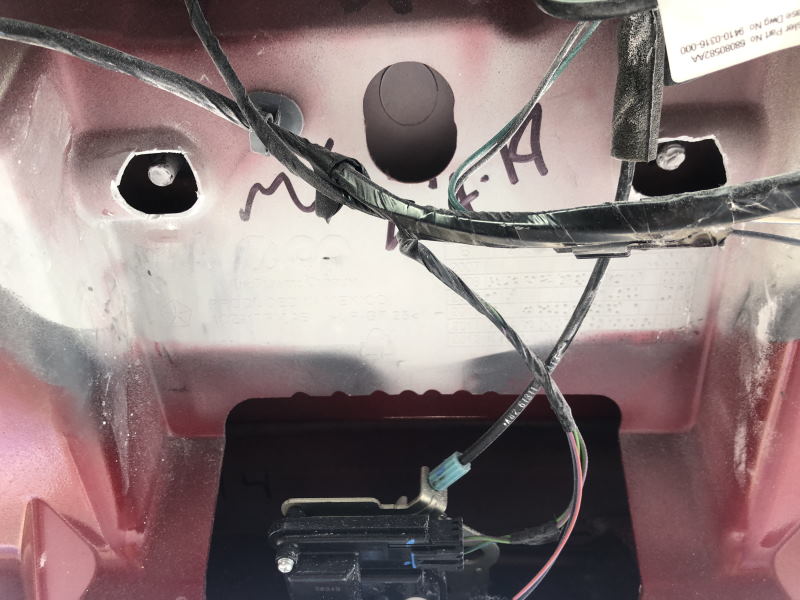
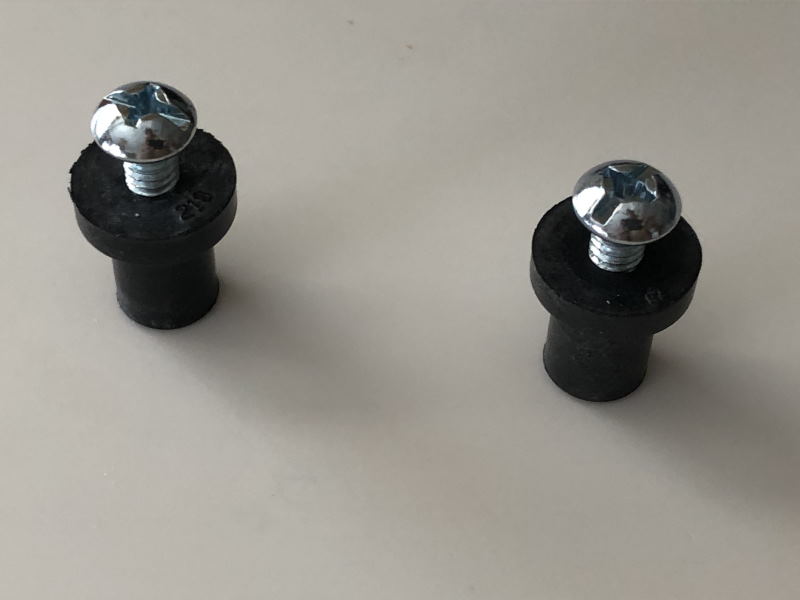
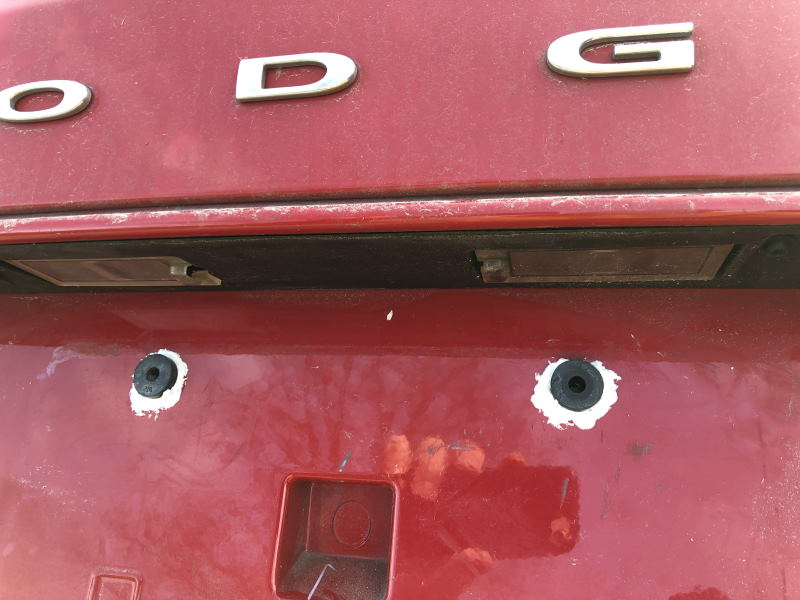
Time to replace the rear license plate. 10 minute job, right? Ah.... No. (2014 DJ - plates last replaced 10 years ago-ish.) I was unable to remove the bolts that hold the plate on. Both fastening devices attached to the tailgate for the bolts just spin, and spin, and spin. (They are not the plastic square nut type.) On researching further, this is a common problem across multiple manufacturers. To jump to the middle of the project, below is what the fastening devices look like AFTER the license plate was brutally removed. They are a type of soft metal, not plastic, internally threaded to accept the bolt. The license plate bolt corroded inside of these, locked tight, and these would just spin (instead of the bolt coming out). Temperatures were in the mid 30f's, which probably didn't help. The (red) body panel these are inserted in is fiberglass (not plastic nor metal). Multiple attempts to grip these and/or stop them from spinning failed. I needed to hold these from the backside to get the bolts out. After removing the inside tailgate panel, there is not direct access to them. I was able to snake my fingers to one of them through an access hole, but not able to grip it with pliers or vise grips. Luckily the inside panel covering the devices is fiberglass or plastic, is easily identified, and easy to cut with a dremel tool. Below is picture of the access holes cut. I then clamped on vise grips and was able to turn the bolts out. Even then, the bolts did not want to easily release and turn. They definitely were corroded in tight. With the vise grip still on, from the outside I then drilled off the device. To replace the hardware, now with access to both side, there are options. Simplest would be to use a standard nut, bolt, & washers. Granted if/when the license plate would be to be changed again, it would require removing the inside tailgate panel again. Another option would be to reverse the orientation of the bolt and nut so it becomes a stud. The license plate would then be fastened on with a nut/acorn nut. I went with option 3, those rubber expanding gizmo's from the hardware store (below). The holes had to be enlarged slightly to access these, but again, its a fiberglass panel (easy to drill out). The hardware store also had the plastic square nuts that snap in place, but I passed on this option as I was unsure about the thickness of the fiberglass and if the plastic nut would securely snap in. For grins, I gooped on some adhesive caulk I had lying around and bolted up the plate. The rubber expanded as expected when the bolts were tightened and gripped firmly. When researching solutions, there are several postings in this forum mentioning incorrect license plate screws, screw that fell out, screws that would just pull out, etc... This explains why. The PO or used car dealer may have had a similar experience. Merry Christmas!
-
DodgeaWrench reacted to a post in a topic:
A possible 3 DJ family?
-
DodgeaWrench reacted to a post in a topic:
A possible 3 DJ family?
-
Power Steering Fluid Leak
DodgeaWrench replied to DodgeaWrench's topic in Brake, Chassis & Suspension
2014 FWD 3.6 SXT 164,000 miles I thought so too. When ordering, some of the 'Mopar' parts sites listed it as not in stock, others did not. I ordered from a Mopar seller I had used before. They did not indicate it was not in stock, but when I called them when the order had not shipped in a timely manner is when they indicated it was on order and due "soon". LOL. I guess I earned another badge! After driving a bit yesterday and today, I slide under to check, and all 4 connections were dry (and I am able to steer the car in the direction I desire)! I'm assuming I won't have another good opportunity for months to check again. Hopefully I wont see spots in the snow.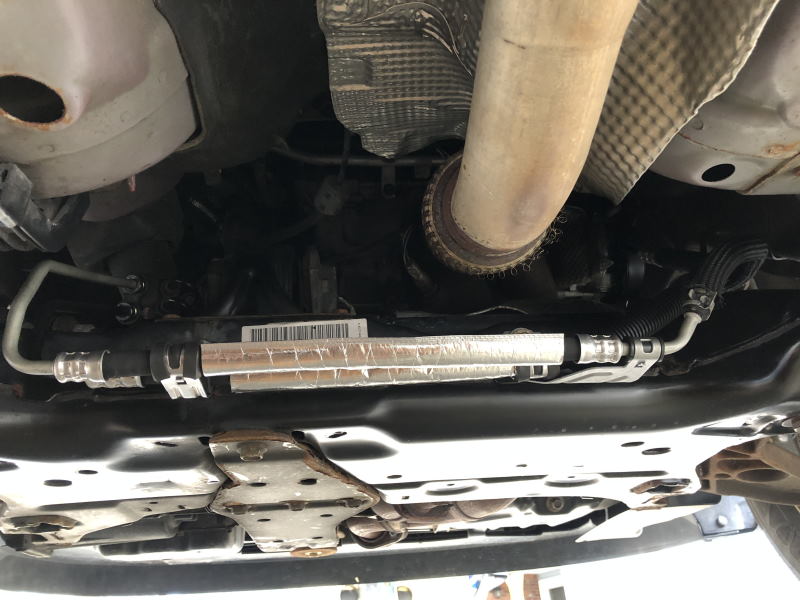
-
Power Steering Fluid Leak
DodgeaWrench replied to DodgeaWrench's topic in Brake, Chassis & Suspension
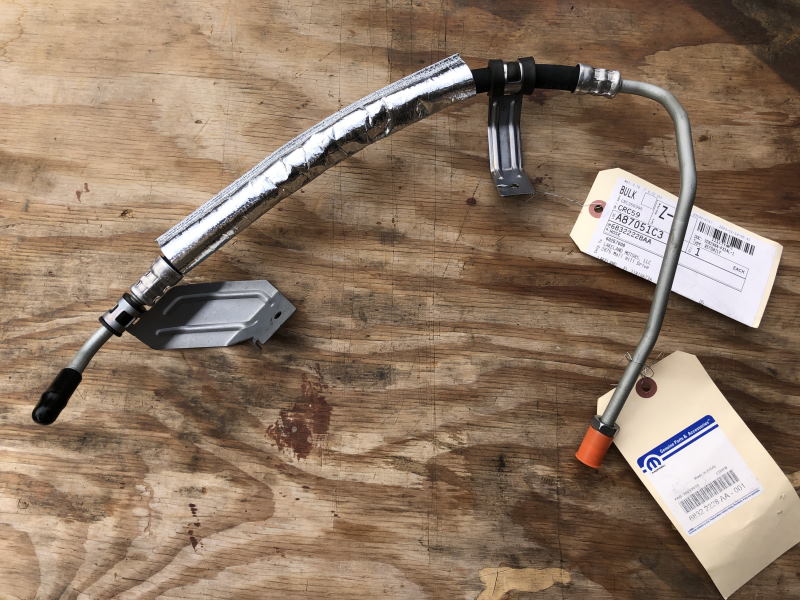
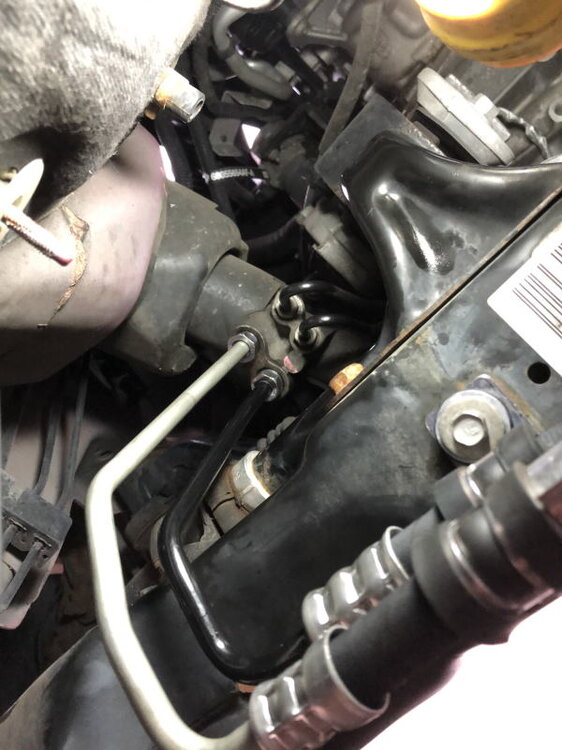
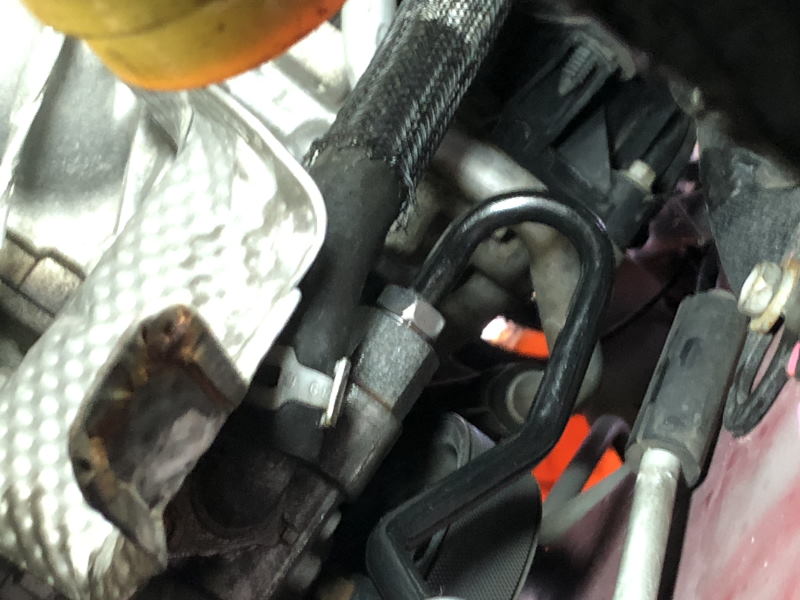
The power steering hose gods are sending me a gift (or setting me up for a cruel joke). After about a month wait, the hoses arrived yesterday in the AM, AND the weather yesterday and today is unseasonably warm, in the 50f's, AND I had previously, randomly, scheduled the day off to use up unused vacation days. I took the opportunity to replace the hoses. *** TAKE NOTE *** If you are planning to do this repair and you are a driveway mechanic (with just basic+ tool inventory), you will need a 18mm crowfoot flare tool. Prior, to prep for this repair, I had purchased a metric crowfoot flare set at HF. I now know it does NOT include 18mm. I had not researched the size I would need, I figured I'd be good with a 'set'. In hindsight you may be able to get by with a 18mm crowfoot flare wrench (but I dont own those either). UGH! As I found out when I went to remove the old hoses , I didn't have the correct 18mm crowfoot flare tool, I used a dremel tool and file to grind out the 17mm in the HF set to 18mm. Replacement is straight forward. The same 2 bolts hold them both to the frame with a hose connection at each end. The rub is the high pressure connection at the power steering pump. While on your back in the driveway, its at a full arms length in, and once your arm is in, you cant see it. After the usual set of 4 letter words, grunts, groans, and dropped tools, that connection was completed. I hope its tight enough. I'm no longer in my 20's. My arm strength is no longer what it used to be. Initial test drive was successful. I'll check Saturday afternoon for leaks. I refilled the P/S system with Valvoline power steering fluid and did not bleed it. I'll provide an update. High Pressure P/S Hose Low Pressure P/S Hose The 'easy' hose connections. Low pressure (silver) in on top. High pressure (black) below it. High Pressure P/S connection on the power steering pump (black). This is the beast to reach. Another view of the same, from the ground looking up.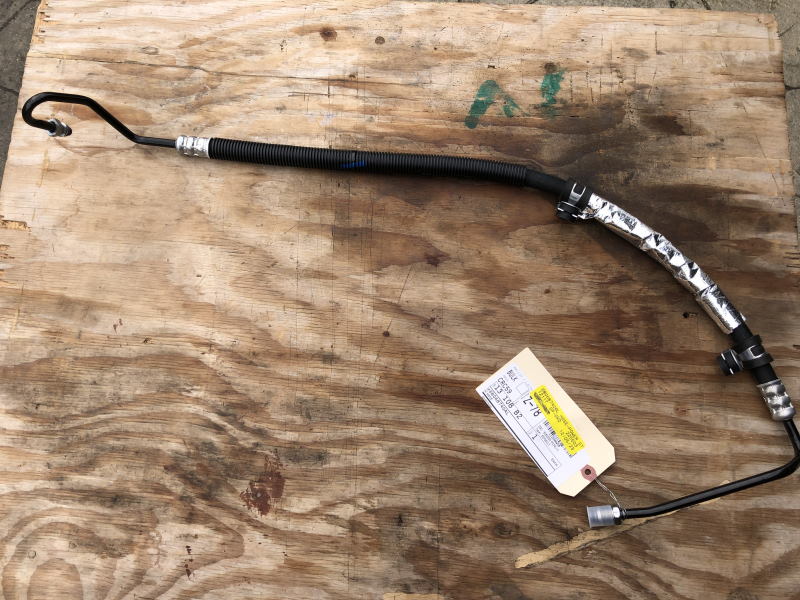

-
Power Steering Fluid Leak
DodgeaWrench replied to DodgeaWrench's topic in Brake, Chassis & Suspension
Still waiting for parts to arrive. I ordered both the high pressure and return hose. I figure I'll do them both while I'm under there. If the weather was decent, I was hoping to replace the hoses over the Thanksgiving weekend, but without the parts, that window appears to be closing. As for the recall, I've only been able to find info that it applies to Canadian vehicles that have a block heater, and possibly only the return lines. Regardless I did try a couple more lookup sites and did call the Chrysler customer service line, but no luck. It did not apply to my vehicle. Hey, it was worth a shot. I watched those power steering pump replacement videos too. Agreed, it looks like engineering revenge. After my lugnut fiasco, I was walking the dogs and came across someone in their driveway wrenching to try and get the 2-piece nuts removed. We shared a few 4 letter words and best I could offer was good luck and advise to throw them all out.