

QuarterSwede
-
Posts
67 -
Joined
-
Last visited
-
Days Won
6
Reputation Activity
-

 QuarterSwede got a reaction from Jagar in How To: Run Power Through Firewall
I just received a sub (the excellent 10” Pioneer TS-SWX2502) and amp (amazingly small 1600w mono Pioneer GM-D8601 amp) for Christmas and went to run power through the firewall of my 2015 (automatic/no clutch) and could not locate a grommet that wasn’t in use.
I read a lot of threads talking about where there is a 2” one but no one had pictures and I couldn’t locate it myself. After an hour I found it by accident. It’s just to the left of the brake booster and hidden under the rubber mat. Its right underneath the protruding rubber square. This rubber square pulls away and off to reveal a massive 2.5” grommet. From there it’s trivial to wire it to the the posts (near the drivers shock tower).
You used to be able to get through the drivers door grommet but that no longer exists on the 2015 (you should avoid possible pinch points anyway). It seems that as Dodge is refining the Journey’s design they’re making it more difficult to install aftermarket accessories. Why hide the grommet at all? It serves as a fireblock but once it’s permanently removed that is no longer the case so why have it there?
Anyway, I thought I’d post this to help anyone else installing aftermarket power for an audio system.
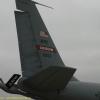
Hole in Firewall after rubber and 2.5” grommet have been removed:
A closer shot. You can see where the rubber mat was removed:
From the hood (driver’s side):
A closer shot from the hood:
The 2.5” grommet (top) and square rubber piece that hides the grommet:
Just to show how they fit together while installed:
-
 QuarterSwede got a reaction from Artiflex in How To: Run Power Through Firewall
I just received a sub (the excellent 10” Pioneer TS-SWX2502) and amp (amazingly small 1600w mono Pioneer GM-D8601 amp) for Christmas and went to run power through the firewall of my 2015 (automatic/no clutch) and could not locate a grommet that wasn’t in use.
I read a lot of threads talking about where there is a 2” one but no one had pictures and I couldn’t locate it myself. After an hour I found it by accident. It’s just to the left of the brake booster and hidden under the rubber mat. Its right underneath the protruding rubber square. This rubber square pulls away and off to reveal a massive 2.5” grommet. From there it’s trivial to wire it to the the posts (near the drivers shock tower).
You used to be able to get through the drivers door grommet but that no longer exists on the 2015 (you should avoid possible pinch points anyway). It seems that as Dodge is refining the Journey’s design they’re making it more difficult to install aftermarket accessories. Why hide the grommet at all? It serves as a fireblock but once it’s permanently removed that is no longer the case so why have it there?
Anyway, I thought I’d post this to help anyone else installing aftermarket power for an audio system.
Hole in Firewall after rubber and 2.5” grommet have been removed:
A closer shot. You can see where the rubber mat was removed:
From the hood (driver’s side):
A closer shot from the hood:
The 2.5” grommet (top) and square rubber piece that hides the grommet:
Just to show how they fit together while installed:
-
 QuarterSwede got a reaction from Pity Pat.Patton in 10” Sub Install Compete
After 24 days I finally got my Pioneer 10” slim sub installed to my satisfaction. My goal was to make it easy to remove so that the trunk could still be fully used for luggage for a family of 5 and to be able to put the back row up without removal. I decided to use large a quick connect/disconnect for my power and ground and a smaller quick connect/disconnect for my amp remote turn-on wire.
For those looking to fill in for the low end that’s missing from door/dash speakers this Pioneer 10” sub matched with a Pioneer Class-D mono amp is perfect. It’s also high powered enough to rattle the license plate, if that’s your preference.
I ran the power cable from the battery (see previous How To post) down the driver’s side (left) to the rear. I like how easy it is to pop off the trim panels and hide the cabling. It is then routed across the vehicle’s driver side to the passenger’s side (right) under the 3rd Row seat where the back folds. Doing this avoids pinch points. I used a stiff wire hanger to fish the cables through. Taping it on with some electrical tape makes it easy to pull across.
I chose the passenger’s side as the location for the amp and sub as the amp’s power inputs are on its right side and it was easier to hide the cables. Note: this slim sub and amp will fit, height wise, under the driver’s seat. It will stick out about 6-8” and I decided against that as it would block the floor compartment and my kids feet would beat it up.
The RCA and remote turn-on cables went down the passengers side. I bolted the ground terminal ring under the 3rd Row seats to a bolt in the middle holding the seats down. It was the only bolt in the area without paint. The bolt was too large for the terminal ring so I slide the terminal under and bolted it down with prejudice. It isn’t going anywhere and it’s well grounded. The RCA cables were run up past the 3rd Row seat and then tucked along the channel of the trunk compartment lid.
To crimp the terminals for the power and ground quick connect/disconnect I decided against buying a 4AWG crimping tool for a one time use. I used a jack stand as an avil, a torx impact bit, and a hammer. I crimped the terminals on 4 sides and it seems to be holding well. It’s definitely not the recommended way but it’s still safe.
My wife thinks it’s large and takes up more room than she realized it would but since I’ve added the quick connect/disconnects she’s happy. Anyone with questions on how to wire their Dodge Journey’s audio system, feel free to ask. I’ve ripped he vehicle apart and learned a few things in the process. Let me know what you think!
My system
Speakers
Dash: Infinity Reference 3.5” 3022cf Front Doors: Kenwood eXcelon 6.5” 3-way - Discontinued Rear Doors: Infinity PR9603IS 6X9" 90W 3-Way Primus Series Sub: Pioneer 10” Shallow Mount TS-SWX2502
Amp
Pioneer GM-D8601 Class D Mono Amp
Headunit
Pioneer 4100NEX Pioneer CD-MC20 Auto-EQ Mic Metra Turbo Kit - moves the climate controls down and puts head unit where climate was. Requires 4.3” screen (basically becomes climate controls all the time) Access ASWC-1 Steering Wheel Control Interface
Cables
New England Providore 4AWG CCA Wiring Kit with Power, 100A Fuse, Ground, Speaker wire, Remote turn-on wire, and RCA. HYCLAT Battery/Ground Quick Connect/Disconnect Terminals
-

-
 QuarterSwede got a reaction from USAFGuerin in Member Map
Pretty cool. Added another state, Colorado!
Interestingly Redtomatoman I'll be driving past you on I-40 on my way to Phoenix in 3 weeks for my wife's grandmother's interment (no need for condolences, she was a spiteful old bat).
-
QuarterSwede reacted to Roly in Aftermarket amplifier/subwoofer
sorry to revive such an old thread, but Metra has a kit available for the 4.3 inch radios. It includes a relocation and replacement a/c controls.
-
QuarterSwede reacted to Eduardo831 in Journey R/T Custom Exhaust
I live in California you can remove anything you want as long as your catalytic convertors are left in place hence the name catback exhaust systems. So if you want a straight pipe after your catalytic convertor its fine smog will pass besides you'll know its legal because no licensed shop will remove your catalytic convertor since it is illegal for them to do so if they arn't replacing them.
-
QuarterSwede reacted to Darthstar7 in Journey R/T Custom Exhaust
You’re now going into a whole different subject yes noise will be an issue, but emissions will pass as long as your cats are in this is in California. The point Armando so everybody knows is in CA you can modify your exhaust as long as cats are in, but aftermarket mufflers are the best option to keep the noise level down so you won’t get a citation for the noise.
-
QuarterSwede reacted to Armando G in Journey R/T Custom Exhaust
Weird, this CA law actually says different.
Vehicle Code 21750. Adequate muffler required
In summary all cars and other motor vehicles must be equipped with a muffler, and any exhaust modifications must not be designed to increase the exhaust noise above 95 dbA.
-
 QuarterSwede reacted to WytChoclitJ in Journey R/T Custom Exhaust
Here are some pics of the tips for anyone interested.
-
QuarterSwede reacted to radon360 in In-floor Storage bin mod?
And the best part is, 8 years later, I still own my Journey with about 165k on the clock, no major problems.
The can of Great Stuff did a nice job of filling the area between the floor pan and bin, and did make a big difference. Still not as good as a Yeti cooler, though .
-
QuarterSwede reacted to bramfrank in In-floor Storage bin mod?
A new record . . . . more than 8 years to get an answer . . . .
-
QuarterSwede reacted to dhh3 in Tow Prep-Package!!
That is the way mine came from the factory, also. All you need is the harness with all the relays which plugs into the harness that terminates by the spare. This harness terminates in a 4-pin flat connector. Get your hitch installed, have your Dealer add the Sales Code, and activate the harness. BINGO! You now have the Trailer Tow Group!
-
 QuarterSwede got a reaction from dhh3 in Tow Prep-Package!!
Thanks for the link. Now I'm more confused; doing research on towing a pop-up.
My DJ has the engine cooler listed and I have the white and blue harness that terminates near the spare but it doesn't list the tow prep group package.
-
QuarterSwede reacted to jkeaton in Towing camper with 2014 Journey 6cy
What is this mythical beast you speak of?
-
QuarterSwede reacted to dhh3 in Towing camper with 2014 Journey 6cy
It is the black thing that blocks the glove compartment light.
-
QuarterSwede reacted to eightfingers in Best 2015 Hitch?
Is this what you're referencing? Could you provide me a link for the connector? I'd love to order a hitch and the wiring harness for this today
-
QuarterSwede reacted to Lobitz68 in Best 2015 Hitch?
etrailer has everything you need if you're not using the dealer... including a T-connector that works fine. You only NEED to go to the dealer if you are interested in using the integrated towing features like the sway control.
EDIT: I haven't decided which way to go on mine, but I am leaning toward the integrated and, more importantly, warrantied install...
-
QuarterSwede reacted to dhh3 in Best 2015 Hitch?
Look under the rear of your DJ. Between the rear of the spare and the back bumper, there may be a wire harness that terminates here. It is either white and blue or green. This is the harness for the lights and anti sway. So, if you have this harness, you just need the short one that plugs in here and terminates at the 7 pin plug, mounted to the Mopar hitch.
-
QuarterSwede reacted to dhh3 in Best 2015 Hitch?
A while ago, end of summer or early fall last year, someone on the forum wanted to install the LED tail lights. I went to the trouble of removing both left side lights, taking pictures and posting everything for him. He never answered my post. Anyway, the lowest priced 2014 DJ still has the non-LED tail lamps. Not sure about the 2015s. I did not think that Dodge would make 2 different wire harnesses for the rear lights. If you unplug the harness from the LED taillight, there is 12v going to the light. The converter for the LEDs is built into the housing.
Just an FYI if anyone was losing sleep over this!
-
QuarterSwede reacted to dhh3 in Best 2015 Hitch?
I have actually never seen a DJ with a hitch. More than likely, the Mopar is probably made by one of the well known hitch makers, but there have been a few posts on here where the OP gets the hitch installed someplace other than the dealer and then can not get the lights to work. So, I am going to play it safe. I will pay more, but will be included under my Warranty.
-
QuarterSwede reacted to dhh3 in Best 2015 Hitch?
I will go with Mopar when I am ready. I intend to let my Dealer do the installation. This way, there will be no problem with adding the "code". I already have the harness that terminates behind the spare tire and the oil cooler.
-
QuarterSwede reacted to Lobitz68 in How can I get the proper sales code added for trailer prep
Wow... that is just annoying.
-
QuarterSwede reacted to davea180 in How can I get the proper sales code added for trailer prep
The OP cannot have a trailer prep group added at this point. I read from his post that he is interested now in trailer wiring.
BTW, and I have no explanation for this, my SXT DOES NOT have the trailer prep and it does have an engine oil cooler as is listed on the window sticker. I don't recall seeing it as a part of any "group." I do believe that if you are speaking of a TRANSMISSION oil cooler, the 6 speed trans may come with that standard and its easy to check and see it behind the grill.
-
QuarterSwede reacted to webslave in Towing Questions for a Newbie (Journey 2012)
There is another thread in here on towing. The 2012 towing (and the 2013) is 2500 lbs. with the tow package. A 1,000 lb reduction between 2011 and 2012. Don't know the reasons; could be drivetrain, could be chassis changes, could be that they realized that the 3500 lbs was way too much for the DJ and it was leading to mechanical issues so to cover their butts, they reduced the rating. Whatever their reasons, the tow capacity is 2500 lbs. and if you exceed it you void your warranty, become saddled with additional liability in an accident for being over weight and could quite conceivably be a danger to yourself and others sharing the road, not to mention that if it was reduced because 3500 lbs led to drivetrain issues, you could very well be ruining the car.
I've been towing RVs for ages and the DJ, despite its looks, is not a tow vehicle. It isn't an SUV, it is a car with some SUV characteristics, thus it is a CUV. Designed to carry people and their luggage. It can tow bicycles on a hitch carrier, a small utility trailer or a small pop-up, a jet ski, even a small boat, but, not an RV in the classical term. Part of the reason the Journey doesn't tow as much as some other makes is the fact that it is bigger and beefier; meaning it is bigger and heavier. That "bigger and heavier" comes right off the towing capability. My 2500 RAM Longhorn is rated to tow less than the ST version of the same truck; why?, because it is optioned out the wazoo and all those options mean I can't carry or tow as much as the same truck without them. Fact of the matter is you can't get something for nothing when talking about towing.
The tow package does include the oil cooler, but, not a transmission cooler and with a sealed unit transmission (doesn't even have a dipstick) adding one would be very risky and may, in fact, be why they lowered the tow rating - the transmission can't take towing stress of 3500 lbs. in the dead of summer without additional cooling. The package does include the 4 pin connector which should be sufficient for anything that the DJ can tow...you don't need 7 pin connectors for trailers without brakes and the small trailers that the DJ is rated for don't have brakes. The tow package does not include the receiver or hitch platform, that's why the 4 pin connector isn't installed at the factory; it would just hang down and get damaged, however, the installation, once the receiver is put on is "plug and play" and can be added with a screwdriver to pop off the tail light assembly and plug it in. The instructions are in the bag with the 4 pin connector. To tow the lightweight <2500 lb. trailer it is rated for you shouldn't need anything "extra". I, personally, was surprised when I ordered the tow package (to use my 2 bicycle carrier, not an RV) that the "tow package" didn't include the receiver and hitch, but, then again, I was also surprised that when I ordered the roof rails that they didn't come with the cross bars (come on Chrysler, what gives?).
So if you bought your Journey to go RVing, unless you do it in a small popup and don't take a lot with you (remember there is a Combined Gross Vehicle Weight Rating also), you are going to be out of luck...
Addendum on the 7 pin connector...if the trailer you are thinking about towing has brakes, it probably is too heavy for the Journey; most states don't require trailer brakes on trailers of 3,000 lbs or less, single axle. If the trailer you want to tow has more than one axle, or trailer brakes, then it is too heavy for the 2012-2013 Journey.