brwengel
-
Posts
151 -
Joined
-
Last visited
-
Days Won
3
Content Type
Profiles
Forums
Gallery
Everything posted by brwengel
-
Normally I wouldn't use 93 octane, especially since it usually cost 40 cents per gallon more, you wouldn't see a dollar benefit with the increased gas mileage. My only choice at this particular Costco was 87 or 93 octane, and as I said for only an additional 20 cents it was well worth it. I also would add that in another car I have, I try to use gas that doesn't contain ethanol. It's hard to find gas without ethanol added, but it is out there, and when I burn a tank of ethanol free gas I can travel about 50 miles per tankful further. I know that the ethanol doesn't burn with as much power, and it immediately drops my MPG, so the extra cost of ethanol free gas is definately worth it, when you can find it. Just my unscientific two cents worth. Happy Motoring...
-
On a recent long distance trip I ran across some cheap gas at Costco in South Carolina. The premium gas (93 octane) was only 20 cents more than the regular gas (87 octane) so I thought I'd try a tank. As soon as I drove away from the pumps my onboard computer changed my avg fuel economy by two MPG! I thought this can't be right, after all how would it know what type of gas I had just put in. So I drove that tank out and calculated my mileage and it had increased by three MPG! So I bought another tank of 93 octane and I received the same results. I guess to prove my theory I could switch back to 87 octane gas and see if my lieage drops back to the previous level. I'll keep you posted. I guess it depends on how much more the premium gas would cost to make it worth while, most places I fuel at the premium gas cost almost 40 cents more, but when it only cost 20 cents more then it is definately worth while. Happy Motoring...
-
I just received my protector two weeks ago from Sherwood Automotive. There is double-sided tape down both ends and one piece the entire length near the bottom edge. It certainly isn't water-proof so I suppose water could get under it and then freeze, but it is pretty firmly held in place. One note is that I'm a bit disappointed regarding the material the protector is made from. I guess I expected it to be a bit more rubbery, instead it is made entirely from plastic and is pretty stiff. If you were to scuff this protector it would surely leave a mark, and while you have protected your bumper cover, you're left with a permenant mark on the bumper cover. For more than $130 I expected better quality, although the fit is great and the installation is a breeze, they could have used a better material choice. Just my two cents worth.
-
From the owners manual pg. 406: Wheel Nuts Tighten all wheel nuts occasionally to eliminate the possibility of wheel studs being sheared or the bolt holes in the wheels becoming elongated. This is especially important during the first few hundred miles (kilometers) of operation and after changing a tire. This allows the wheel nuts to seat properly. All wheel nuts should first be firmly seated against the wheel. The wheel nuts should then be tightened to recommended torque. Tighten the wheel nuts to the final torque in increments. Progress around the bolt circle, tightening the nut opposite of the one you previously tightened until the final torque is achieved. Recommended torque is 95 ft lbs (130 N·m).
-
Well I can tell you from my own experience that with my V-6 I am getting an average of 22mpg. My buddy has a four-cylinder and he tells me that with just about 6,000 miles he is getting about 26mpg hwy! Not bad for an under-powered overweight vehicle. Happy Motoring...
-
I hate to disagree with you Sam, but the diagram you provided will tell her the Max Tire Pressure, which is not the same as the recommended pressure, and not what the tire pressure monitor sensors are set at. For example on my Journey with 19" Kumho's the max tire press on the tire is listed at 44 lbs. , but the placard on the door jamb (just above the latch) states that the pressures for front and rear are 34 lbs. At least that's the pressure for my tires and vehicle combo hope this info helps.
-
If you open the drivers door and look on the door sill there is a white placard with the tire specs for your vehicle and your tires. The pressure is located on this sticker. You want to keep the pressures at the recomended pressures to keep the tire pressure monitoring system satisfied. Good Luck and Happy Motoring...
-
I just checked the Costco website and you're right the price does not appear until you make your selection. I ran through the configuration and the price is $169.99, so it looks like the $30 off sale is over, at least for now, but I don't think that $170 is too bad.
-
The only thing I can tell you is that my Journey was built in May '08 and I have that same option. I have two overhead aimable LED's and there is one that shines on the feet of the drive and the passenger. I haven't crawled under to locate them, but you can see them at night when the headlights are on, I couldn't tell you if they come on any other time.
-
At the time I ordered them they had a sale and I think an extra $30 off, seems to me they were $130 per row. I ordered two rows (front & rear) and with tax the total was $299, with free shipping. I think this price is far lower than anywhere else I could find them. As a side note I might add that I'm still awaiting the proper cover for the passenger seat bottom, since this is a brand new option for them they sent me the wrong one, but their customer service was great about it and they're sending me the correct one. The only other thing I would mention about them is that they have about a two week delivery, since i think they make them to order. And remember if you buy them from Costco, it's like having a lifetime warranty!
-
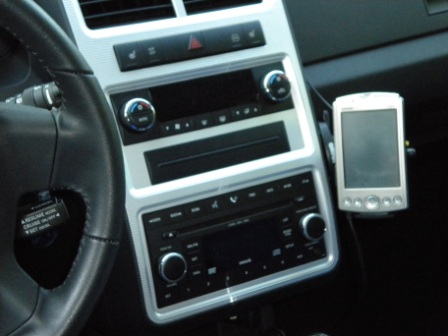
I guess if I had the pick of any location in the vehicle I would slightly relocate it, but since there aren't too many mounting choices, this one's not too bad. I like my GPS a bit lower in the vehicle to keep off the sun glare. If you noticed, my GPS is quite old, and as a result the screen isn't as bright as many of todays' models. My unit is a Garmin iQue 3600 and is about 10 years old, and I guess I'm too cheap to buy a new one. Regarding the location, it's not to bad because it is within reach and it works that low because I use an external antenna which is mounted to the front center of the dash. Probably a unit with an internal antenna would not pick up a signal that far away from the windshield. I travel for a living and use my GPS everyday, and I really like the fact that you have to look hard to see that I have a unit in my vehicle, and no suction cup marks!
-
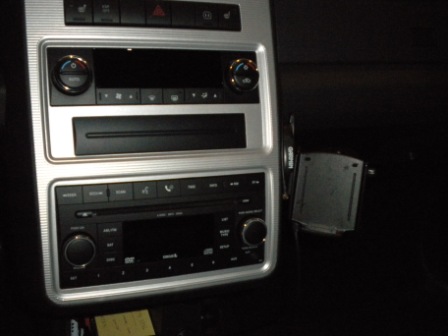
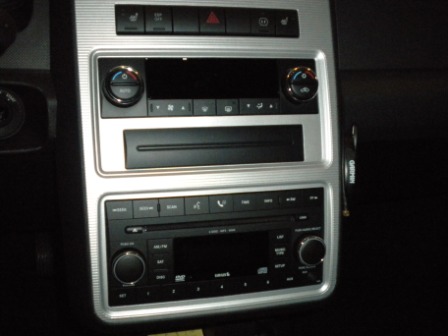
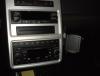
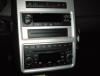
I've been looking for a good mounting location for my GPS. I'm one of those people who doesn't like to mount my unit on the dash or the windshield. Since the interior of the Journey doesn't give you a lot of choices I deceided on the side of the center stack. The cover is easy to remove, and it is actually pretty thick, so it will stand the stress of the GPS mounting bracket. It's actually far enough out of the way for passengers legs, and you can still fold the seat flat and not hit it. The first pic shows the unit mounted, the second shows the cradle with the GPS removed, and the third shows the cradle removed, which is all that shows for a potential thief. I guess I could have removed the Garmin name from the base to further disquise it. Sorry the pics are so dark, a camera buff I'm not! If anyone is interested in more detail, I'd be happy to share.

-
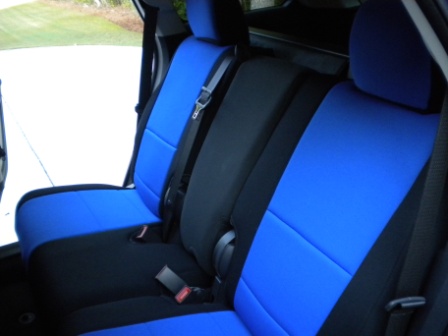
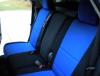
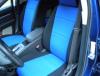
My Journey is mainly a work vehicle, and I'm trying to protect the light colored center section of my seats. I found these custom fit seat covers at Costco, they're made by CoverKing. It's hard to find seat covers for the passenger side flip-up and fold-flat seat, and remember these seats have side airbags in them, so make sure your seat covers are cut out for this feature! The flash in my camera makes the blue look lighter than it really is, the pics of the rear seats looks closer to the real thing.

-
I discovered something today, while installing my new seat covers (see photo section) I removed the drivers side rear seat to help fasten the seat cover under the seat. That's when I discovered the even though I have the five passenger seating (which means the second row does not fold up like the seven passenger model) the mechanism for this fold up feature is actually installed. The latch is there, but the cable is missing to release it when you would want to slide it forward to access the rear seating. Now this doesn't do much for most of us, but as the original poster is looking to add a third row seat, it wouldn't be too difficult to add the cable to make the seat fold up like the seven passenger model would!
-
My Journey is mainly a work vehicle, and I'm trying to protect the light colored center section of my seats. I found these custom fit seat covers at Costco, they're made by CoverKing. It's hard to find seat covers for the passenger side flip-up and fold-flat seat, and remember these seats have side airbags in them, so make sure your seat covers are cut out for this feature! The flash in my camera makes the blue look lighter than it really is, the pics of the rear seats looks closer to the real thing.

-
Bluetooth on standard stereo
brwengel replied to vx255's topic in Audio, Infotainment Navigation, MyGig, UConnect, etc.
I agree with Sam, I think this solution should work for you. My buddy bought an SXT with an REQ radio and added the U-Connect option. The only difference between his dealer installed option and my factory installation is the fact that my microphone is located in the rear-view mirror, and his is mounted seperately to the "A" pillar. I don't think the fact that your vehicle is a right hand model should make a difference, the installation would just be a mirror image of the installation instructions. Happy motoring! -
Something else to consider is the second row seating. On Journeys that have a factory installed third row seat the second row seats fold-up to allow access to the third row seating. I guess you could fold flat the second row seats, but it would be kinda tough climb over them. The $930 for the third row seating is actually quite a deal since it gets you not only the third row seating, and the folding second row but also rear A/C! And as Sam mentioned the plastic panels in the rear are different, my SXT has only 5 passenger seating, and as a result the passenger side panel doesn't cover the entire right side. For some unknown reason this panel has a cubby hole at the right rear which is great for storage, but I'm not sure why it's different from the 7 passenger model.
-
I'm not sure where you are located but here in the USA the warranty is 3 year 36,000 miles, but I'm not sure how that applies to brakes. Just my two cents worth.
-
I was on the Dodge Owners website; http://www.dodge.com/en/owners/ In the Current Offers section, under Specials & Savings, you'll find a drop-down box for Seasonal Specials. There you'll find a link to enter your Zip Code and you'll be presented with a coupon good for an oil change, tire rotation, 23 point inspection all for $17.95 at your local dealer. Offer good until Aug 30, 2009. Happy motoring!
-
Yeah I'm sure that my noise is a result of the bug deflector, but not the deflector itself. I can't quite get my head far enough into the winshield to see, but the noise is definitely comming from the base of the windshield. I can see the bug deflector while driving and it seems rock solid. Since my first post I've been in touch with the manufacturer of the bug deflector and as it turns out they are only about 1 hour from my house. So I took the car by for them to have a look and a test drive and they agreed to make a modified deflector for me to try. Yesterday we installed the new deflector and sadly is was no different. I did learn however that this company actually makes the OEM version for Chrysler, so the factory deflector is no different than my after-market one (except that mine cost half the price of the Chrysler version). Once again I contacted the dealer to help me with this problem, since I was sure it was caused by the loose plastic over the wipers. They agreed to replace the plastic cowling, however like most Chrysler parts, there are none available and it is on back-order. So we'll wait and see, I'll let you know how I make out.
-
On a few ocassions I have fueled up as soon as the low fuel light came on, and each time it took about 17.5 gals. So I figured I have about 2 1/2 gals left enough to go 50 miles, and I probably have a 1 gal reserve beyond that!
-
Well since my Journey has an aluminum hood and a large sloping windshield, I decided to add a bug deflector to help with stone chips on the hood and windshield. I decided on one from Auto Ventshade I picked up at my local AutoZone for about $49. I got it home and installed it in about 10 minutes, all was good so far. I drove it around town and all was still well, but when I got on the Interstate and reached 60 mph I heard a terrible vibration noise. My first thought was that the bug deflector was the cause of the noise, so I decided to experiment and I installed about a 4' length of foam pipe insulation behind the bug deflector, but this did not change my nosie. Now I expected that the bug deflector would change the airflow over the car, so I looked at the base of the windshield. There are two plastic trim pieces just behind the hood over the wipers. These are the cheapest crappiest trim pieces I've ever seen, they are only held on with a few plastic rivets and appearantly hold each other on the car. The top piece comes off easy enough so I removed it and drove the car, no change. Next I tried to remove the lower piece, but this is not possible without removing the wiper arms, so I just gave up and reinstalled everything. Next I contacted the manufacturer of the bug deflector and asked if they had any compaints, but apperantly the deflector for the Journey is too new, so we'll wait and see if anyone else complains. I did have the car at the dealer to have the sun visor replaced and I asked them to look at the plastic trim pieces at the base of the windshield, they mentioned that they had another complaint after the owner installed a bug delflector, but they indicated it was kind of my problem since I installed the bug deflector. Even though Dodge sells a bug deflector for about $90, I wonder if anyone has had one of these installed and if it also has the same problem. Anyone else have any experience with their Journey and a bug deflector?
-
Performance Steering & Suspension Option...
brwengel replied to brwengel's topic in Brake, Chassis & Suspension
Yeah as I mentioned, the difference was only $195 and for that you're getting larger wheels & tires, and fog lamps, so that doesn't leave much for suspension & steering, more like nothing at all. -
Performance Steering & Suspension Option...
brwengel replied to brwengel's topic in Brake, Chassis & Suspension
Is there nobody out there that has any ideas about this option, or am I the only one questioning this "Performance" feature?