Dean H
-
Posts
282 -
Joined
-
Last visited
-
Days Won
31
Content Type
Profiles
Forums
Gallery
Everything posted by Dean H
-
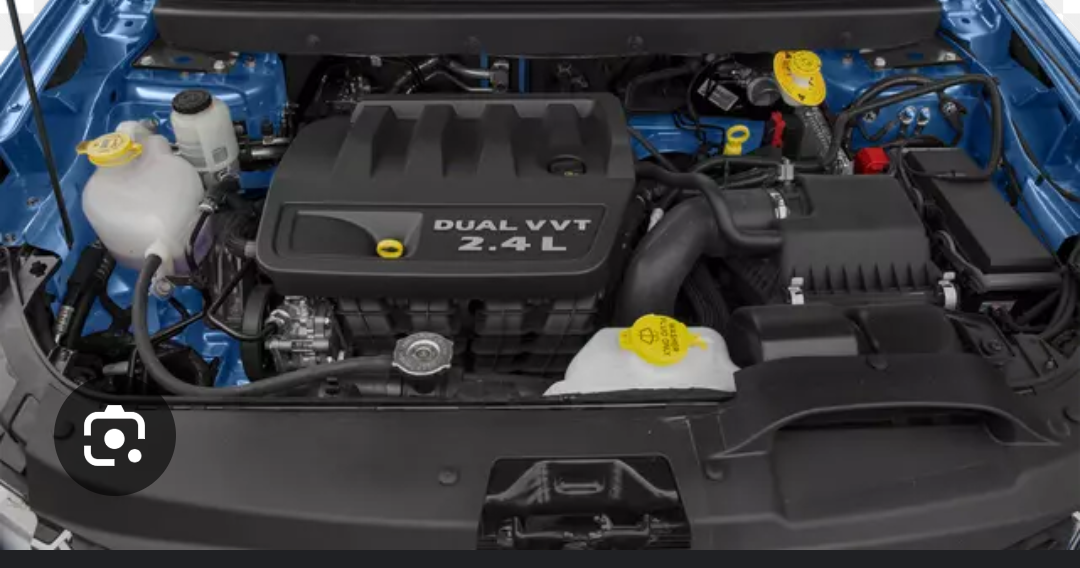
2016 Dodge Journey 2.4 fuel pressure spec is: 58 psi + or - 5 psi.
-
Do you have the stock Dodge radio? What aftermarket equipment do you have?
-
My friend installed my battery backwards.
Dean H replied to JohnsterMonster86's topic in Electrical, Battery & Charging
To fix this issue- Install a new fusible link or fuse on the Dodge, 4 gauge alternator cable. OR- Run a a new, separate 4 gauge cable. With a circuit breaker or fuse matched to the 4 gauge cable amperage rating. Run it from the TIPM positive battery stud. To the alternator battery stud. Disconnect and seal off the old cable down at the starter. -
Follow 5rebel9's directions. Read my post and whole thread below, regarding the battery and battery sensor. Everything you need to know is covered in it. https://www.dodgejourneyforum.com/topic/18210-electrical-system-fyi-battery/
-
My friend installed my battery backwards.
Dean H replied to JohnsterMonster86's topic in Electrical, Battery & Charging
For clarification purposes here is my picture of the starter and cables in question. The top red cable is the battery voltage feed cable from the TIPM (under hood fuse box). The lower dirty orange one is the fusible link that connects to the alternator stud. Your fusible link is blown. I believe you have the 3.6 V6 engine. Please verify this fact.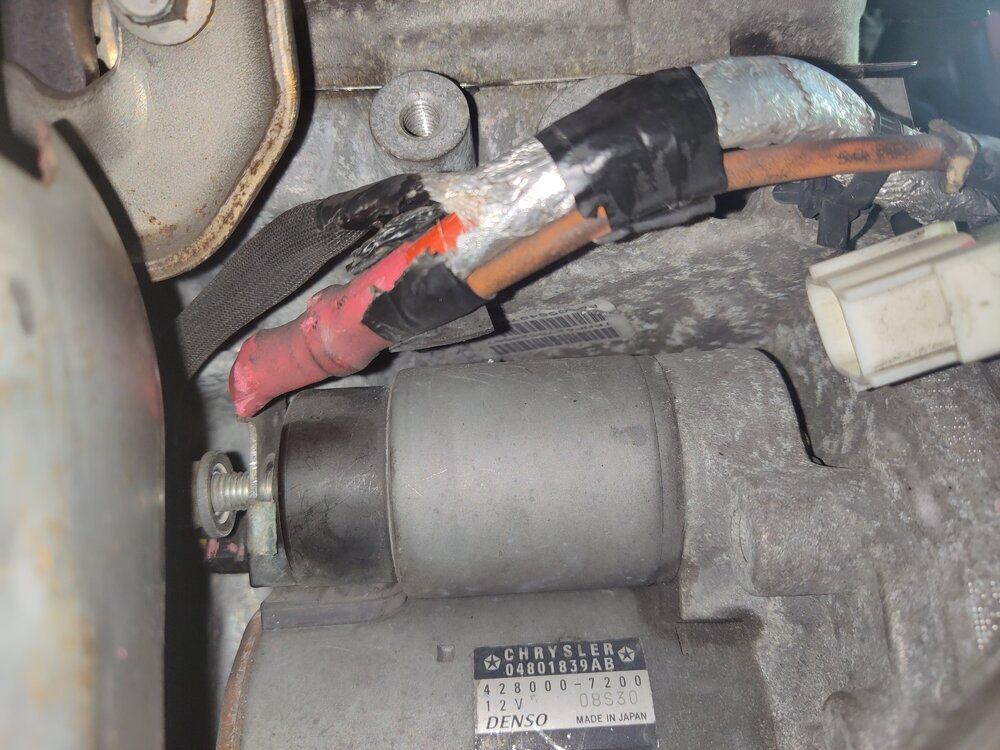
-
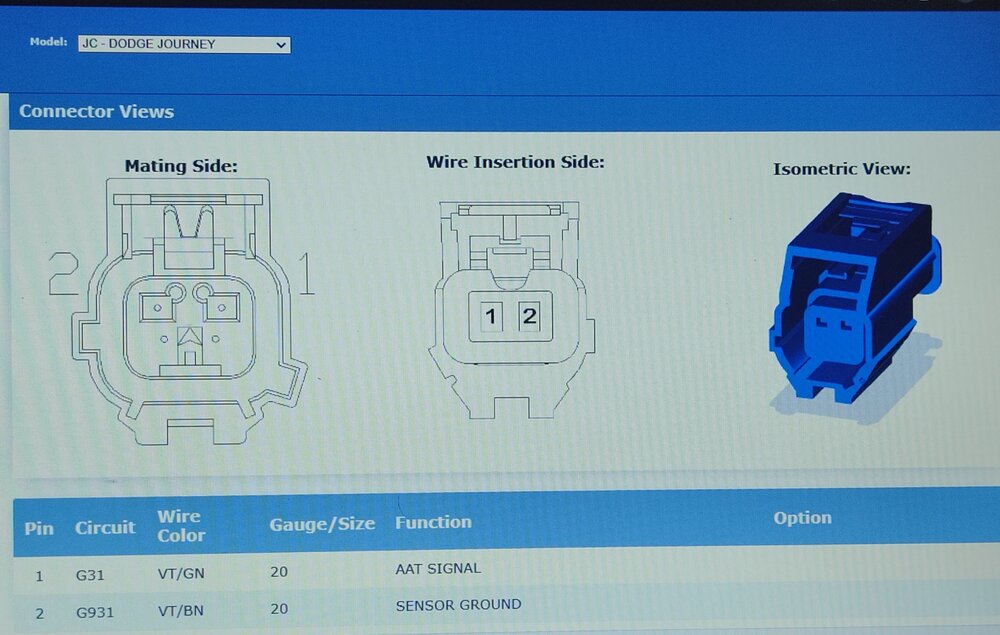
Ambient Air Temperature Sensor Code P0070
Dean H replied to MarkyB's topic in Electrical, Battery & Charging
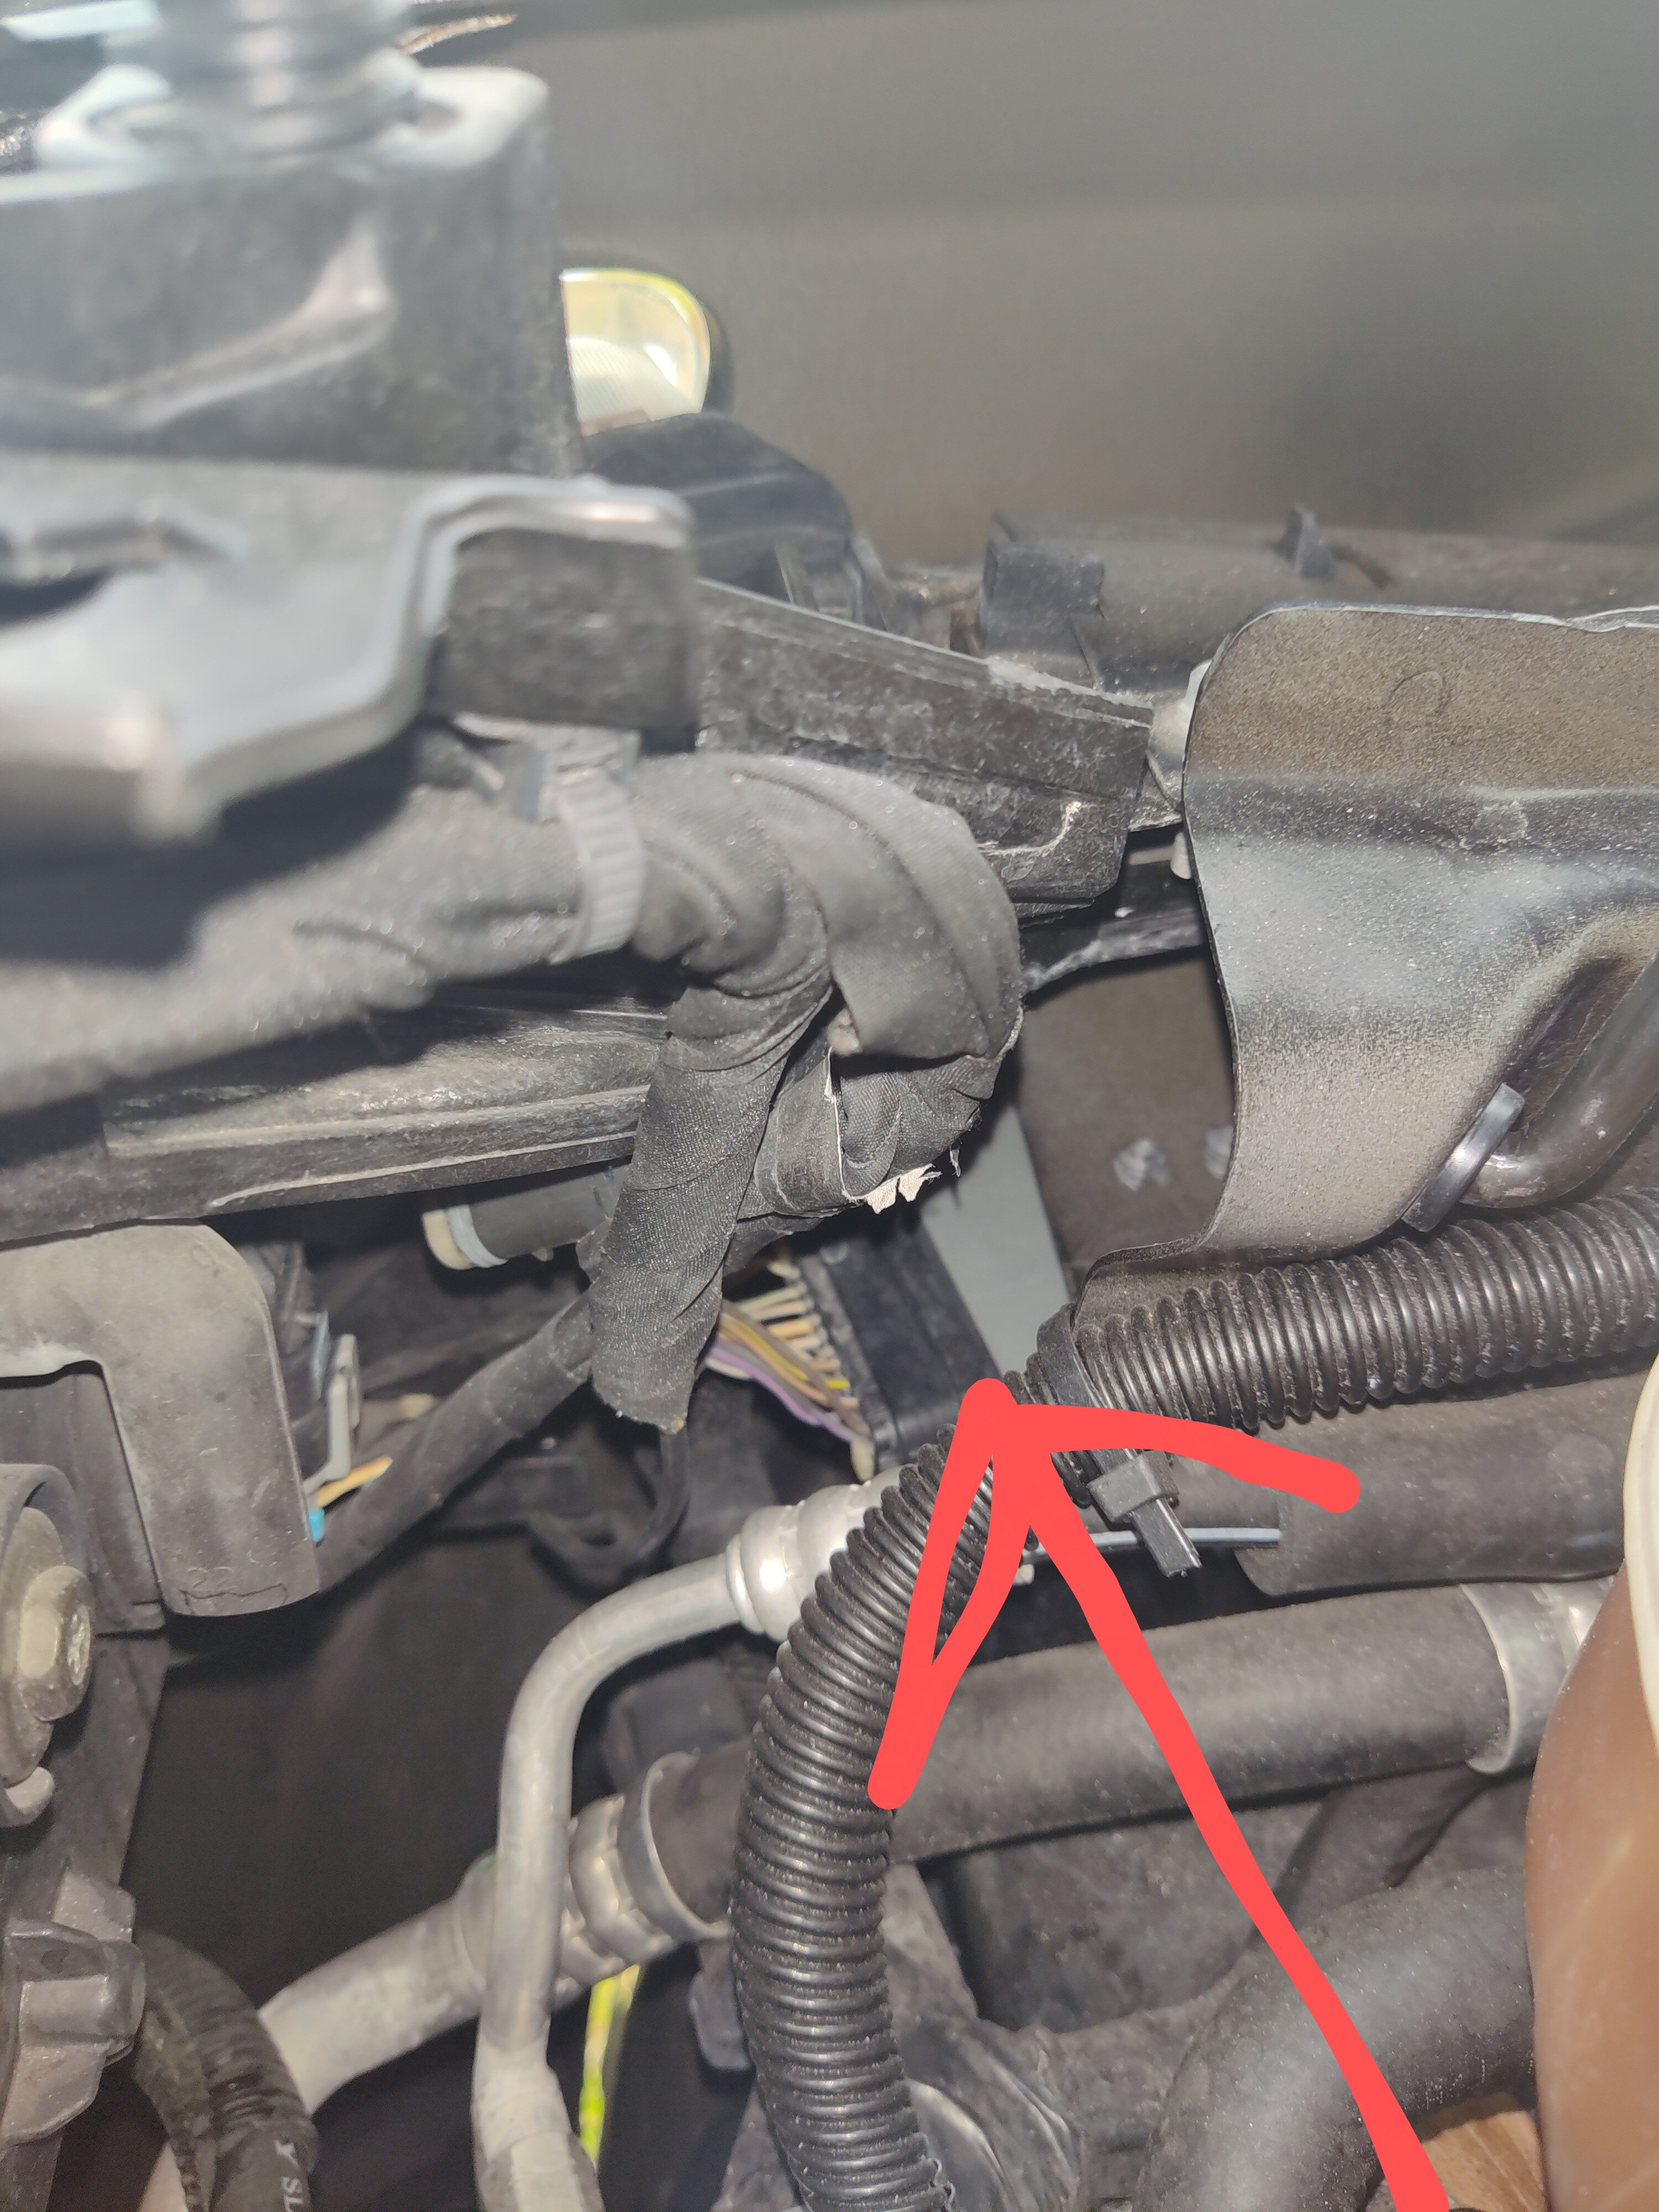
The red clip has to pulled down to release the wire harness. Can you tell me the code title for P0070? So I can look it up. -
Ambient Air Temperature Sensor Code P0070
Dean H replied to MarkyB's topic in Electrical, Battery & Charging
Your going to remove the complete sensor from the front clip first. Then try to separate the connector. It is held in by a push in trim thing. Using trim removal tool with the slot in it will help While pulling it away from the front clip. Pull on the the left side then right side. Going back and forth. Go easy. The connector is going to be a royal pain in the -beep-
-
My friend installed my battery backwards.
Dean H replied to JohnsterMonster86's topic in Electrical, Battery & Charging
So what you have is the top cable. That is the battery voltage feed from the TIPM- (under hood fuse box). To the starter. The lower cable carries the battery voltage to the alternator from the starter stud. The smaller section is a fusible link. It protects the cable like a fuse does. Use a multimeter and check for battery voltage at the alternator stud. To find out if this cable is a problem. Here is a picture of my 3.6 starter cable on top and alternator cable fusible link below it.
-
Ambient Air Temperature Sensor Code P0070
Dean H replied to MarkyB's topic in Electrical, Battery & Charging
Connector, yes. Easy access - BMC to the right of the glove box.
-
Ambient Air Temperature Sensor Code P0070
Dean H replied to MarkyB's topic in Electrical, Battery & Charging
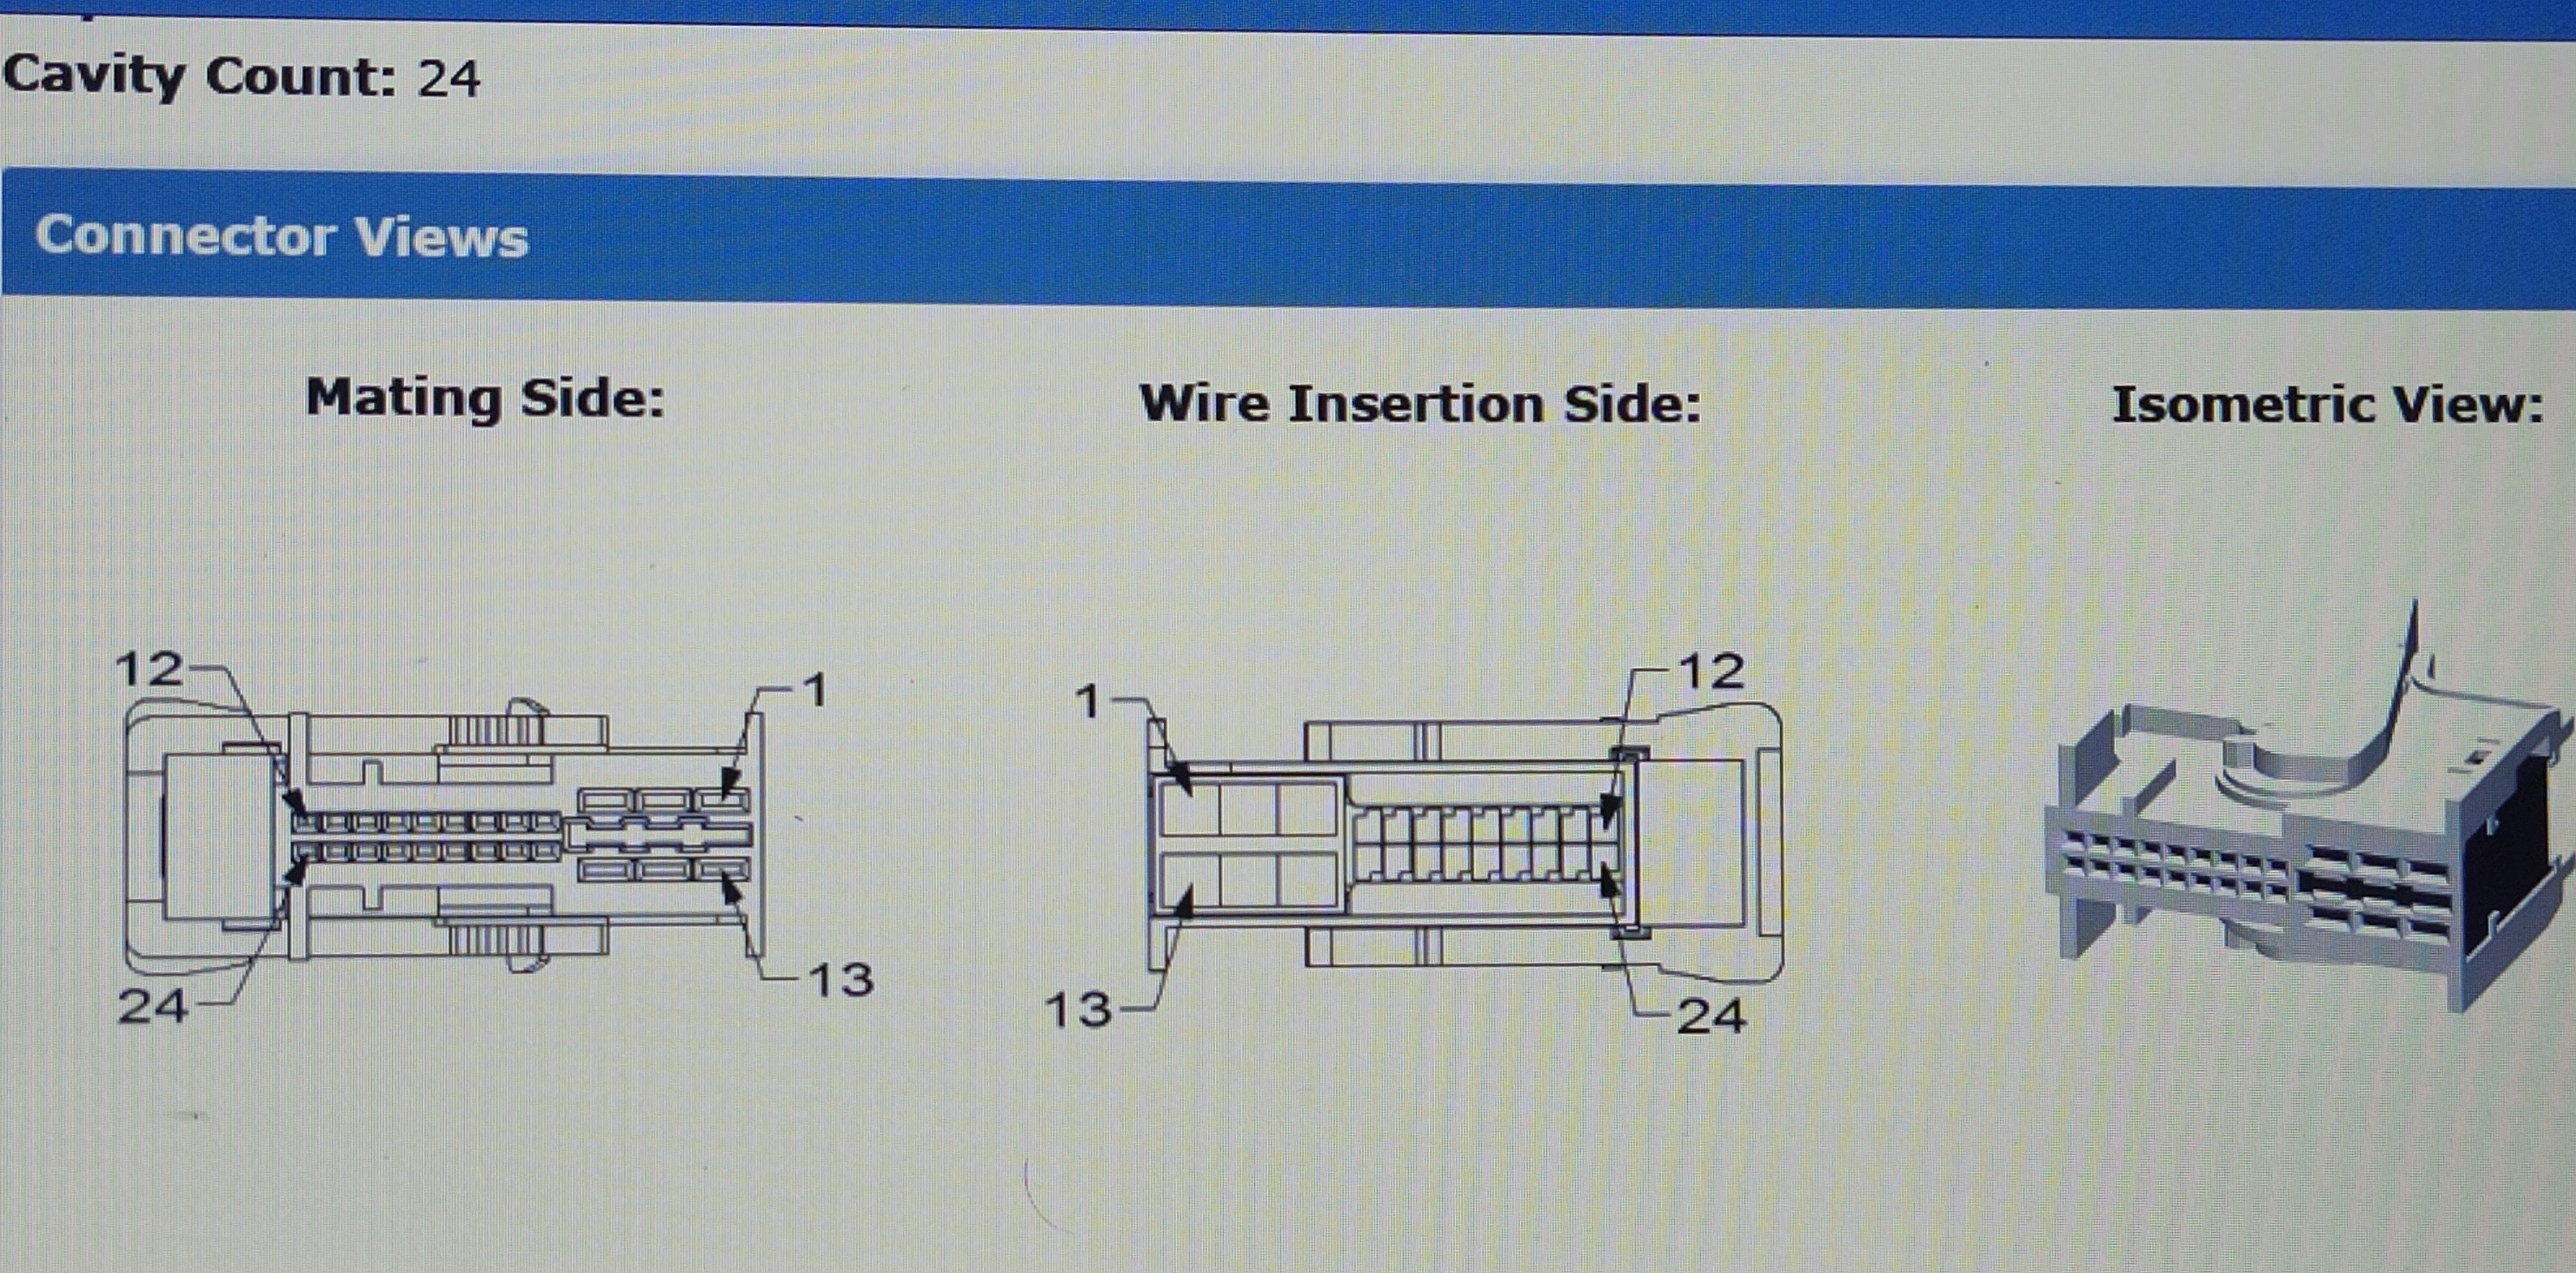
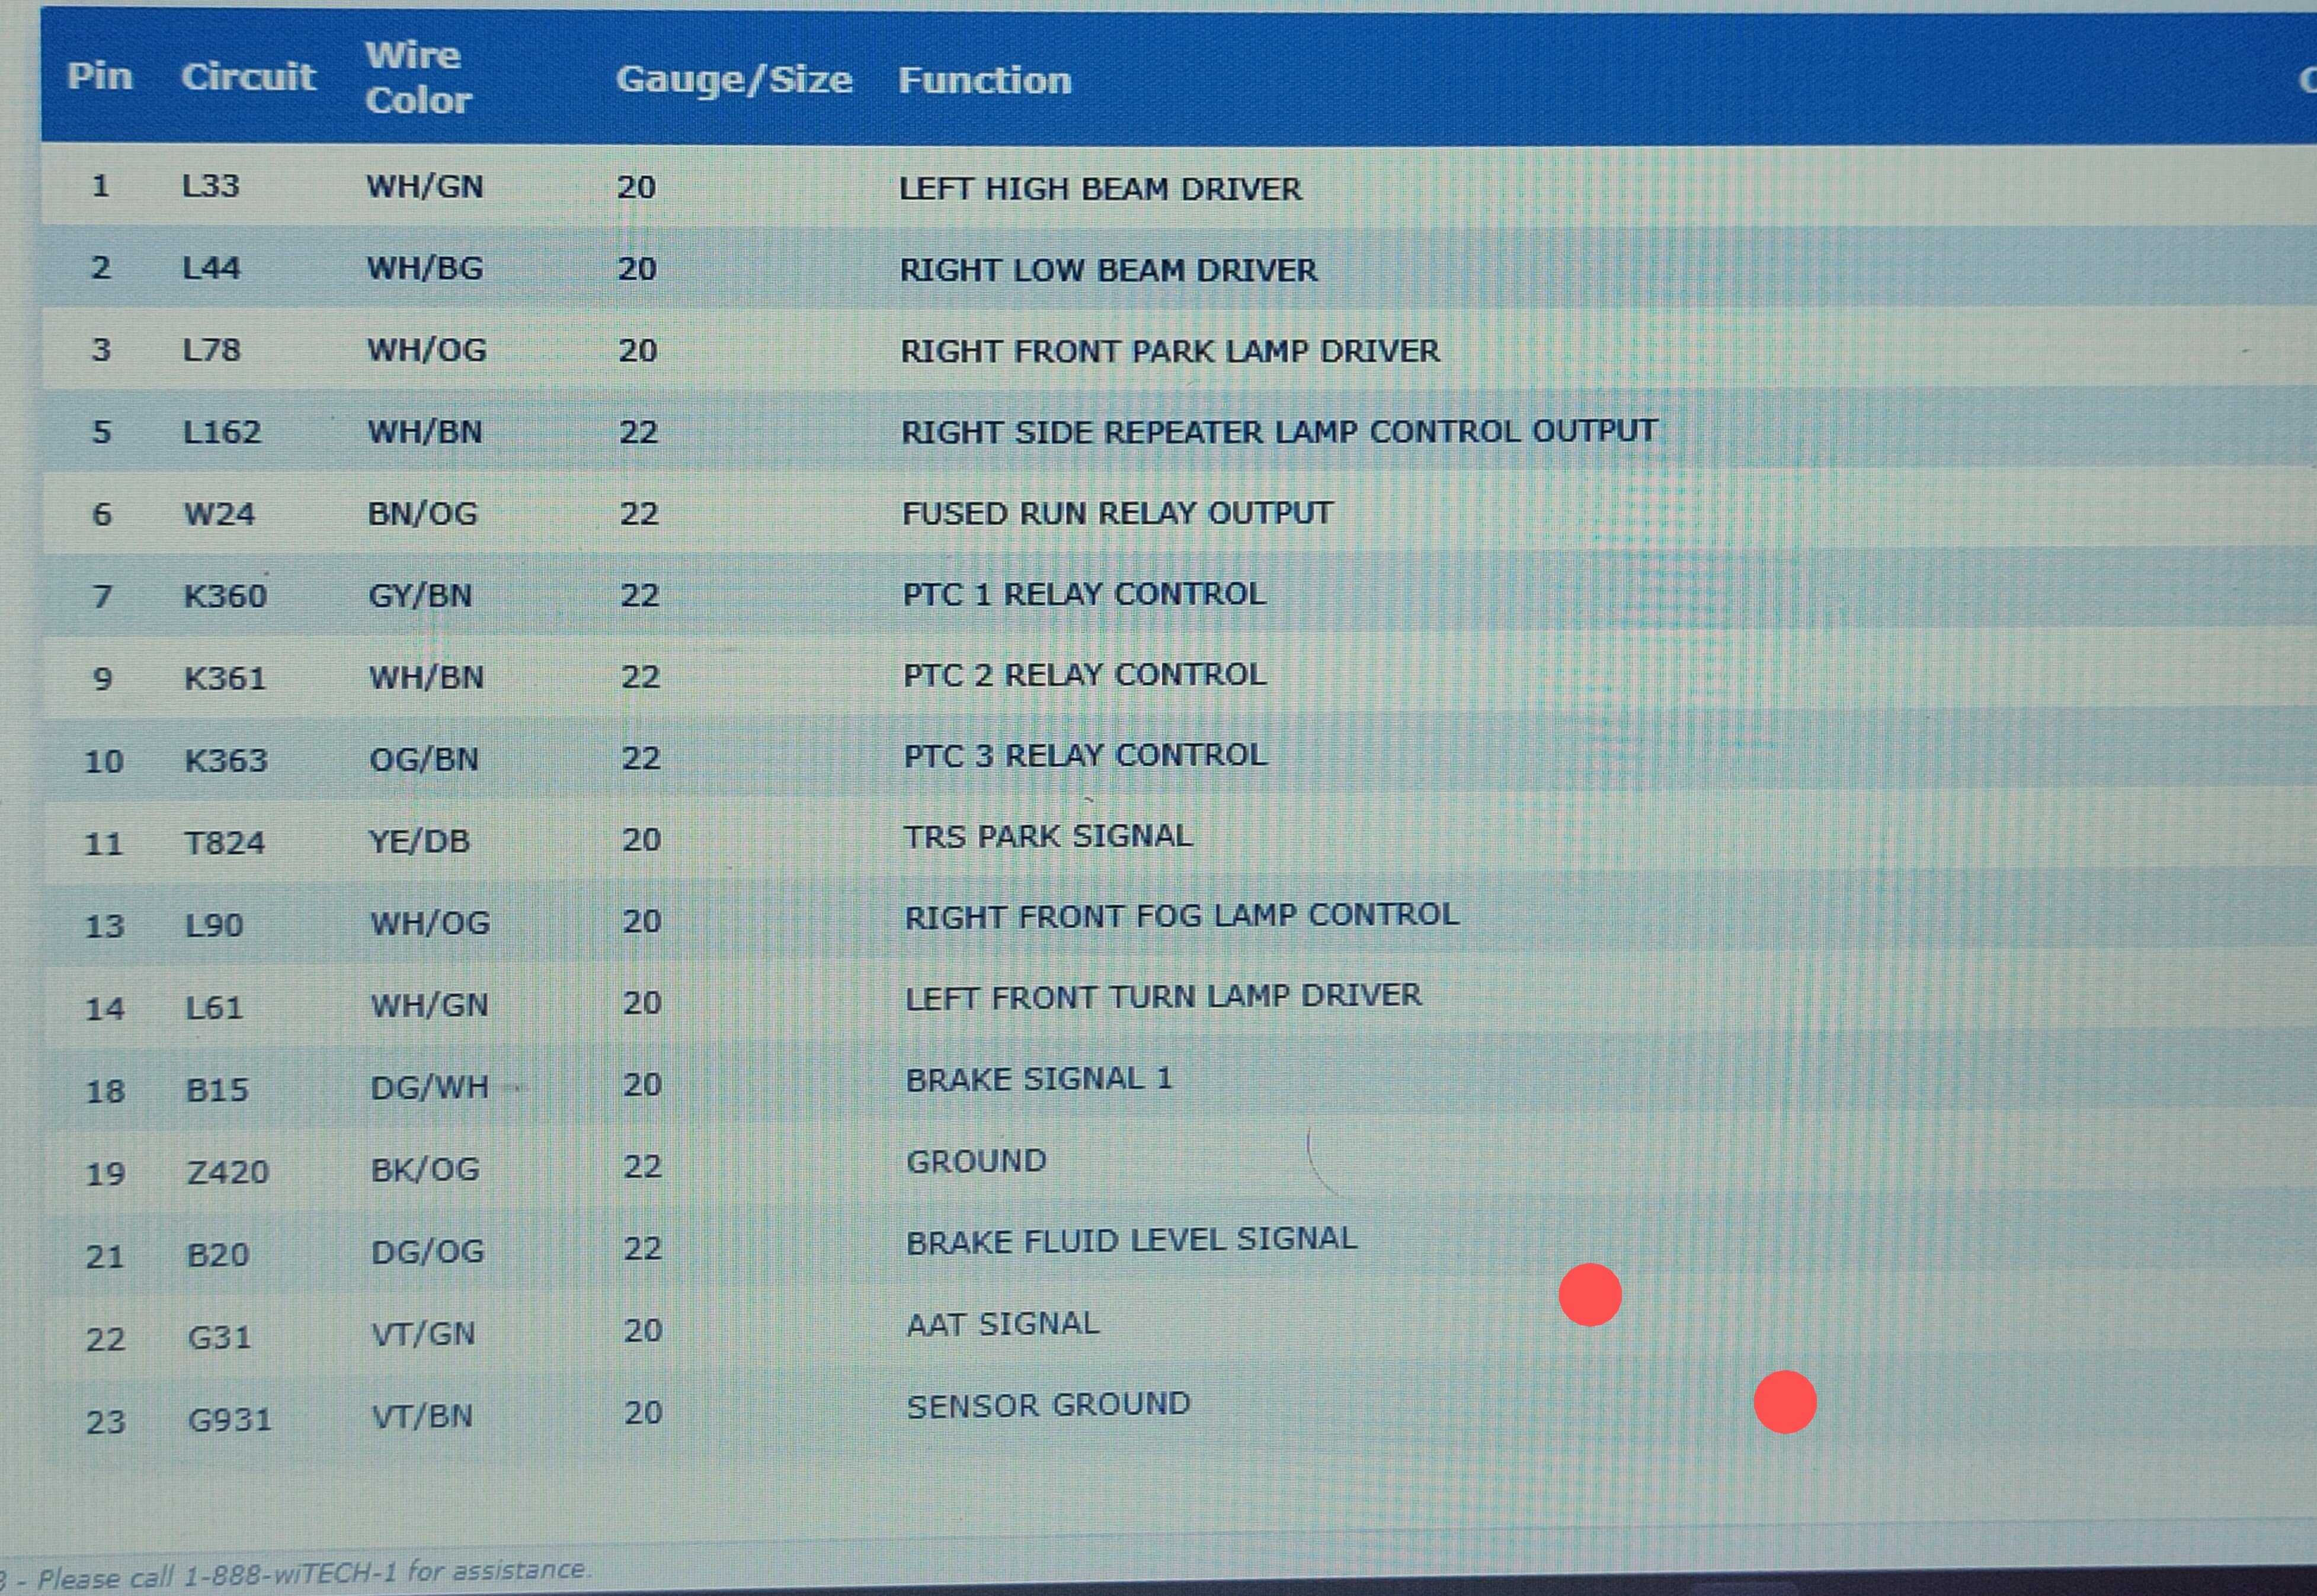
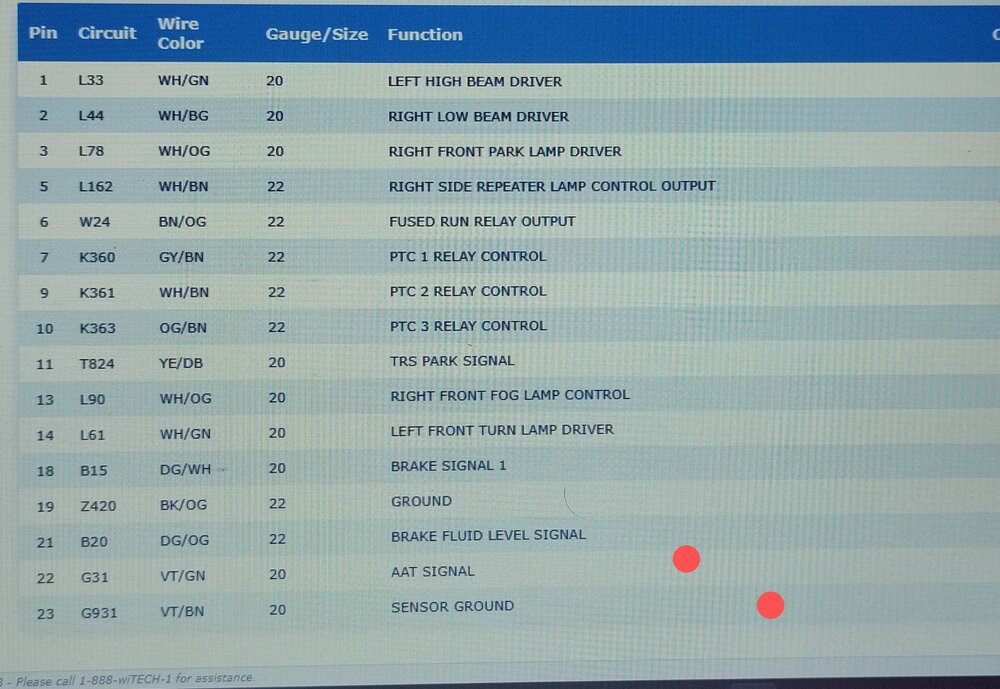
Circuit from front end module connector to BCM. BCM CONNECTOR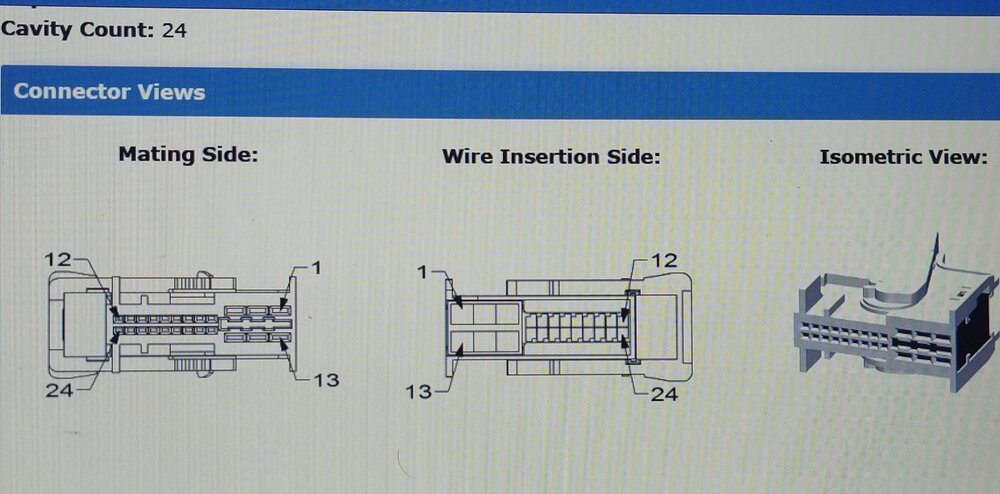

-
Ambient Air Temperature Sensor Code P0070
Dean H replied to MarkyB's topic in Electrical, Battery & Charging
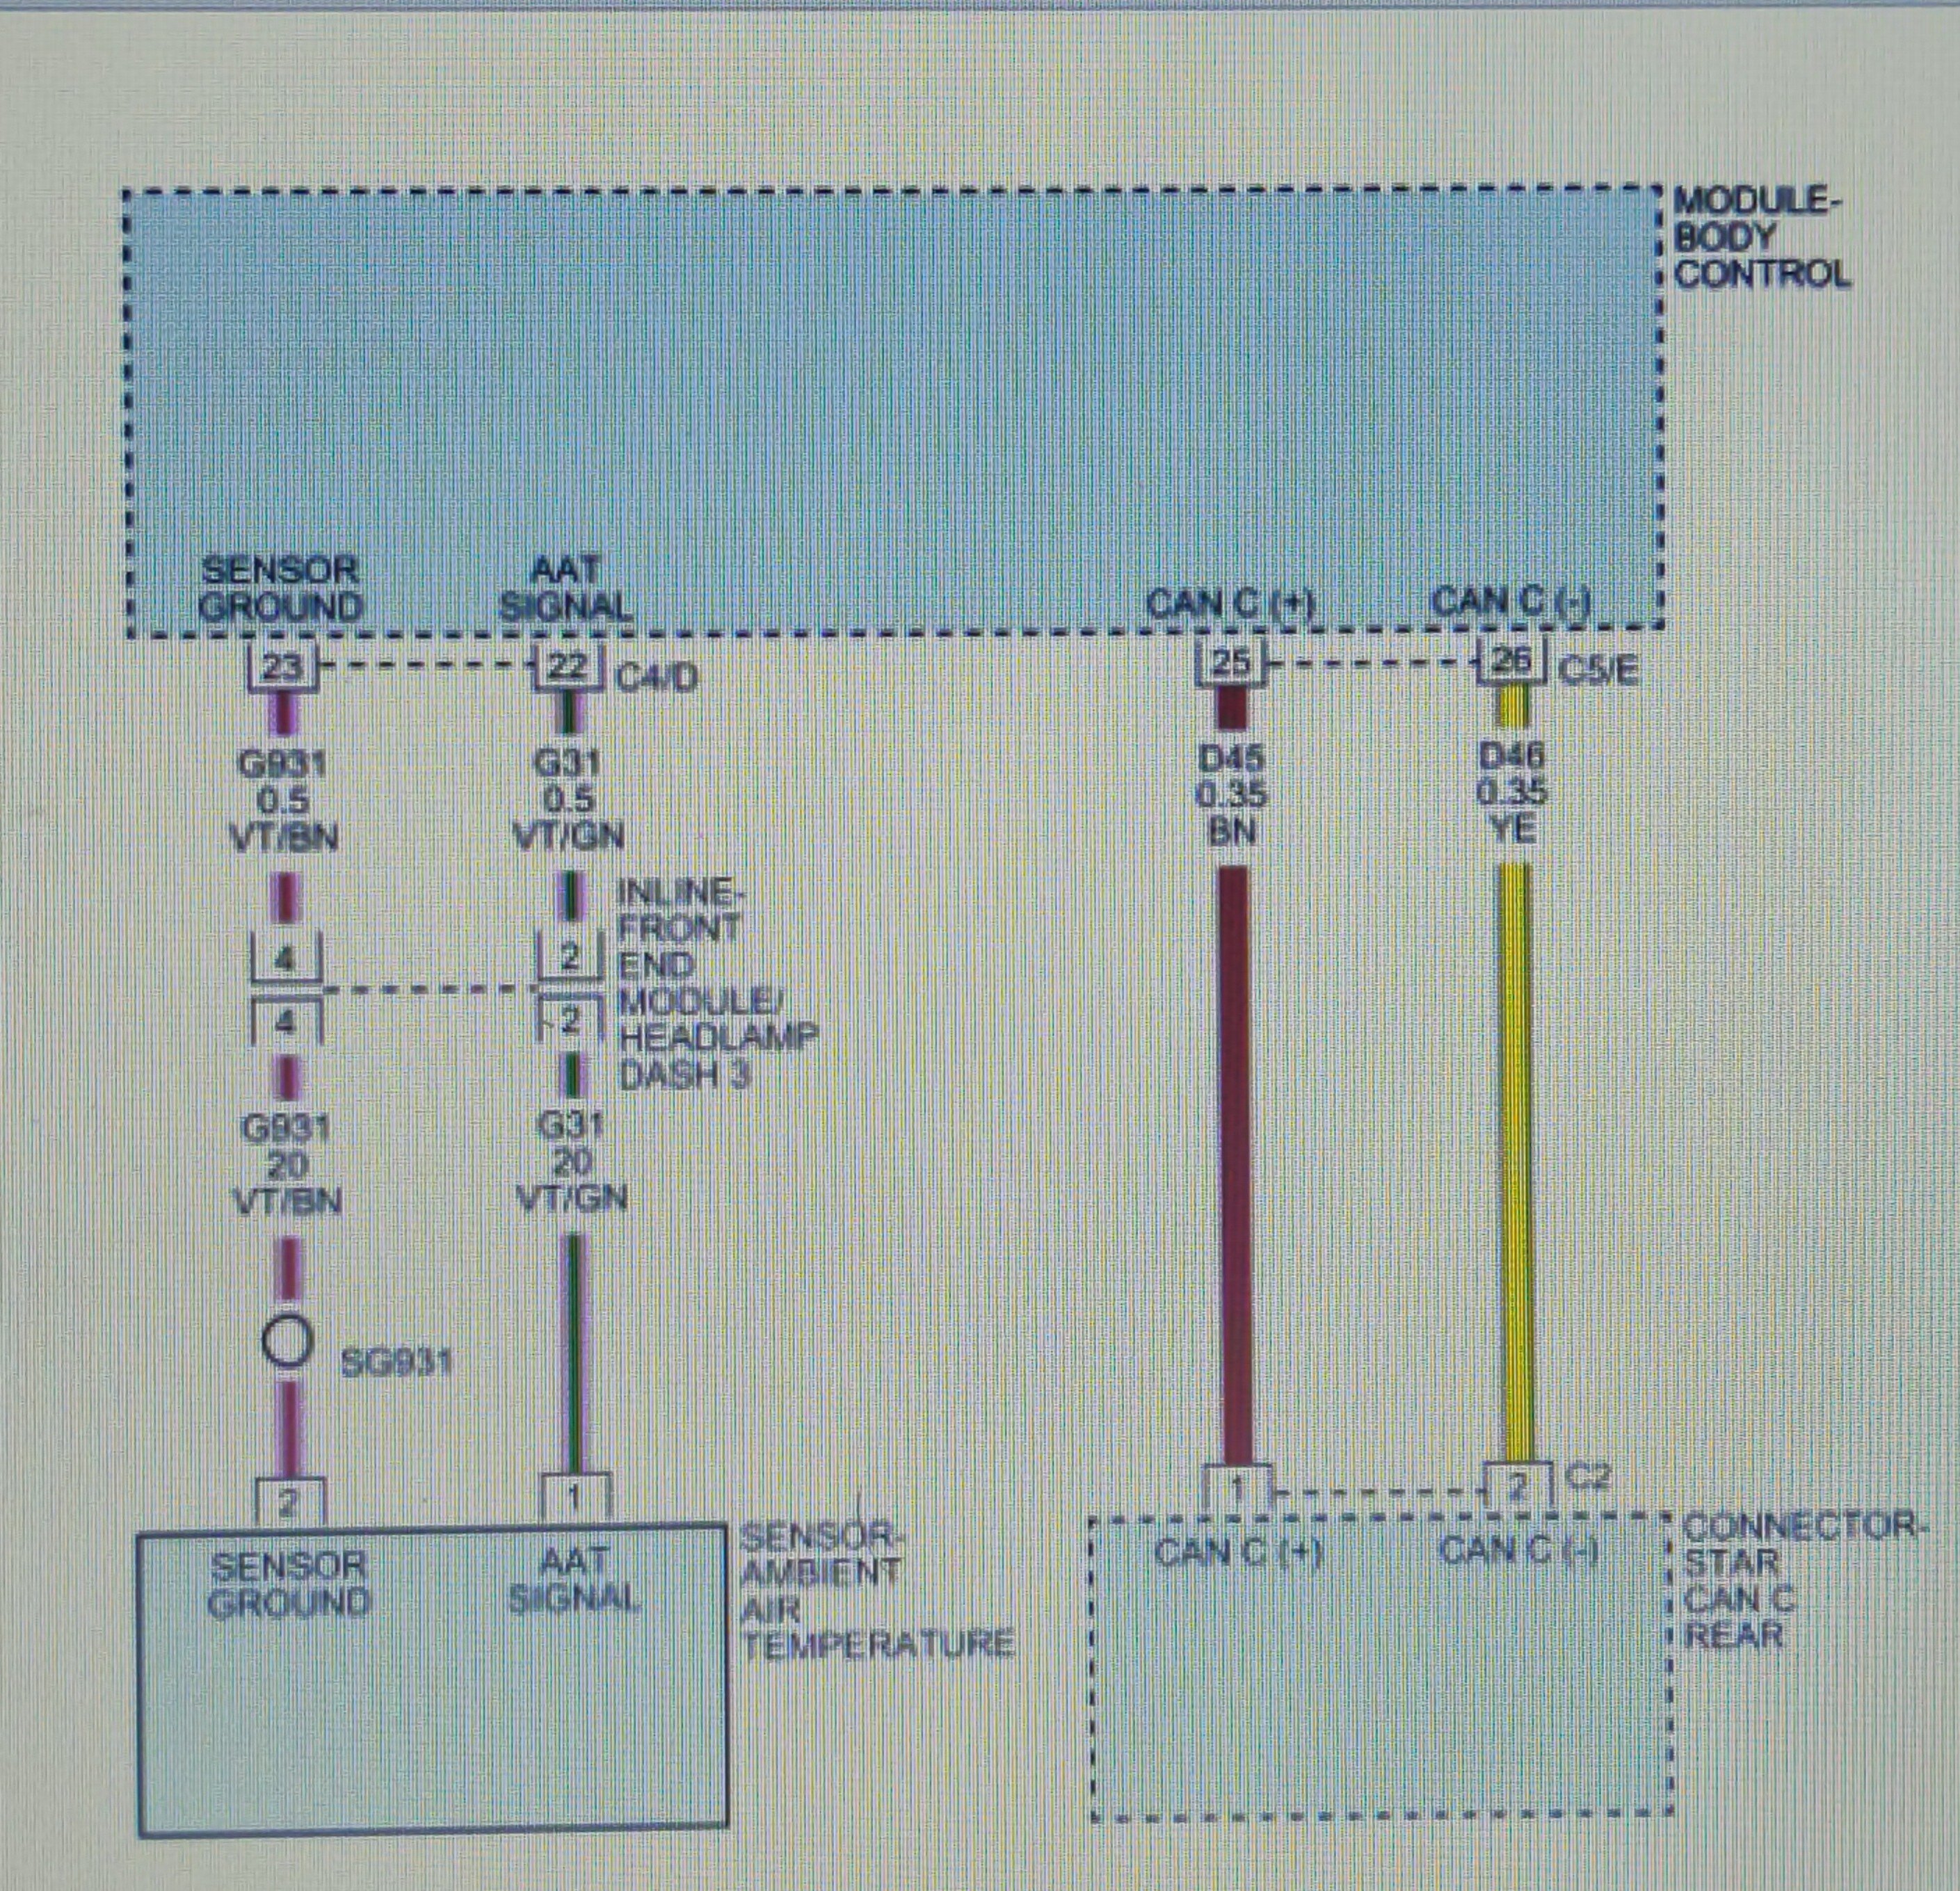
2016 DJ service CD The connector the circuit goes to, is the one at the end of the white line. Inline front end module connector.

-
Alternator, Battery, ETC....HELP PLEASE!!
Dean H replied to Smitty21's topic in Electrical, Battery & Charging
First read this post- https://www.dodgejourneyforum.com/topic/18354-battery-saver-mode/ Start with your battery - Read this post below- https://www.dodgejourneyforum.com/topic/18210-electrical-system-fyi-battery/ After the battery post instructions and results. Then test your alternator. My post's are as simplified as it gets. Simple process of elimination.- 13 replies
-
- 1
-

-
- electronic throttle control
- battery
- (and 1 more)
-
Go read this post and the entire thread of replies - 2013 Dodge Journey SE with 2.4 head gasket replacement https://www.dodgejourneyforum.com/topic/18759-2013-dodge-journey-se-with-24-head-gasket-replacement/
-
Welcome aboard! On the radio touch screen. There is a settings button, where you can change different things on the DJ. EVIC screen located in the center of the instrument cluster. Use the keypad on the left side of the steering wheel. Arrow buttons and the back button. Explore what things you can display on the screen. Read my post below- https://www.dodgejourneyforum.com/topic/18760-journey-maintenance-and-other-fun-facts/
-
If you have this below- EVIC screen located in the center of the instrument cluster. Use the keypad on the left side of the steering wheel. Arrow buttons and the back button. Select coolant temperature. Report back what the temperature is.
-
Thanks for posting this. I missed the part of do not use on aluminum. I'll leave this one for people willing to gamble on it. I aim to give good information, that people can use. Without causing any more issues.
-
No headlights. No turn signals. No wipers
Dean H replied to Jondlc's topic in Electrical, Battery & Charging
The 09-10 Journeys have electrical issues with the TIPM. Start reading here- https://circuitboardmedics.com/2009-2010-dodge-journey-tipm-repair-service/?srsltid=AfmBOorhlOGhfahdG-iW5w0_Imtyz0P4BDVijdUGLSYmnAaXM6SGYv3E -
P0302 Code then....overheating. HELP!
Dean H replied to DodgeBruhBoy's topic in Engine & Transmission
Glad to hear everything is good with your Journey. Post back anytime. Check the coolant level at both places. When you check the coolant level cold, in the radiator. Check the 2 rubber seals on the cap it's self. If not intact. Replace it. The cap pressurizes your cooling system.
-
P0302 Code then....overheating. HELP!
Dean H replied to DodgeBruhBoy's topic in Engine & Transmission
Specifically , You need to check the coolant level cold and after being driven full hot. You need to learn how the coolant level changes. Then check it daily. While your checking your coolant. Check all your fluids and hoses. Know what is going on under your hood. Before you go driving. Go read this post below, I made regarding maintenance. It's up to you monitor this situation. The Journey's engines cannot take too many overheats. Before it's scrap. -
2016 DJ horns wiring diagram.


-
Post a picture of the bracket. It's going to be metric. Find somewhere that sells metric hardware bolts. Start at bolt size M8x1.25. Go to a larger or smaller sized bolt after trying the M8x1.25 bolt. Just thread it in easy to see if it is the right size.
-
You are in luck. You can. You have to remove the engine air filter box and the intake tube from it to the engine. There is one speed sensor on top of the transmission. Hidden by the large bundle of wires. Next to where the transmission cooler lines go into the transmission. The other 2 sensors are on the backside of the transmission. Close together. You have to look over the transmission. Use a good light.
- 1 reply
-
- 1
-
-
What engine do you have?, 🤔🤔🤔
-
Post the codes.
-
P0302 Code then....overheating. HELP!
Dean H replied to DodgeBruhBoy's topic in Engine & Transmission
2016 DJ, Code definition 2.4L engine. P0302-CYLINDER 2 MISFIRE When Monitored and Set Conditions. When Monitored: This diagnostic runs continuously when the following conditions are met: • The engine is running. • The adaptive numerator has been successfully updated. Set Conditions: • The Powertrain Control Module (PCM) detects that the variation in crankshaft speed between each cylinder exceeds a calibrated value, based on engine rpm and load. The Powertrain Control Module (PCM) detects that the variation in crankshaft speed between each cylinder exceeds a calibrated value, based on engine rpm and load Default Actions: • The MIL light will illuminate. POSSIBLE CAUSES FUEL DELIVERY SYSTEM IGNITION COIL, WIRING, OR CONNECTORS ECT SENSOR, WIRING, OR CONNECTORS MAP SENSOR, WIRING, OR CONNECTORS 02 SENSOR, WIRING, OR CONNECTORS ENGINE MECHANICAL SYSTEM POWERTRAIN CONTROL MODULE (PCM) 2. DIAGNOSTIC INSPECTION NOTE: Anything that affects the speed of the crankshaft can cause this DTC to set. NOTE: When a misfire is detected, the PCM will shut down the injector control circuit for the misfiring cylinder. NOTE: Misfire may occur and may not be caused by component failure. Any of the following conditions can cause a misfire: Worn serpentine belt. Misalignment or binding water pump, P/S pump or A/C compressor pulleys. Improper CKP, CMP, MAP, or TPS Sensor mounting. Poor connector/terminal to component connection for CKP sensor, CMP sensor, MAP sensor, TPS sensor, fuel injector, ignition coil, etc. Corroded PCM power or ground circuits. Vacuum leaks. Restriction in the air induction or exhaust system. Internal engine component malfunction. Moisture on ignition system components. Insufficient fuel. Low quality fuel. Manual transmission bog. Towing overload.