Dean H
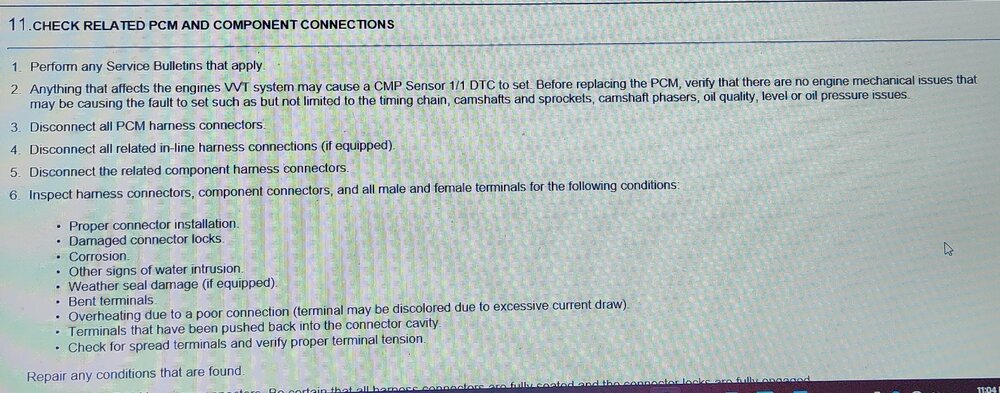
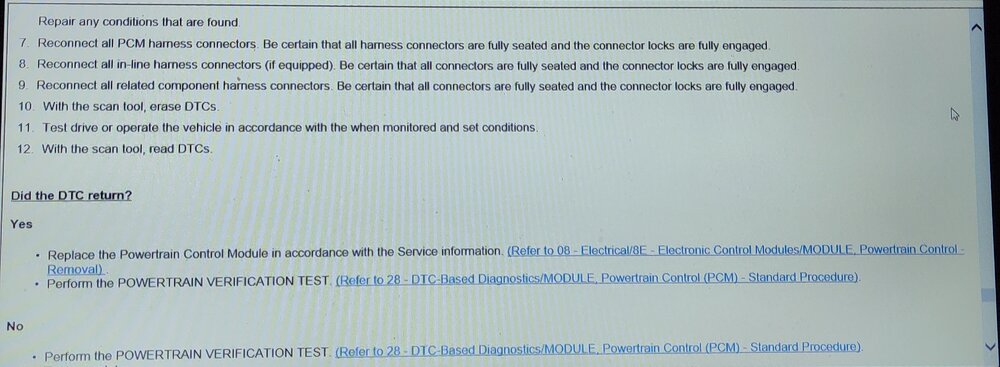
-
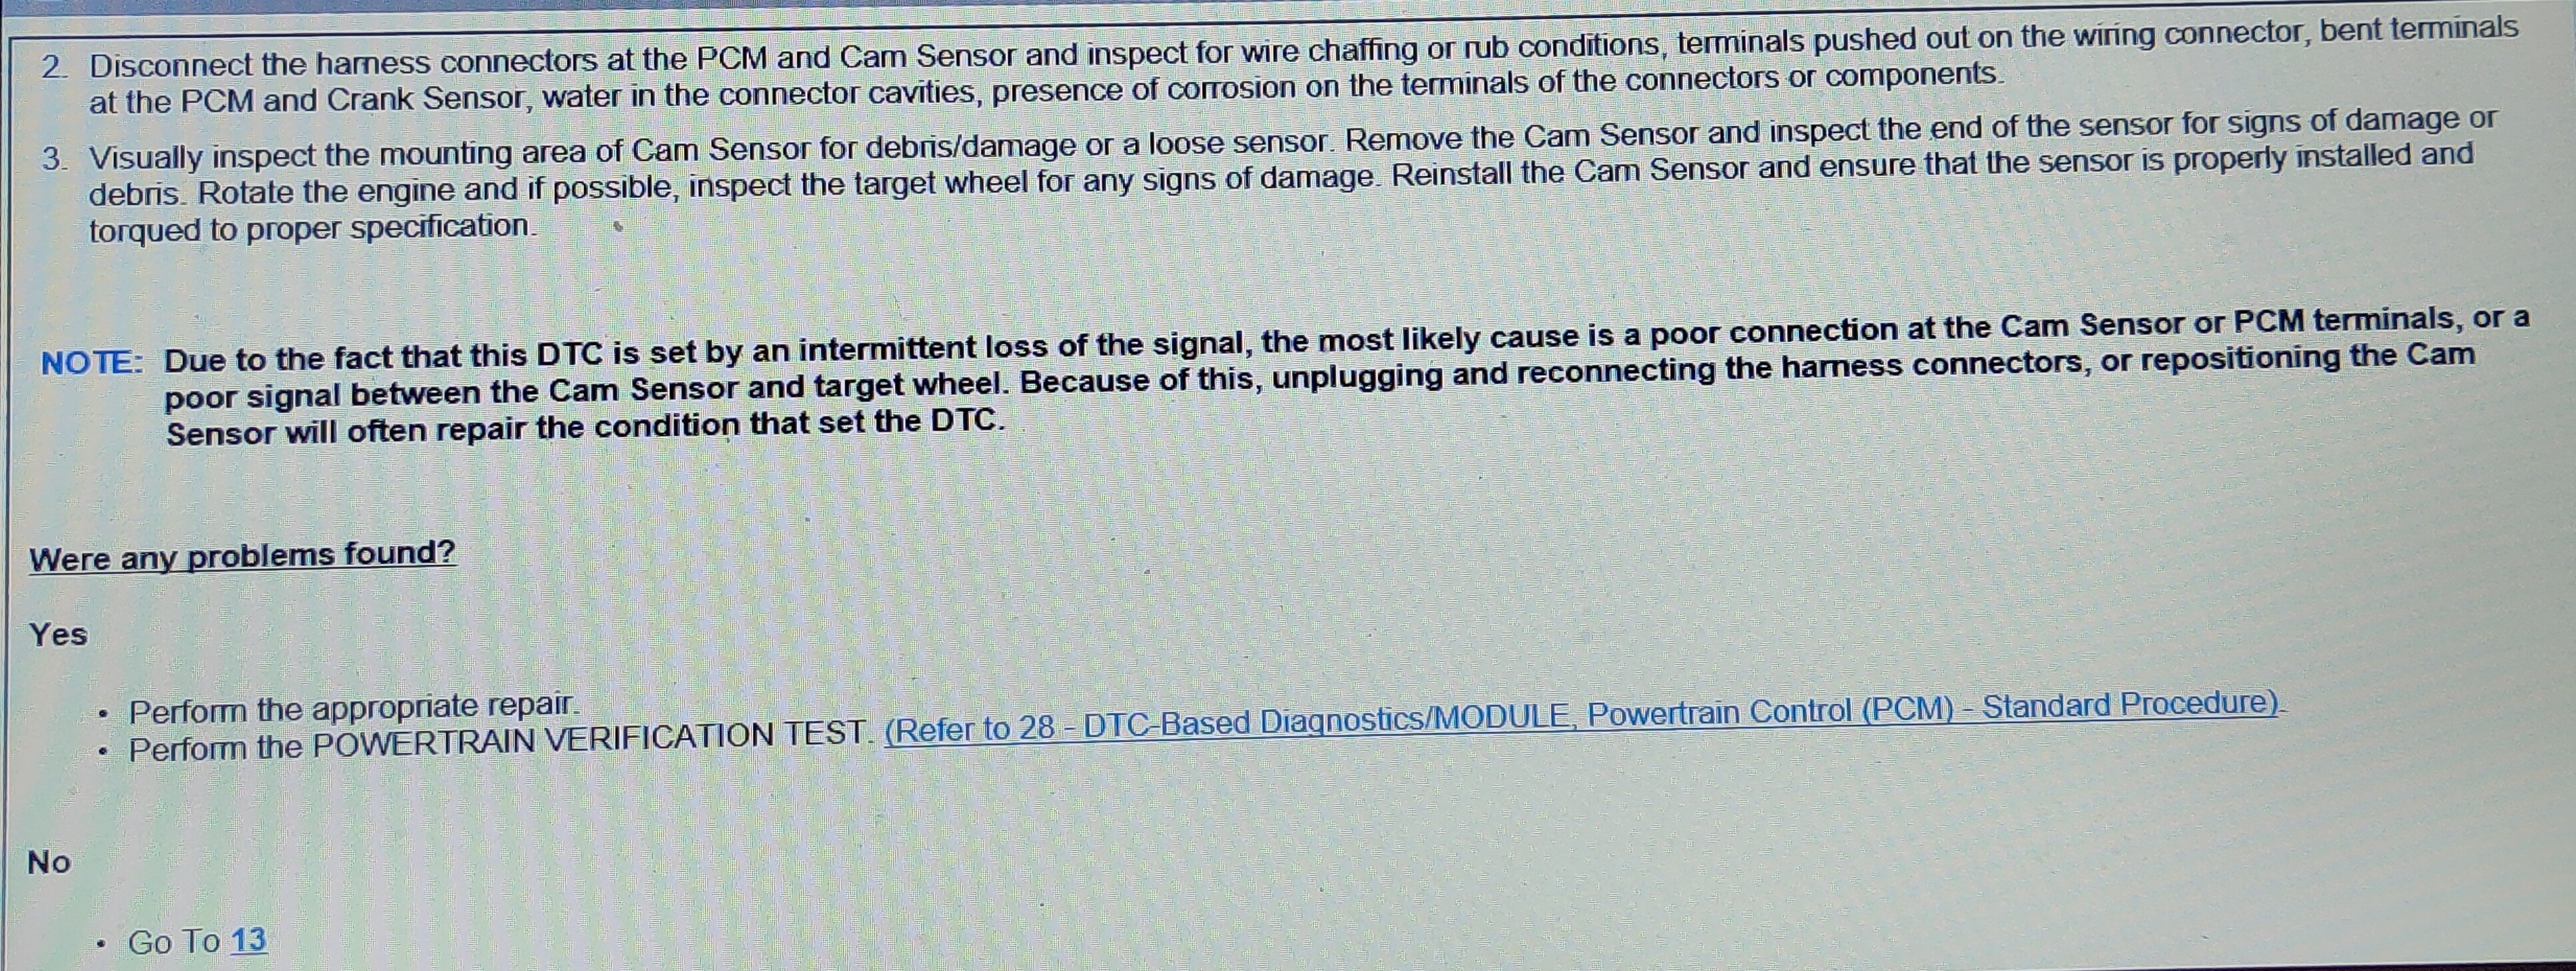
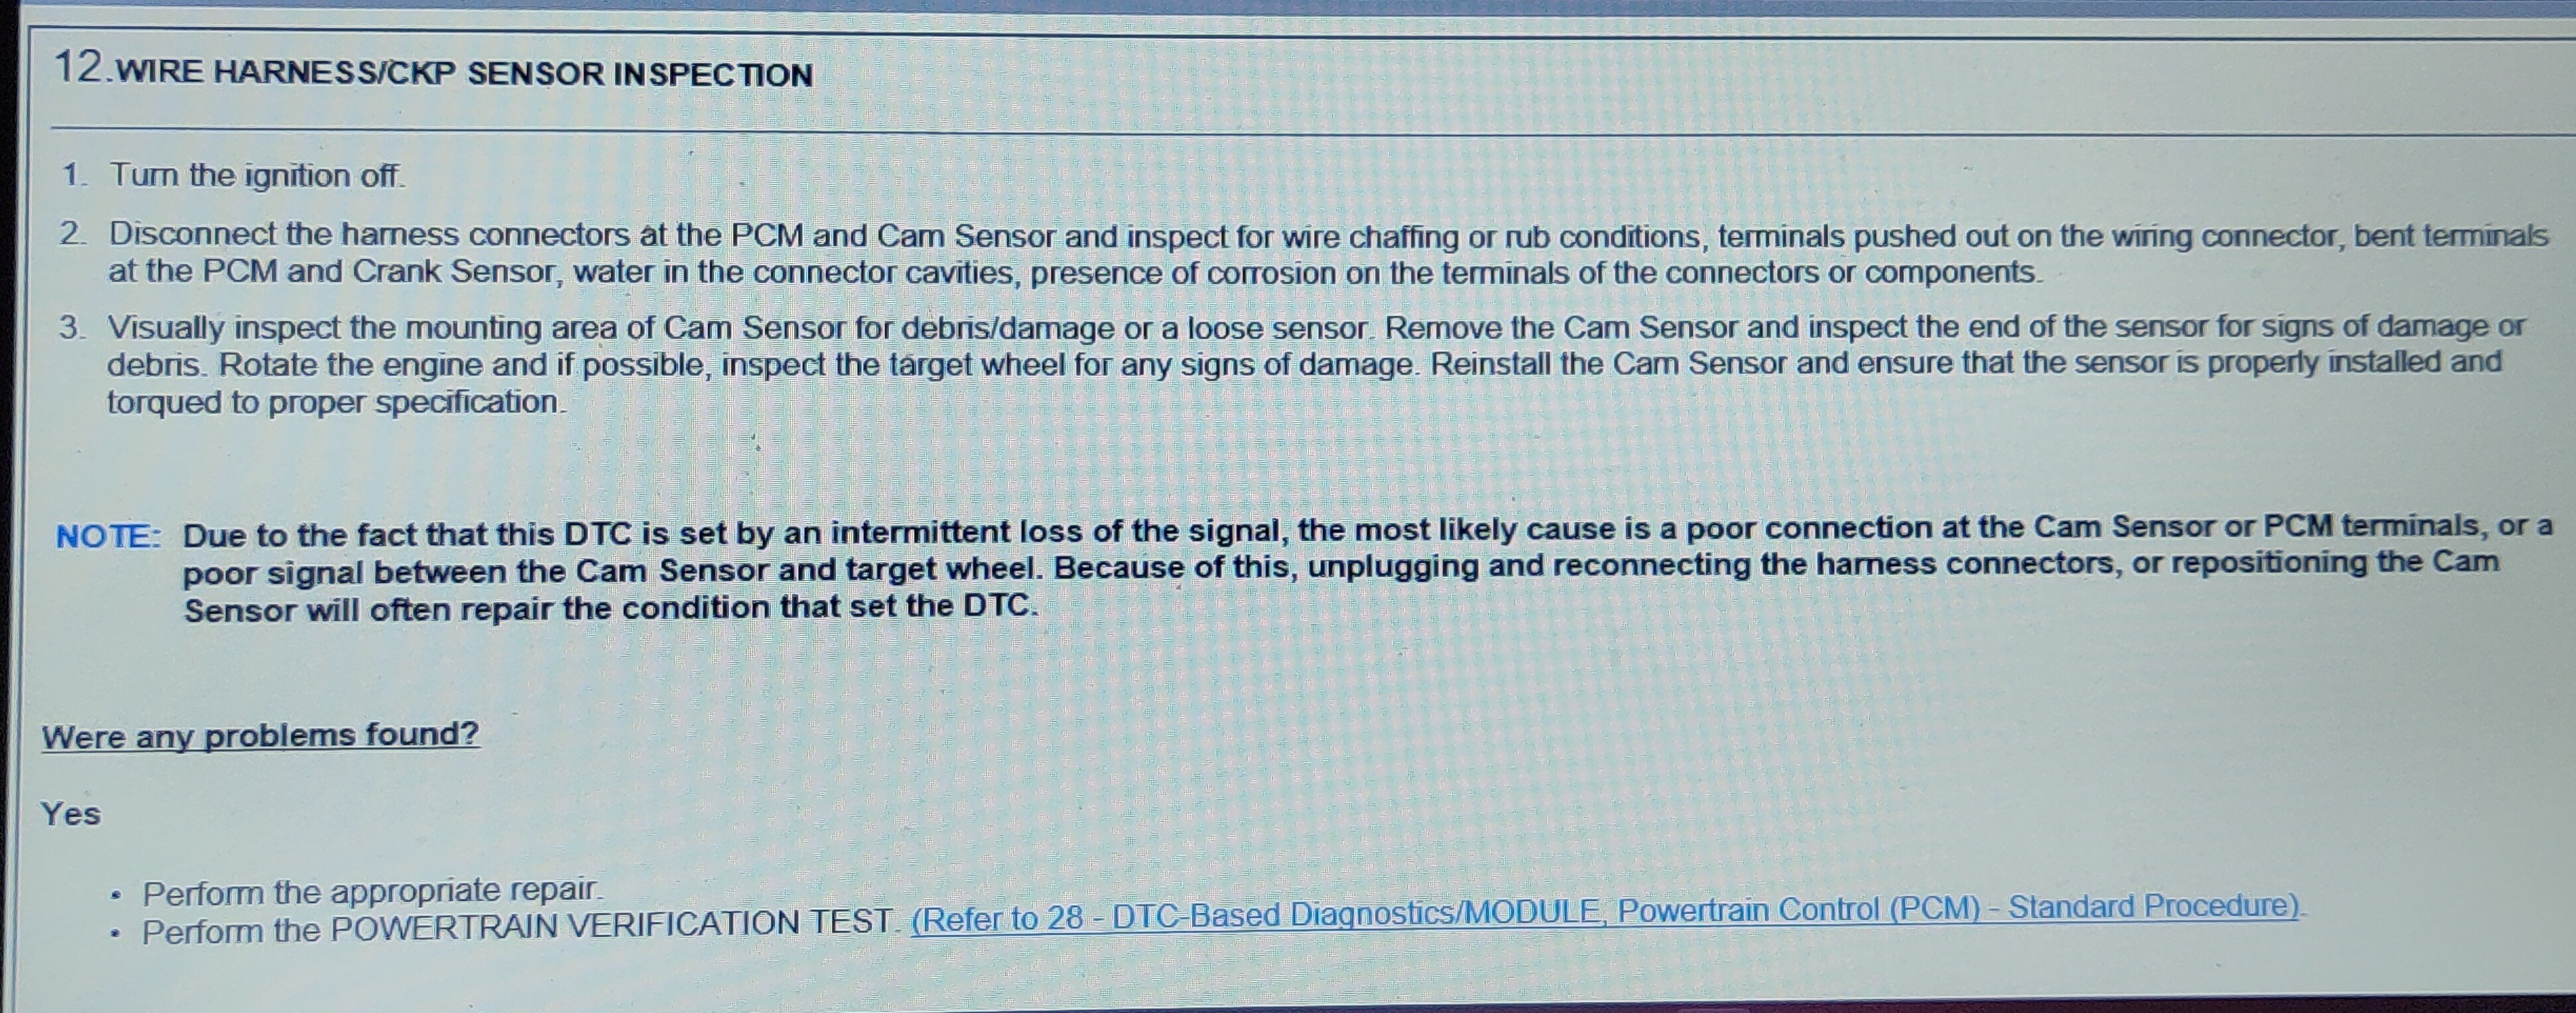
Posts
282 -
Joined
-
Last visited
-
Days Won
31
Content Type
Profiles
Forums
Gallery
Everything posted by Dean H
-
Power Locks Issue
Dean H replied to dbolack's topic in Alarms, Keyless Entry, Key Fobs, Locks & Remote Start
Post all the codes that you have. -
For Journey electrical issues start here. The ground system is a weak point. Doing a ground upgrade is cheap and simple to do. https://www.dodgejourneyforum.com/topic/18374-electrical-system-fyi-ground-system/
-
Electrical System FYI - ground system
Dean H replied to Dean H's topic in Electrical, Battery & Charging
Correction regarding this statement - When, I installed the ground to the instrument panel frame by the cabin air filter. My HVAC switched between defrost and floor outlets immediately. Before, I installed this ground. My HVAC hesitated when switching between defrost and floor outlets. After the ground install, it switched outlets immediately. Dean -
Electrical System FYI - ground system
Dean H replied to Dean H's topic in Electrical, Battery & Charging
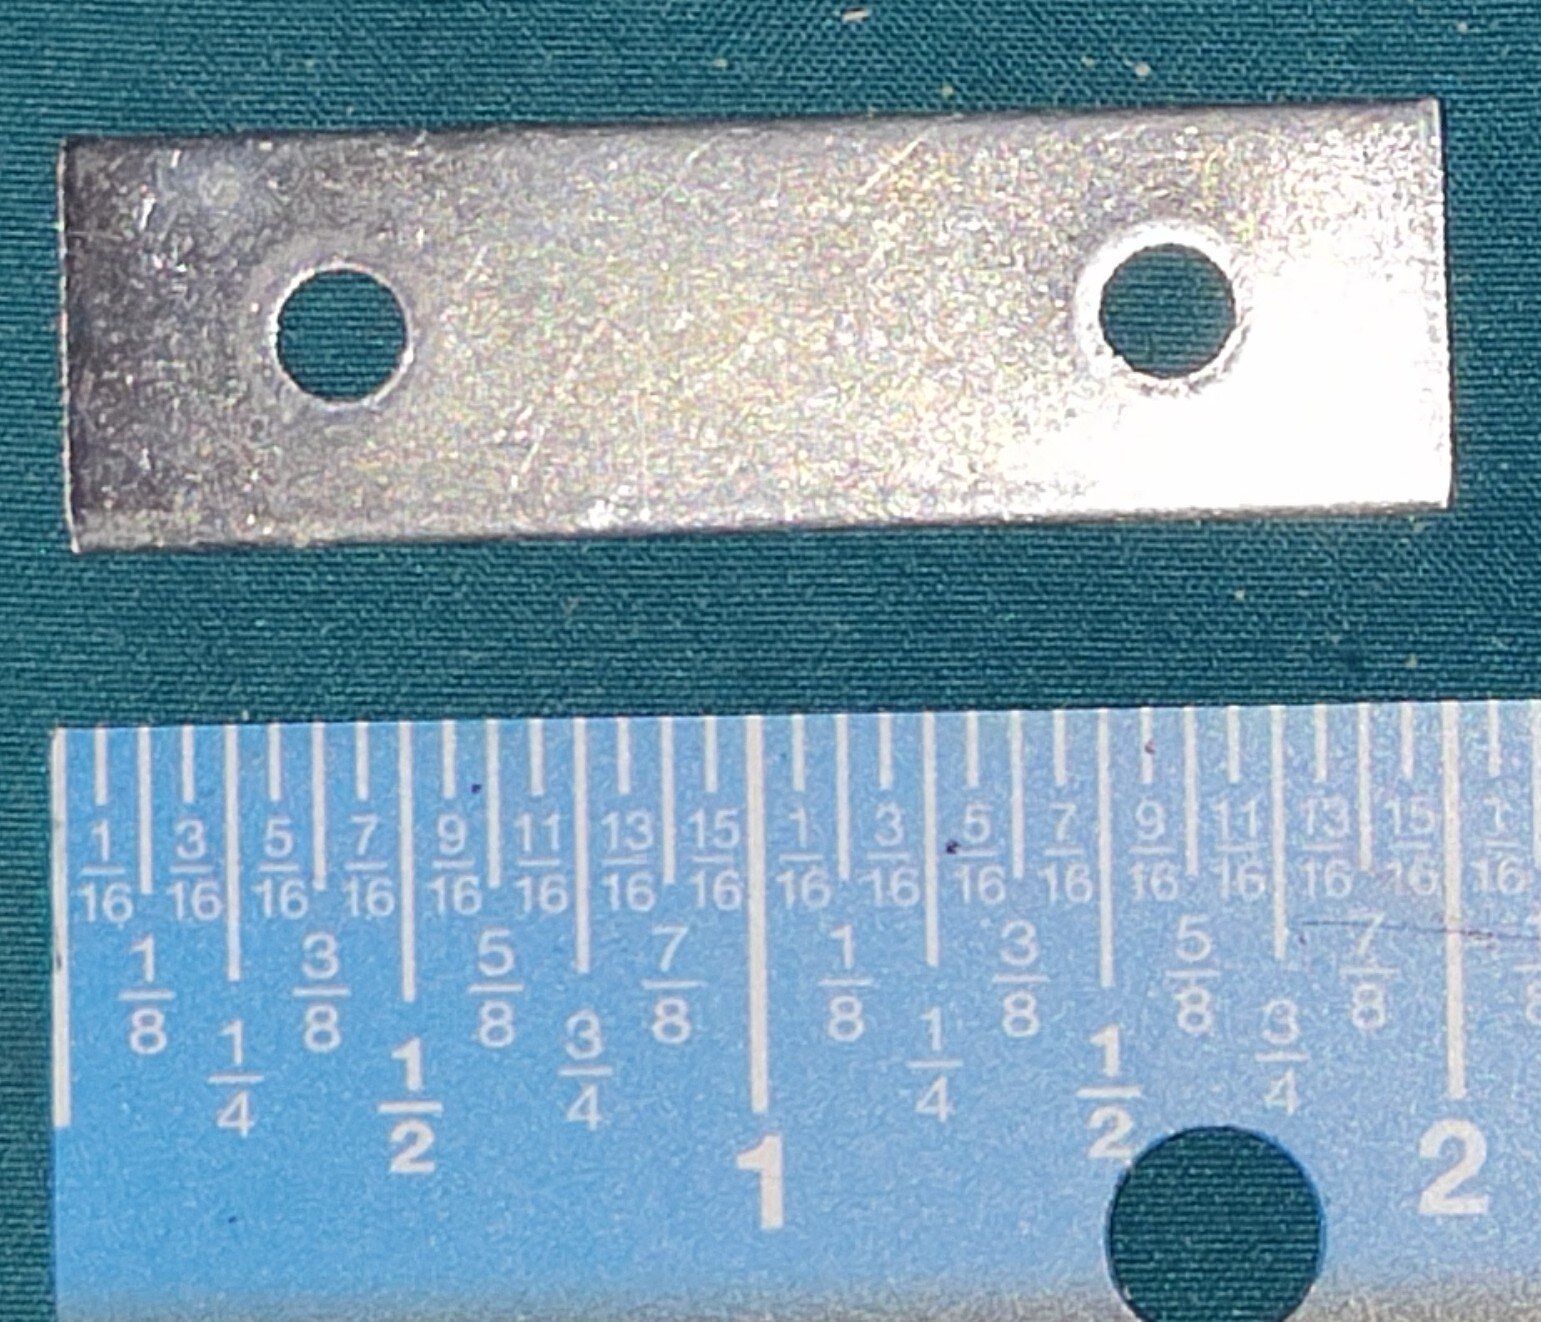
Mending bars https://www.homedepot.com/p/Everbilt-2-in-Zinc-Plated-Mending-Plate-4-Pack-15299/202033910 Cables https://www.ebay.com/str/acdcwireandsupply?mkcid=16&mkevt=1&mkrid=711-127632-2357-0&ssspo=MvbsRTEuTMK&sssrc=3418065&ssuid=i3l8BOlITT-&widget_ver=artemis&media=COPY -
Electrical System FYI - ground system
Dean H replied to Dean H's topic in Electrical, Battery & Charging
Photos - Ground cable to interior . Connect to the engine ground stud. Run it along side the transmission shifter cable going into the interior. Looking from the passenger side. That is the transmission shifter cable entering the vehicle. Passenger kick panel area ground. Easy access and connection. Go up to this ground next to the cabin air filter. Secure with zip ties to stay clear of HVAC wires.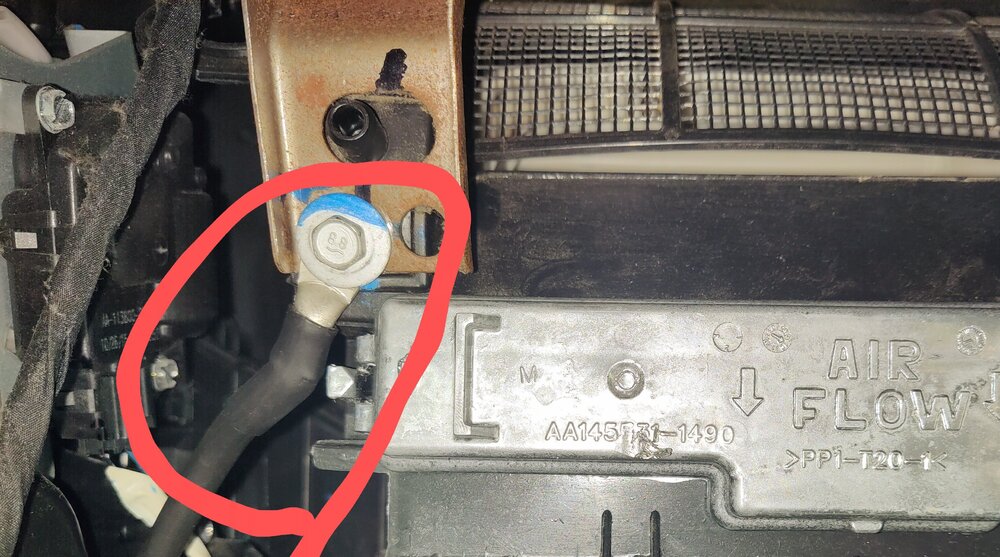


-
Electrical System FYI - ground system
Dean H replied to Dean H's topic in Electrical, Battery & Charging
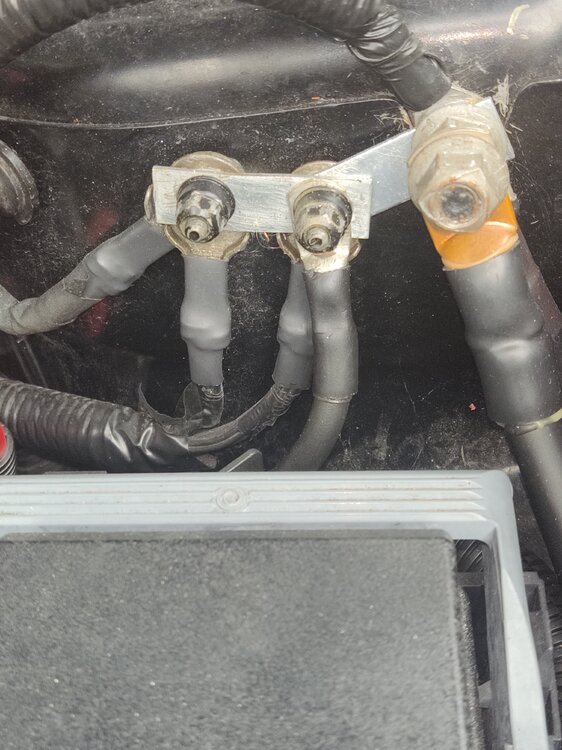
Photos Strut tower ground studs connected by mending bars. Driver's side Passenger strut tower ground studs. 2" mending bar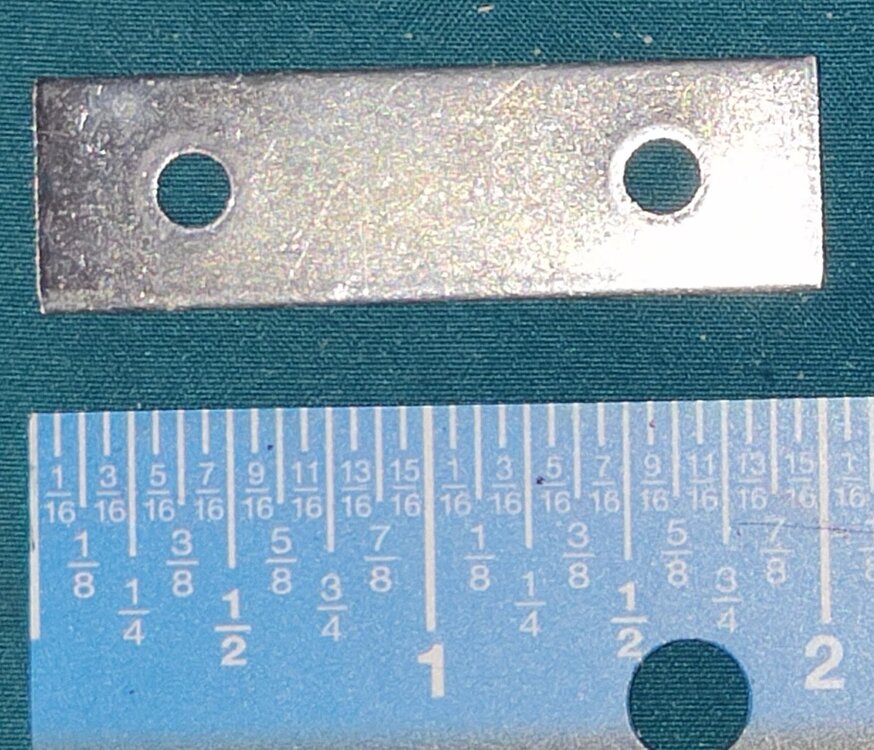

-
Electrical System FYI - ground system
Dean H replied to Dean H's topic in Electrical, Battery & Charging
3.6 engine Stock grounds, driver's side. Engine block ground stud. Under air intake tube. Between large wire loom and vacuum pump. Passenger side engine mount and strut tower grounds. Run 4 gauge cable from points in boxes.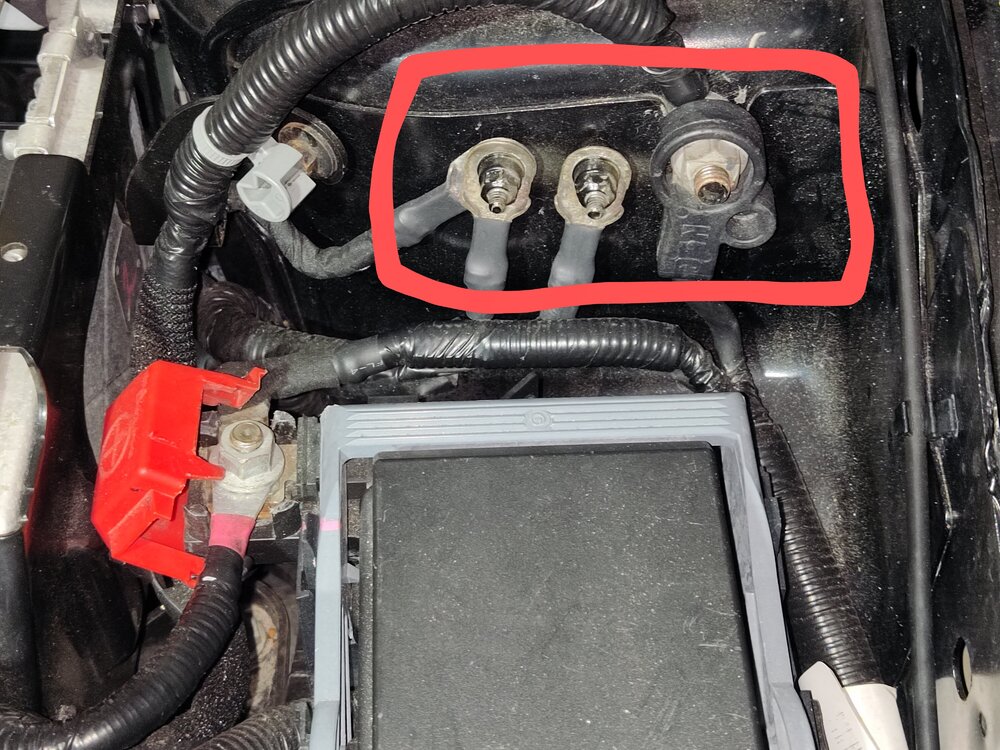


-
Electrical issues? Straight up folks here is the deal. The Journey has a weak electrical system. Dodge made it that way. Most Dodge dealerships don't know what to do with it either. I have identified a weak point, that can be corrected very easily. Drum roll please.......... Upgrade your electrical ground system. Yes, that simple. Read to the end. A 12-volt automotive circuit consists of a power wire to the load (lights, motor etc.), and the ground wire. The ground wire is a return path to the negative battery terminal. The negative battery cable connects to the ground stud located on the drivers strut tower. From the ground stud, a cable connects to the engine block. From the engine block, wires, straps or cables ground to the chassis. Inside the vehicle all electrical circuits are connected and grounded to the vehicle chassis. The metal chassis is the ground return path to the negative battery terminal. Weak grounds that are corroded or loose. Will cause all kinds of strange electrical problems. Cleaning all grounds first is important. To prevent misdiagnosing and replacing parts that are good. This is why, we keep telling people check and clean your connections and grounds. On the Journey the ground system needs a few upgrades to be considered reliable. Dodge cut costs on the electrical system battery cables. They used 4-gauge (AWG). Should have been 2-gauge (AWG). Better engine block to chassis grounds is needed. So, my plan is to connect as many grounds as possible by cable to the negative battery terminal. 1) Battery ground stud to engine block ground stud. Adkd a 2 gauge Cable. Leave the stock ground cable alone. 2) Passenger engine mount. 4-gauge cable to passenger strut tower ground stud. 3) Passenger strut tower ground studs. Connect them together with wire or use a 2 " mending plate modified to fit. 4) Drivers strut tower. Connect the 2 smaller ground studs together. Then connect them to the large battery ground stud. Use wire or 2" mending plate modified to fit. The 2-gauge cable from the battery ground stud to the engine block stud. The starter and alternator ground through the engine block. This upgrade is very important to starting and charging of the vehicle. The engine block is an important part of the ground system. Parts needed -2 gauge (AWG) cable black, 10 ft long with 3 /8" hole lug ends. The 4-gauge cable ground from the passenger engine mount to the strut tower ground. Ties that side of the vehicle in to the ground system. Parts needed -4 gauge (AWG) black, 3 ft long with 5 /16" lug ends. Connecting the strut tower grounds together completes the direct connection to the battery negative terminal. Parts needed- Wire or 2" mending plates. Drill out the holes until it fits. An additional ground that takes some work,is to run a 4-gauge cable from the engine block stud into the interior. Connecting to the bare metal of the Instrument panel frame. I ran this ground cable right along with the transmission shifter cable into the vehicle. The instrument panel frame has the grounds for 90% of the electronic modules on the Journey directly connected to it. These modules need the best direct ground possible. The HVAC module is one of them. This one needs the best ground possible. Get these upgrades done first. Then see what is happening and proceed on to troubleshooting and testing components. I have been running this basic ground upgrade for a year now. When, I installed the ground to the instrument panel frame by the cabin air filter. My HVAC switched between defrost and floor outlets immediately. Studying the improvement of the HVAC turning on by itself. Photos are in the next post. Where to buy parts in another post. Dean
-
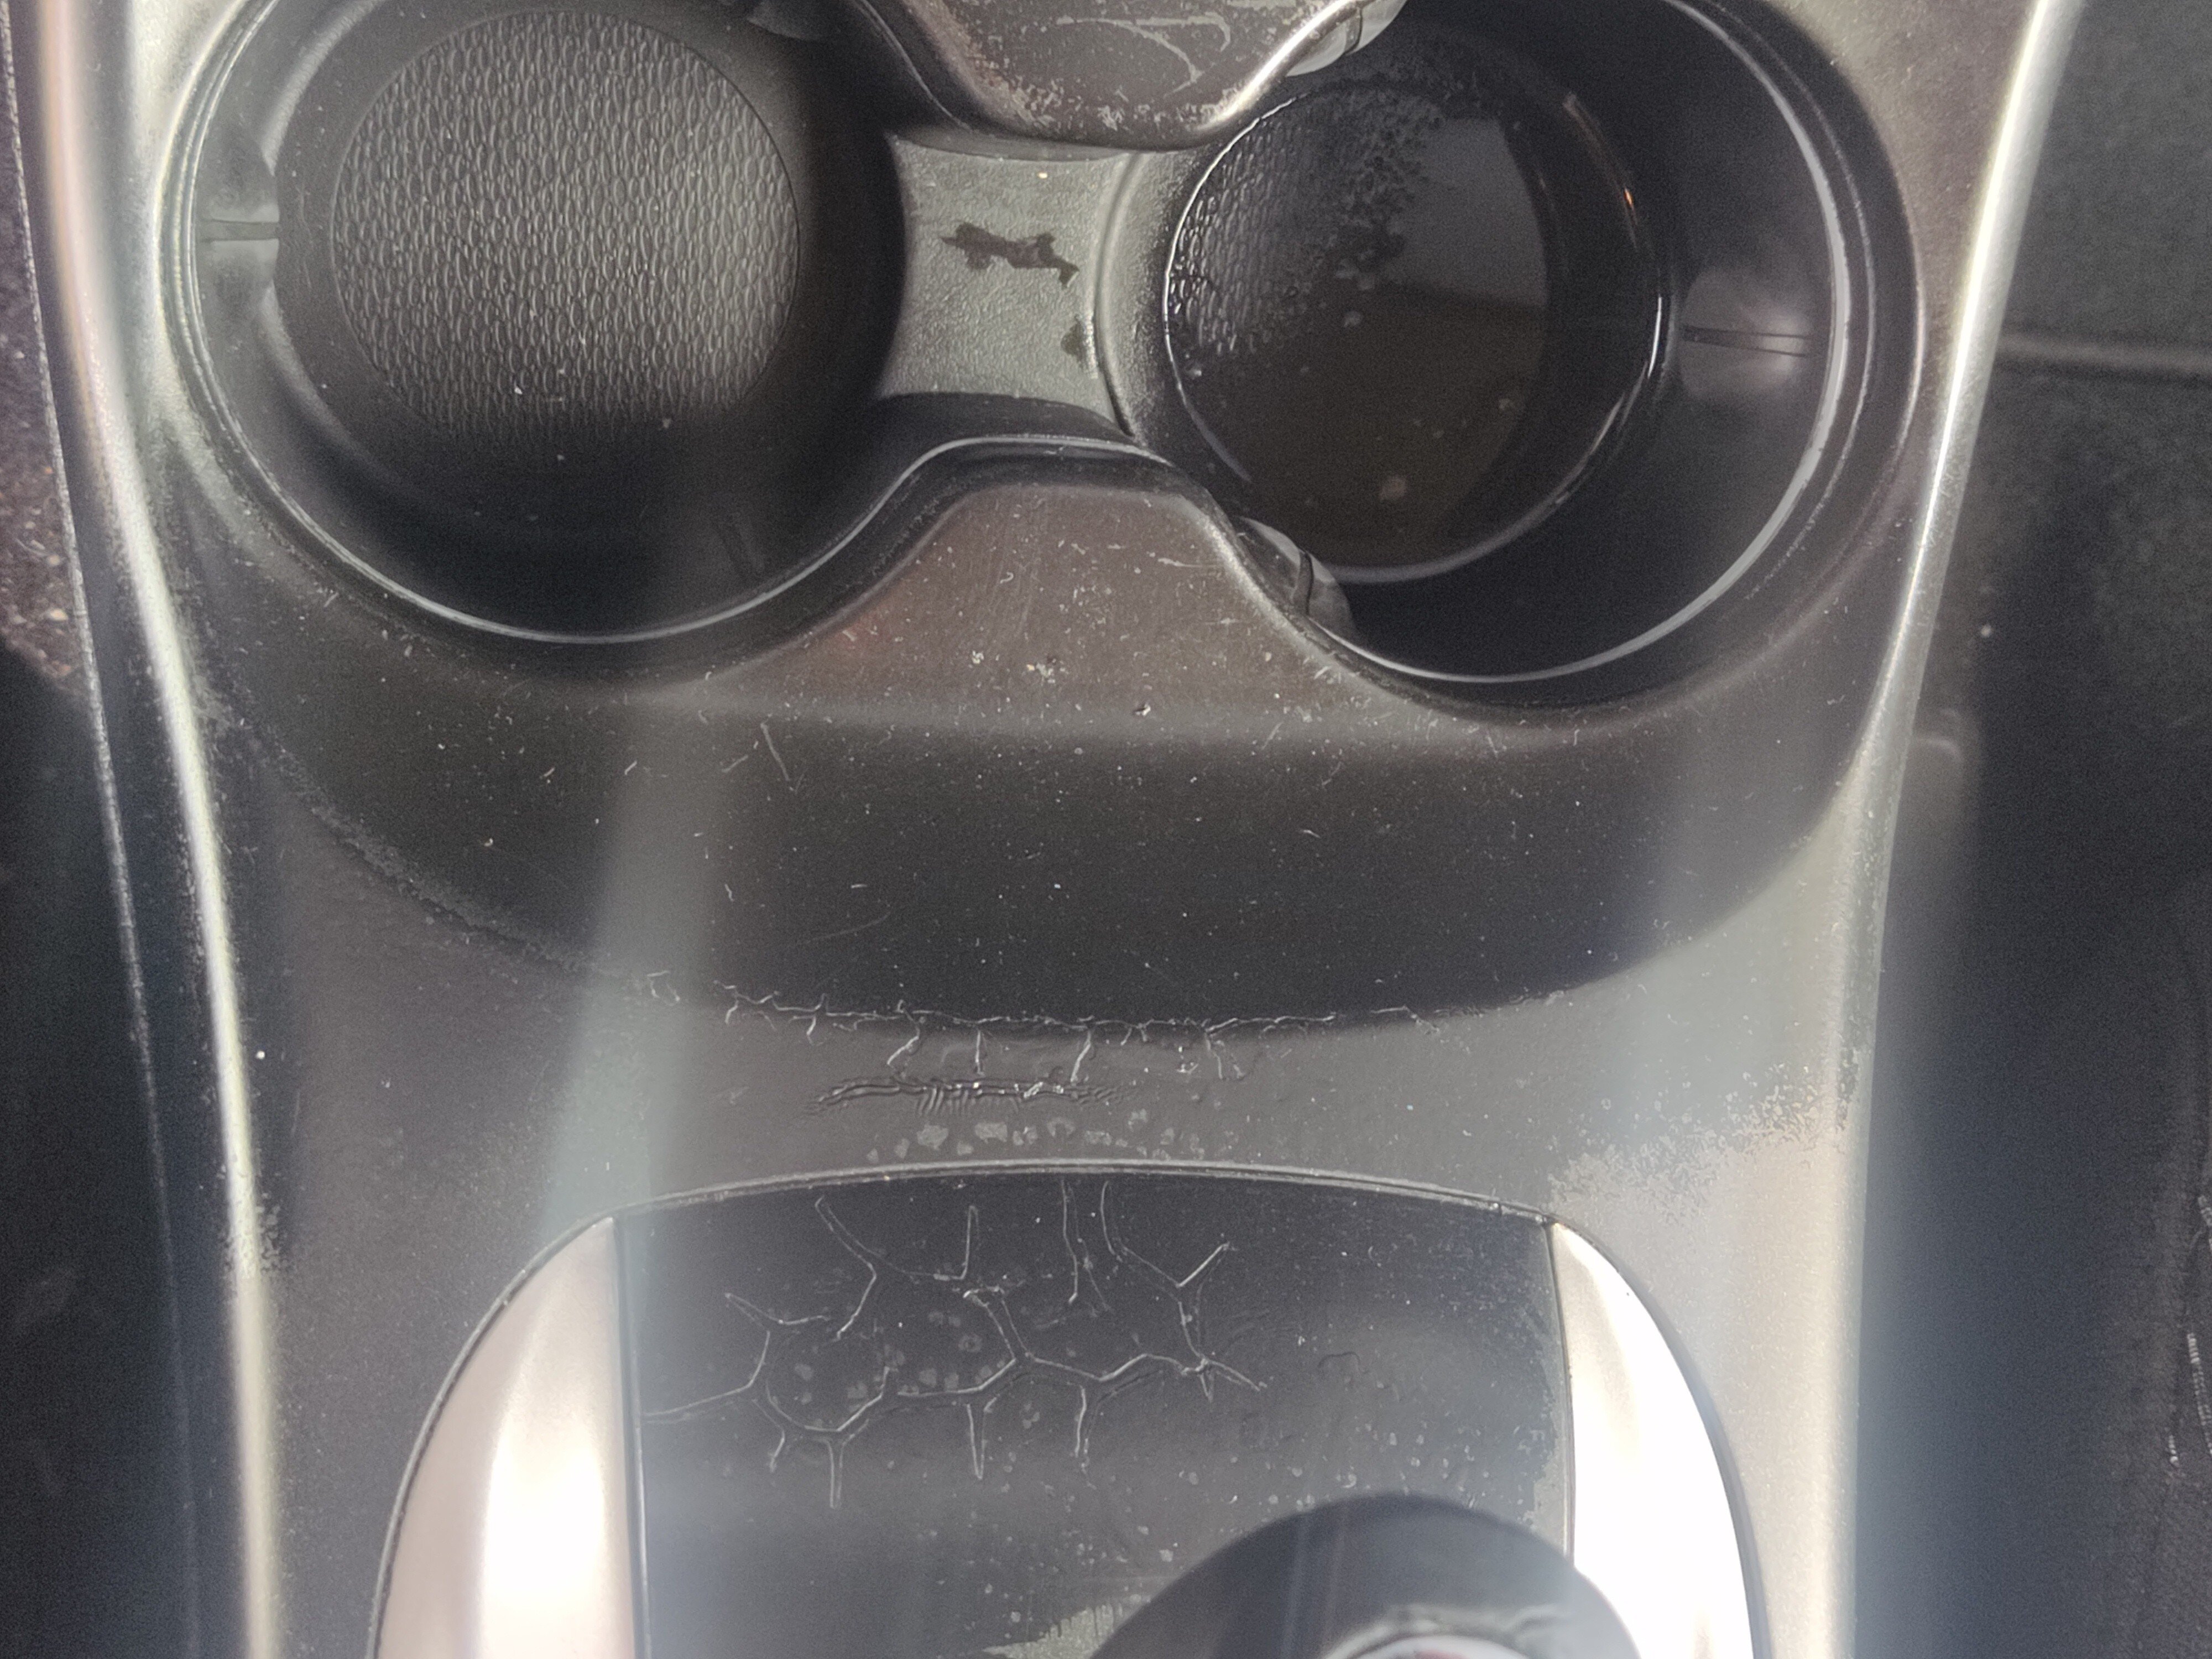
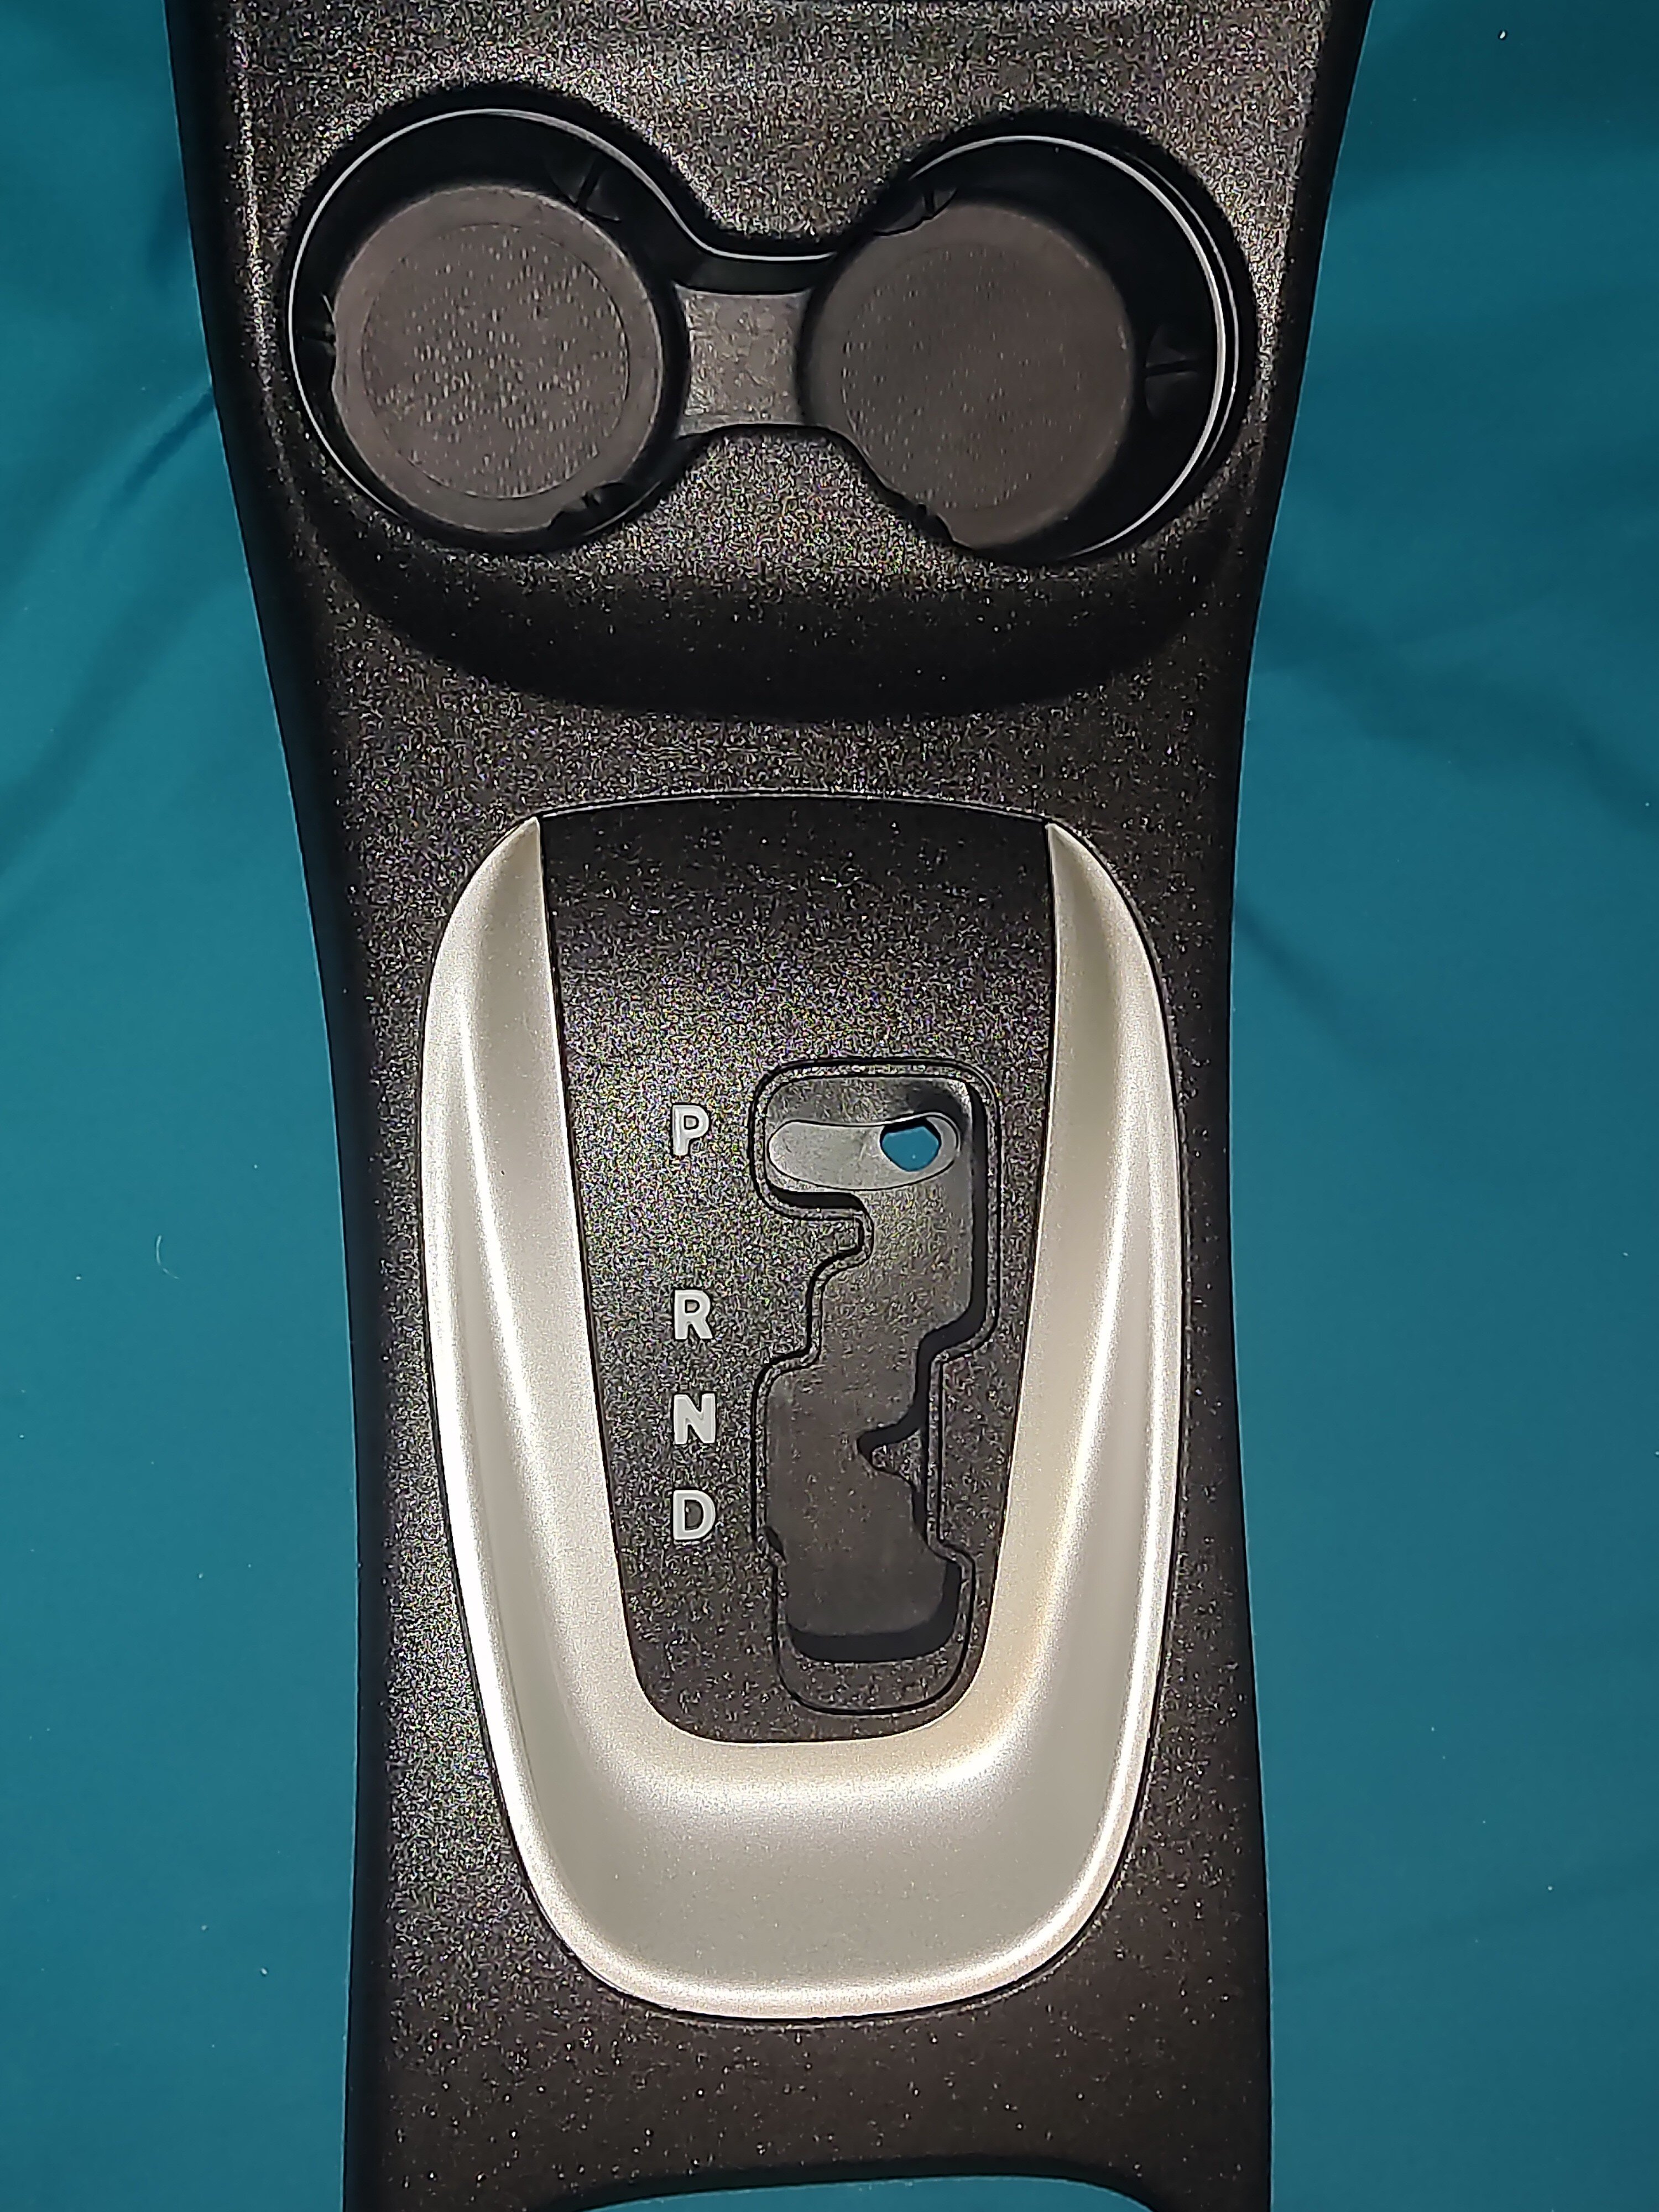
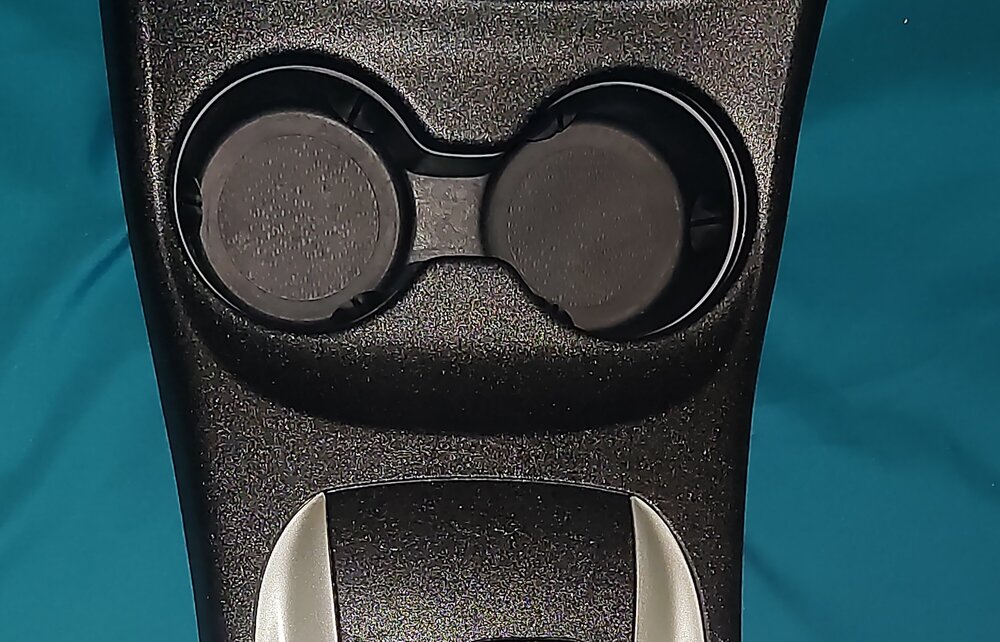
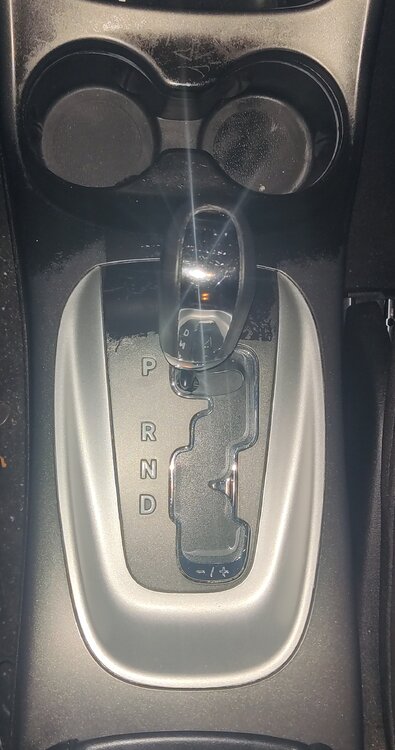
I agree with you on learning trim stuff. Good point regarding the shifter slide gate. It just slides out of the console. Pull on the orange dot. I only used armor all on it, to clean it up. For cleaning the console you have to use a interior brush on it. Because of the texture, you can't use a cloth. Basically my goal is to use what is there. Patch it up as needed. Make it look the best that it can. I'm happy with how it turned out. Dean
-
Center console refinish Page 2. I cleaned the whole piece with alcohol. No other prep. Then sprayed about 3 coats of Rust-Oleum basic bed liner. It is really sticky with a light texture. Gloss black. Side note you can spray another color on top of it. https://a.co/d/7hmFztc Perfect for interior. I used it on my wiper arms and all cowl pieces. Before - Before - Dean


-
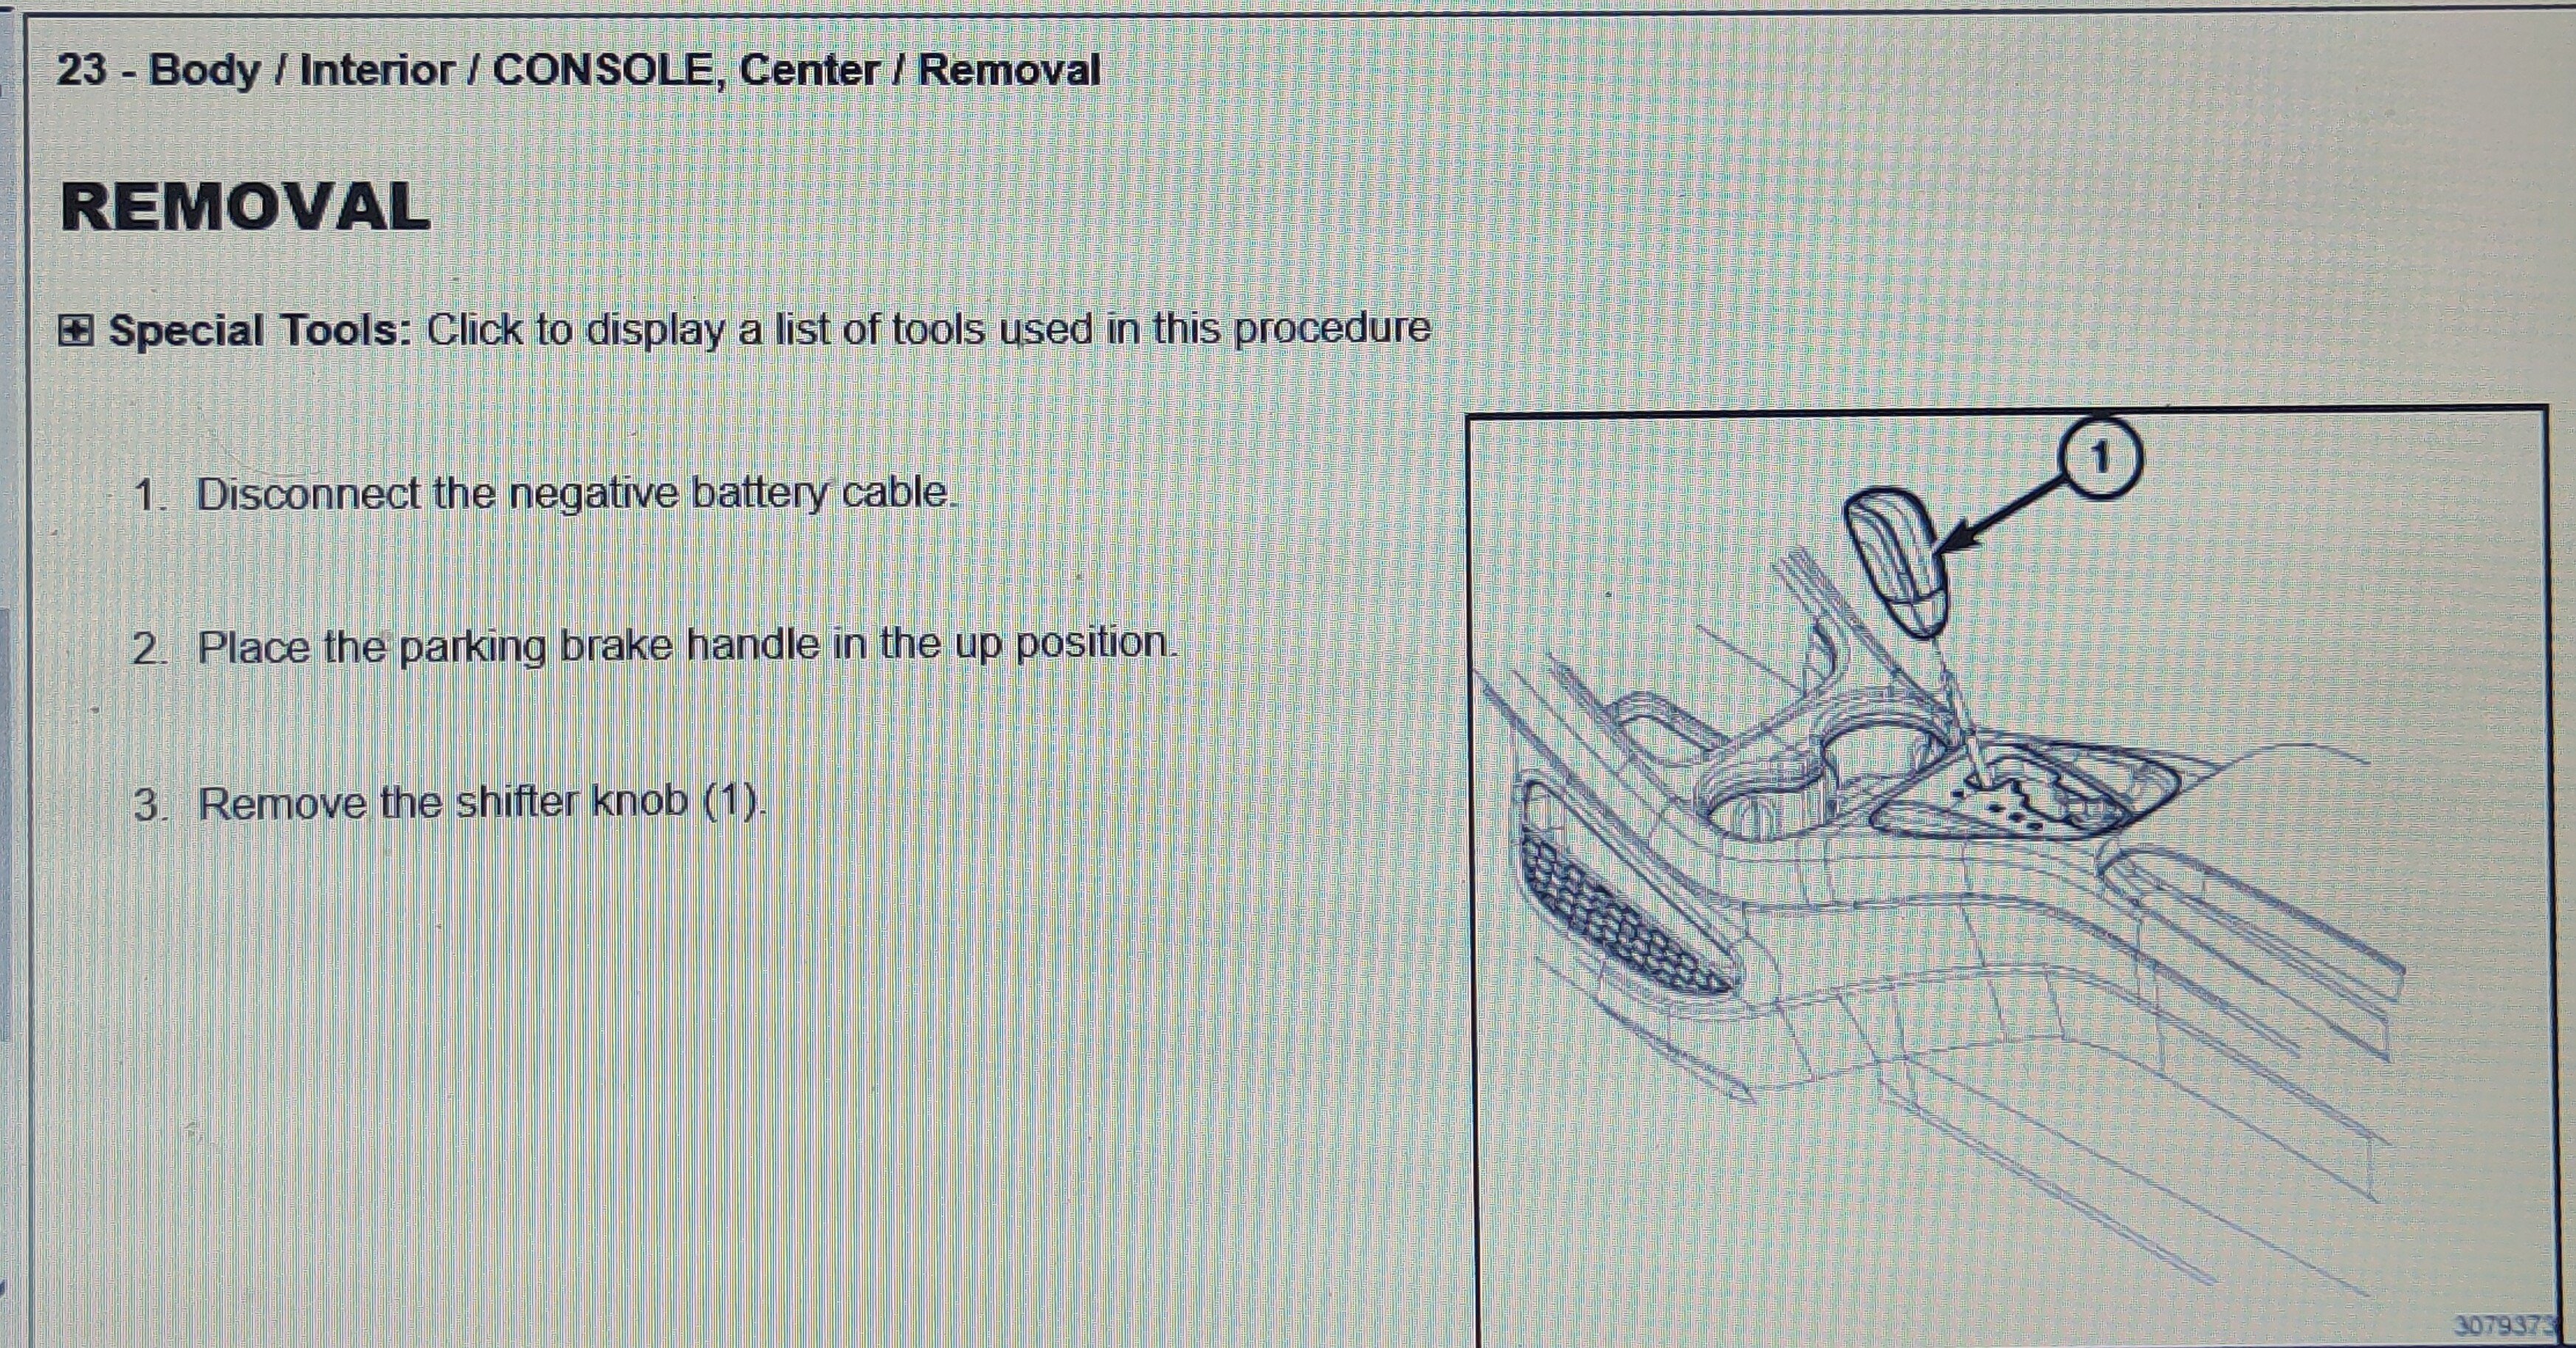
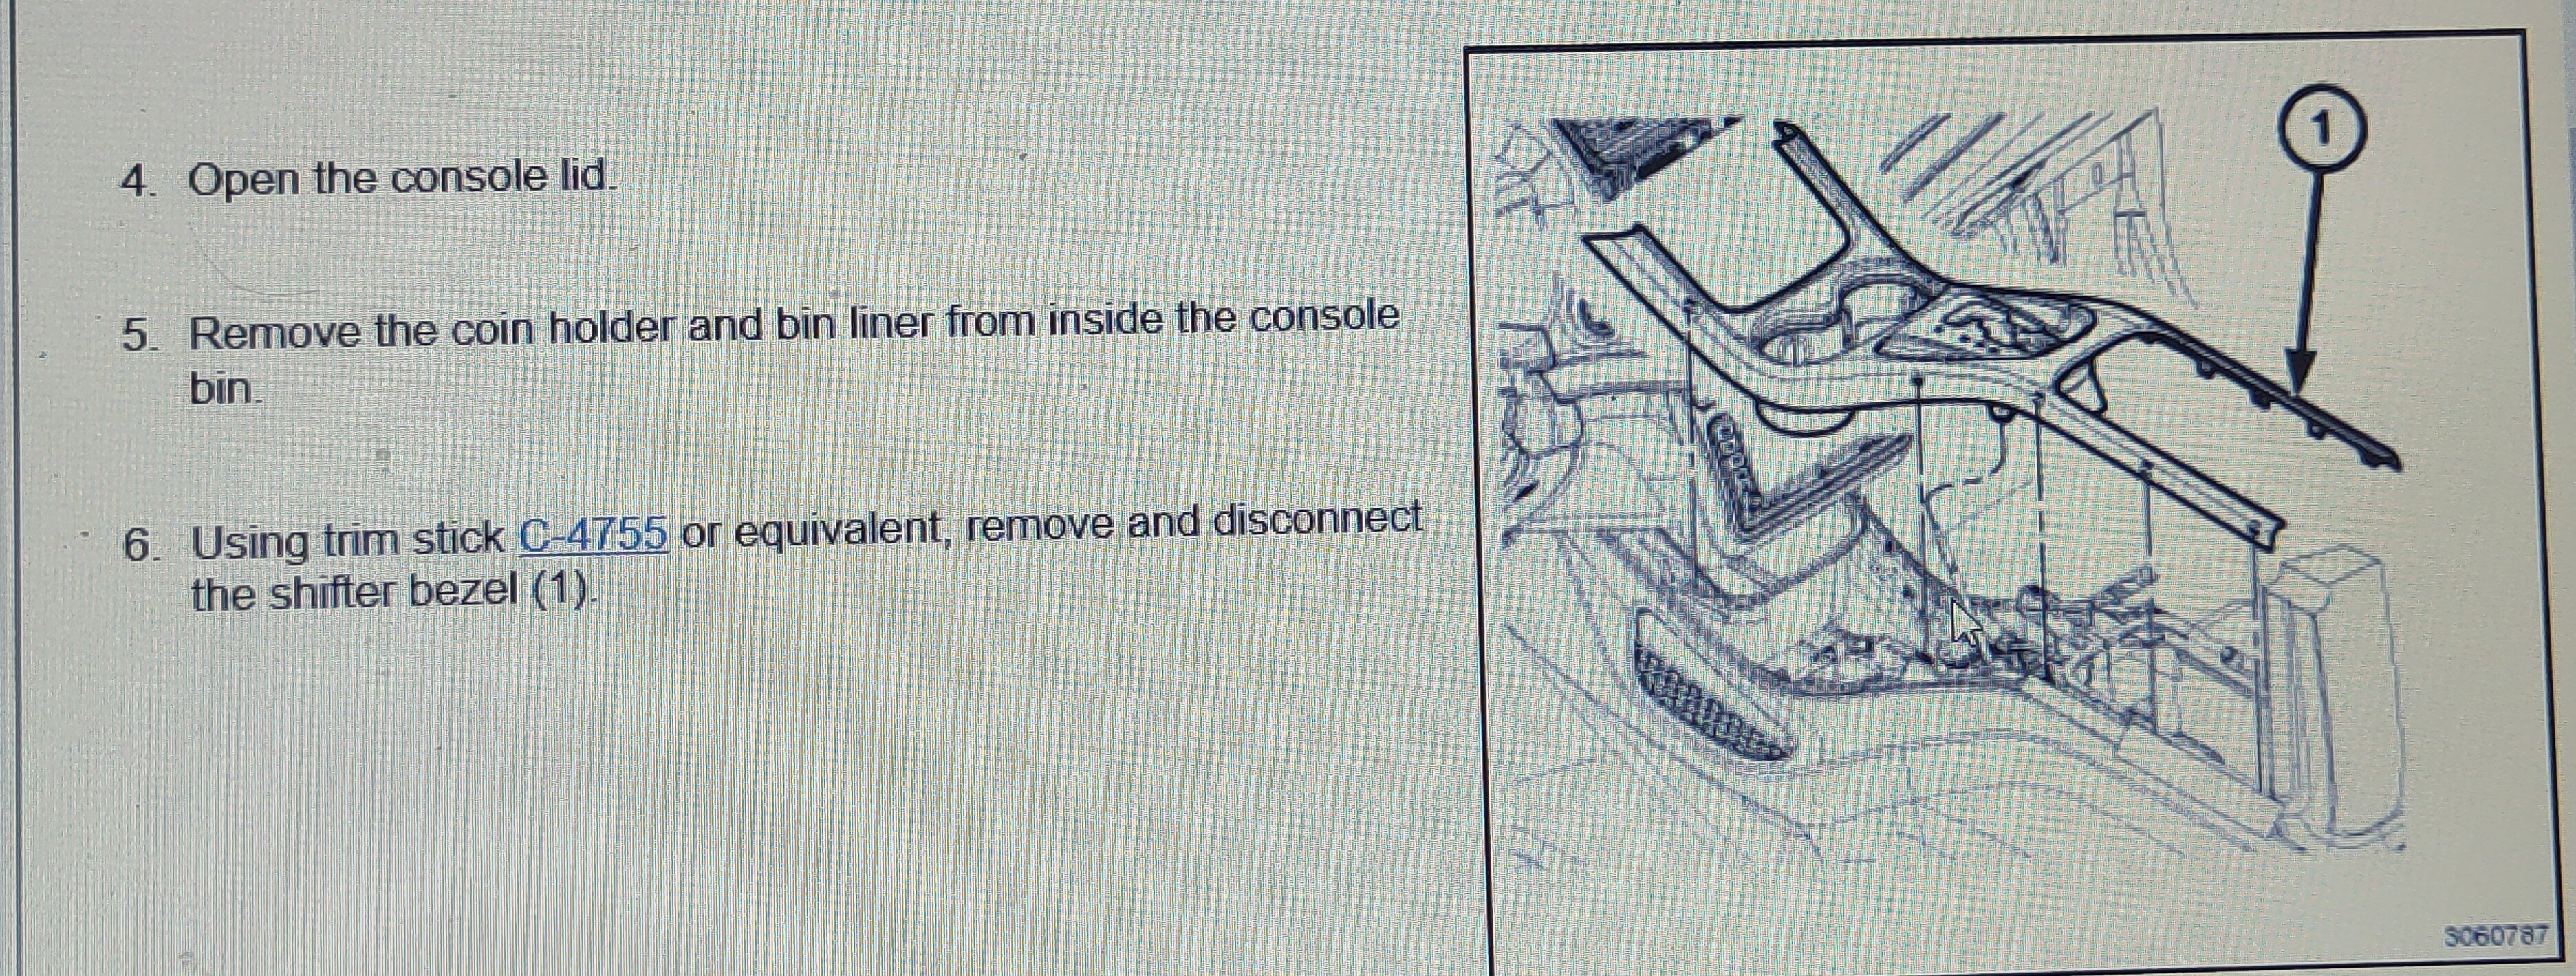
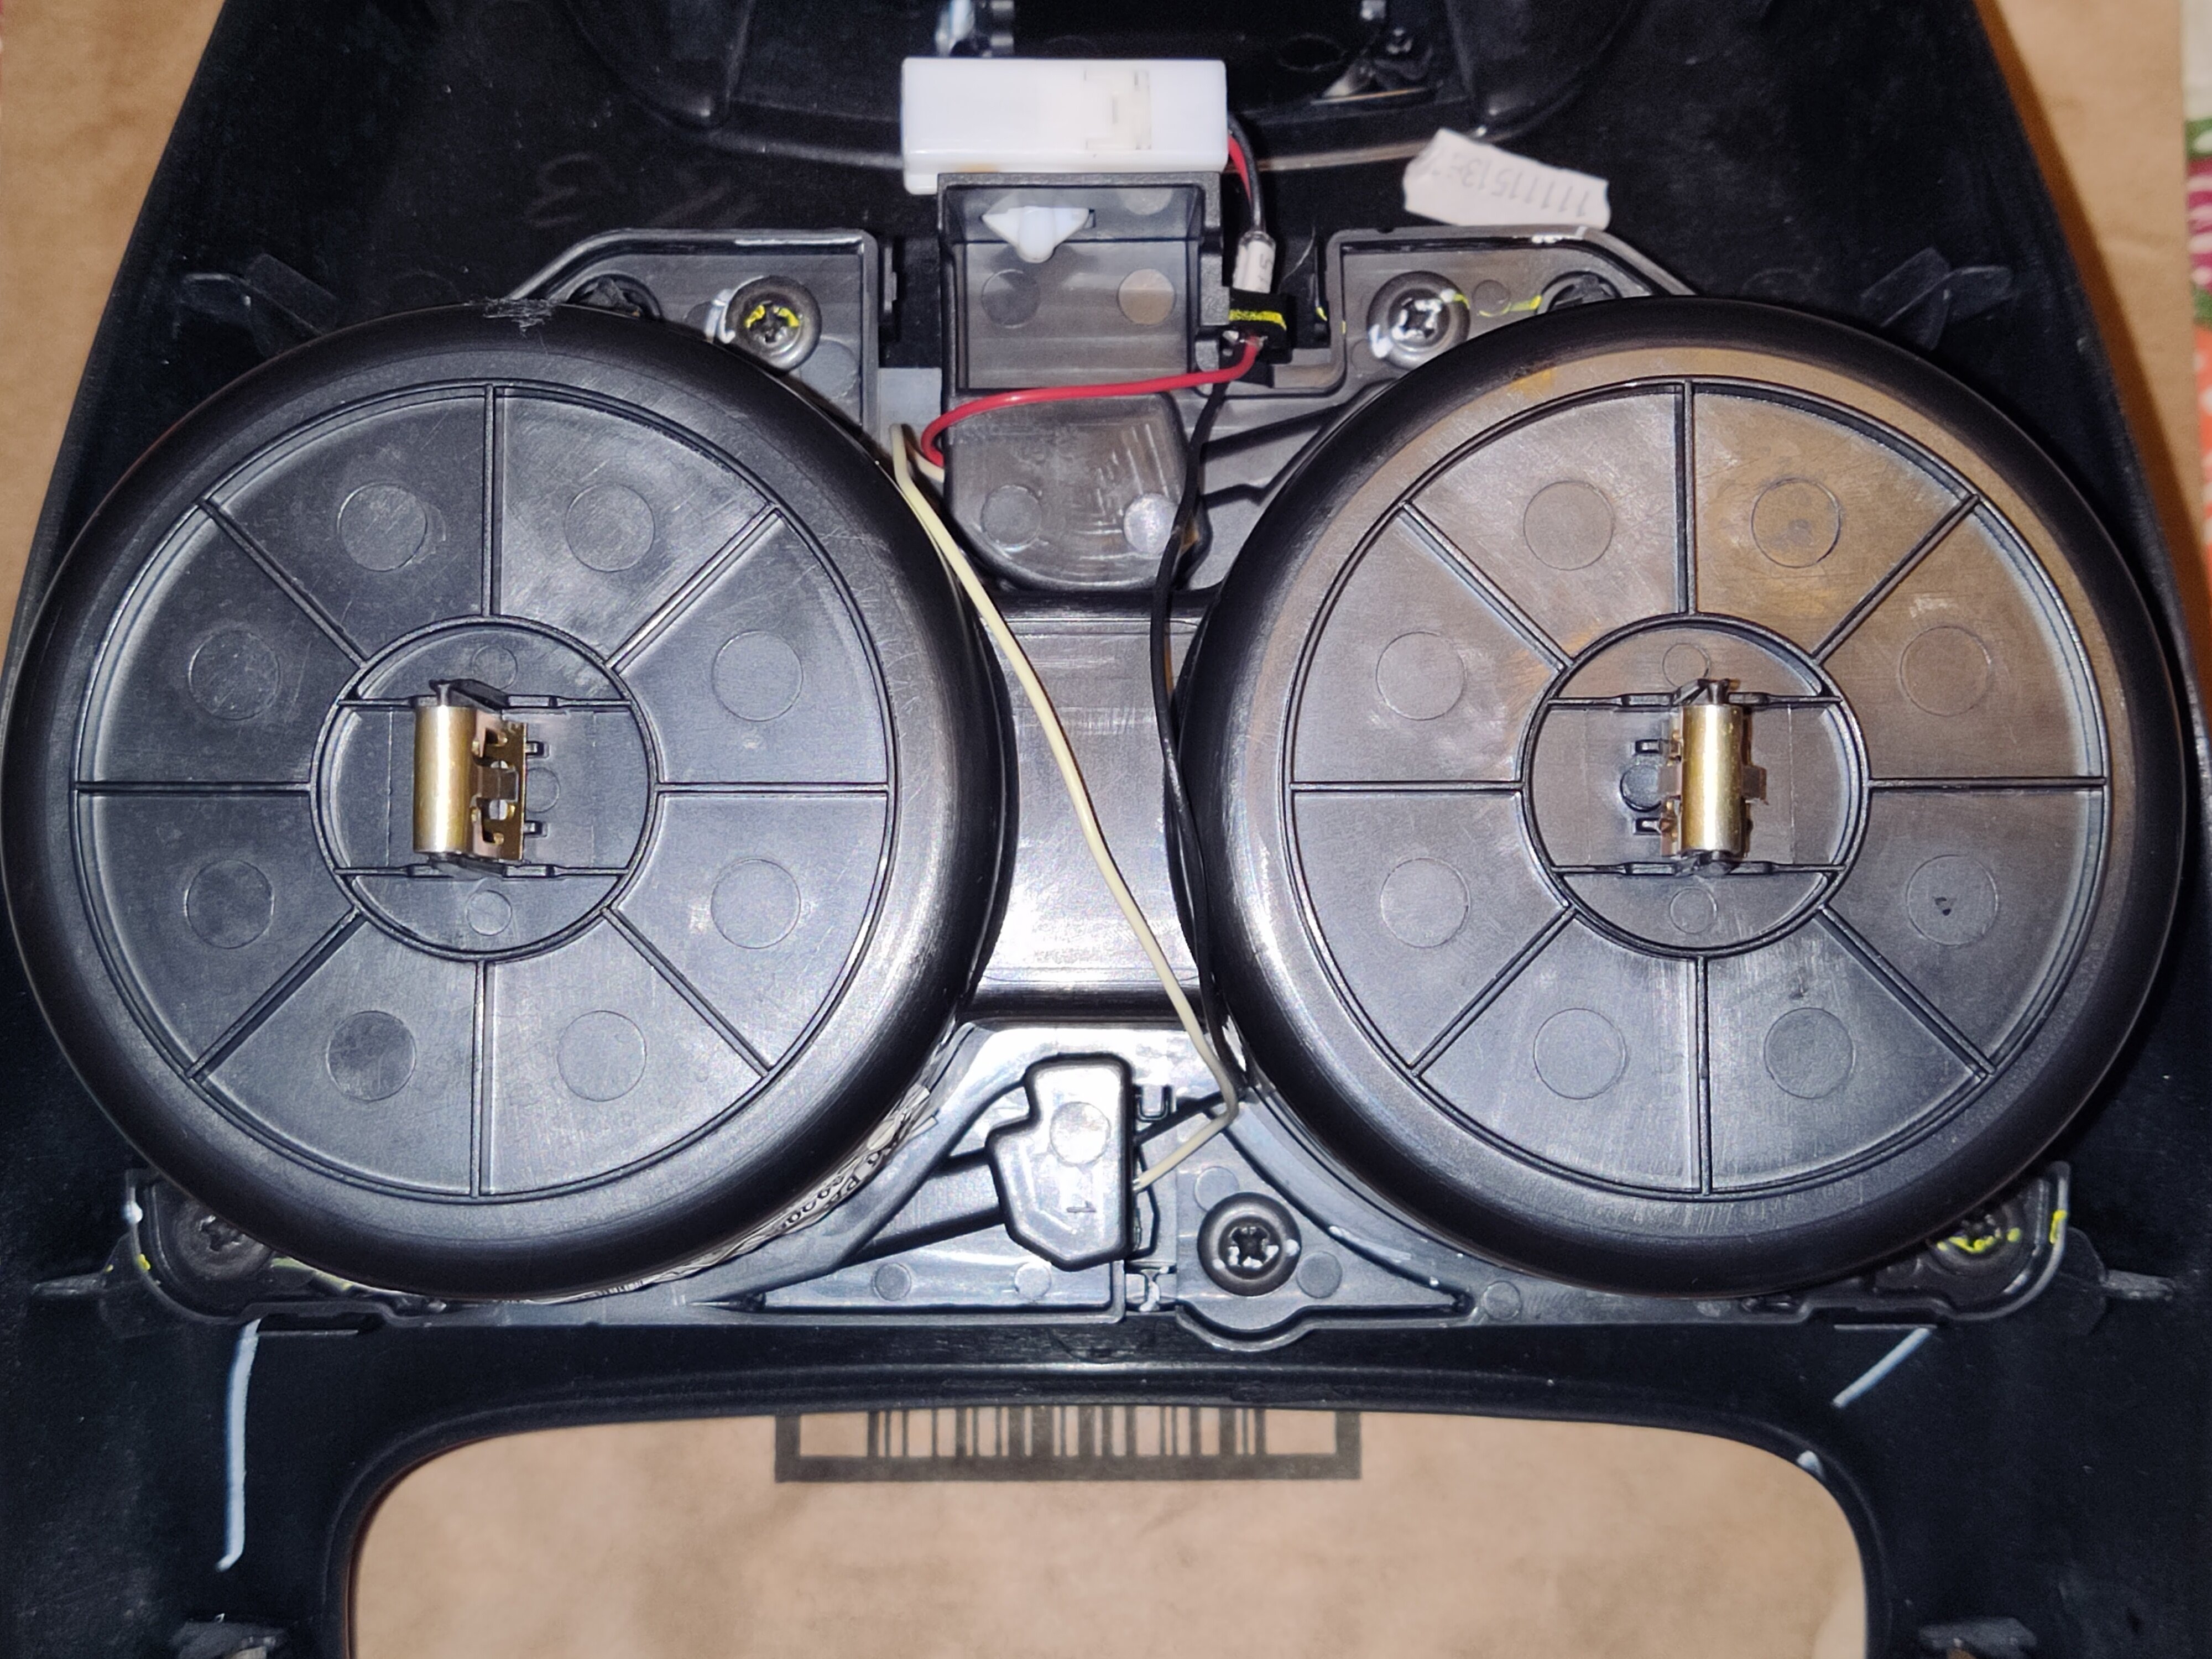
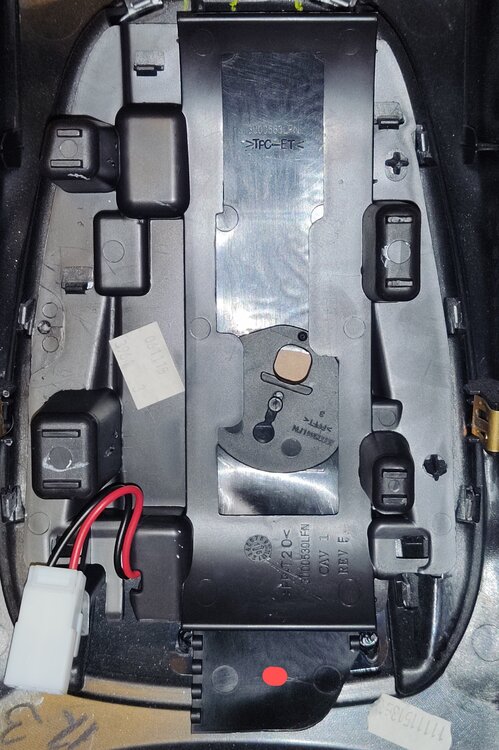
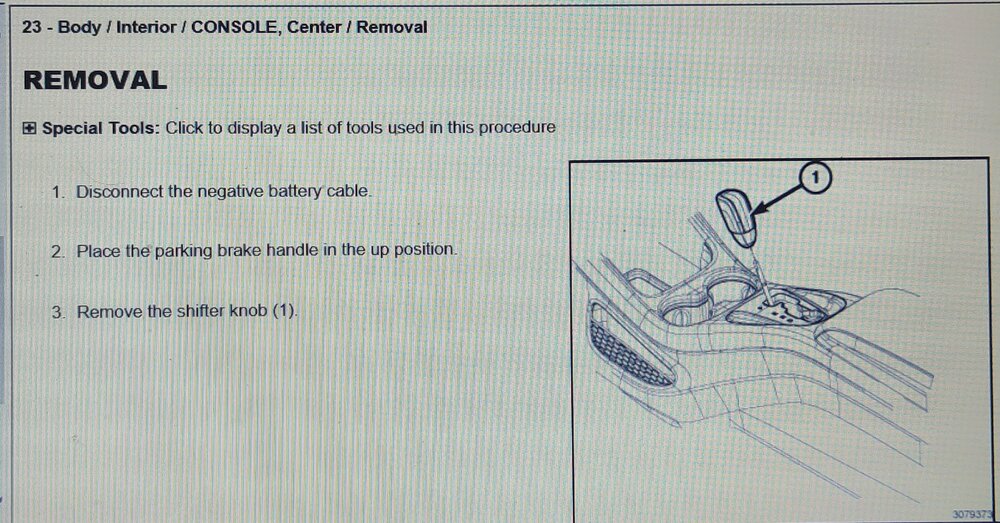
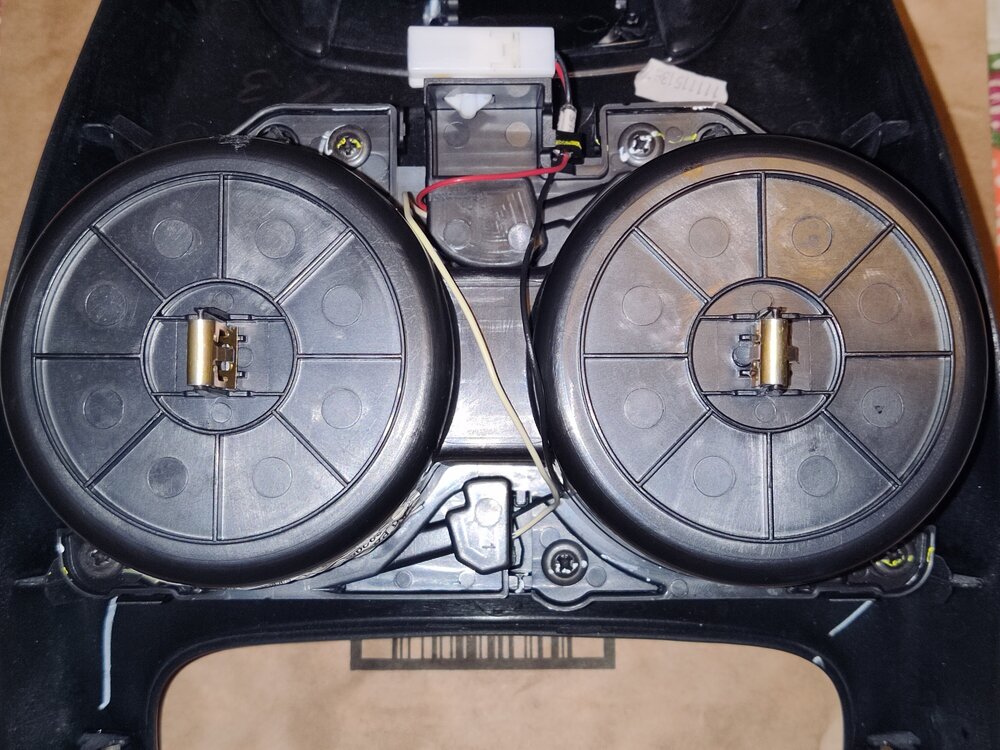
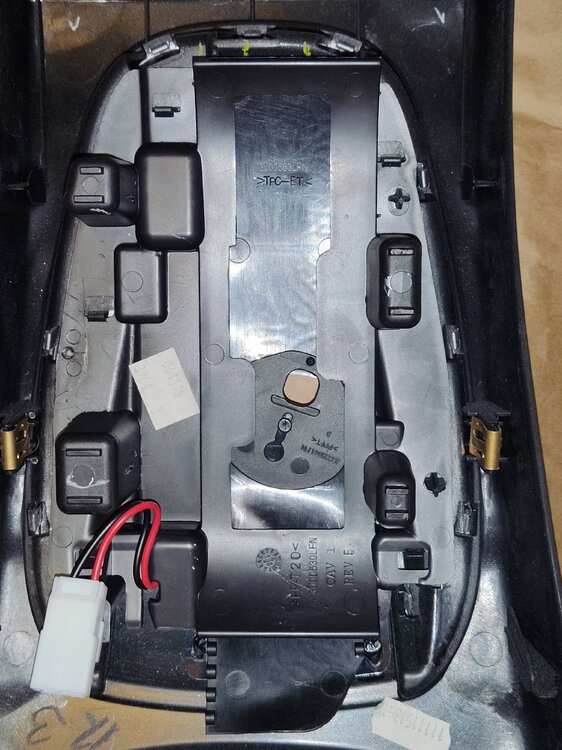
My center console was looking a little rough. How to remove the console top piece. Trim tools needed are- https://a.co/d/bpgHBUq There is 2 electrical connectors to disconnect, before removing the console piece. Comes off pretty easy. Go slow so you don't snap off clips. The cup holder assembly screws into the console. It unsnaps very easily. Handle carefully! Cleans up real nice. The light was blue after cleaning it. Came out nice. The shifter part unsnaps as well. The gear indicator lights is a one piece assembly. The silver trim around the shifter. That was pretty difficult to release. Continue to next post.

-
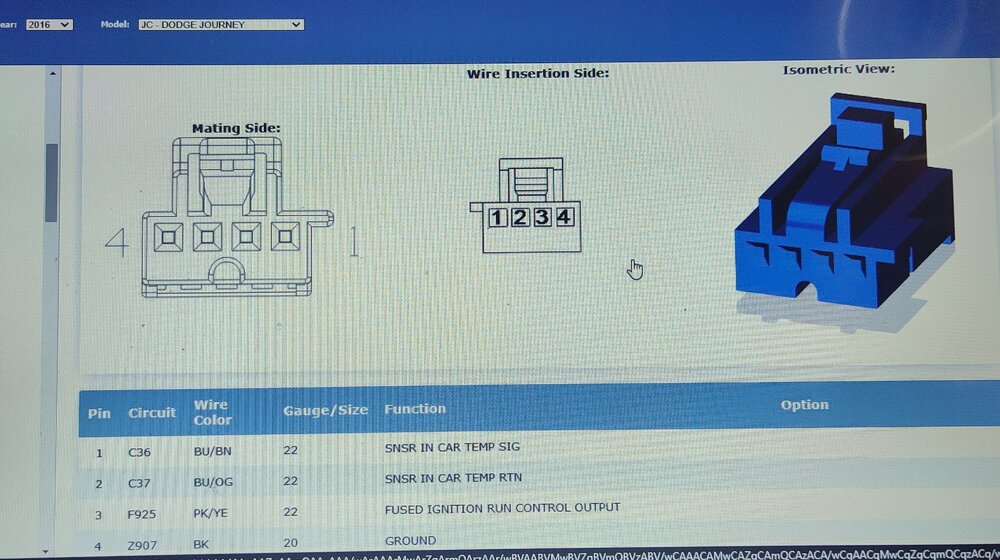
2016 DJ service CD.

-
2016 DJ service CD.


-
For my cabin filter. I went low buck. HOME HVAC Natural Aire - Cut-To-Fit filter. 20" X 30" X 1" thick. Green one. Under $10.00 at Walmart. I should be able to get 8 or 9 filters out of it. It's more free flowing than a paper filter type. Works great.
-
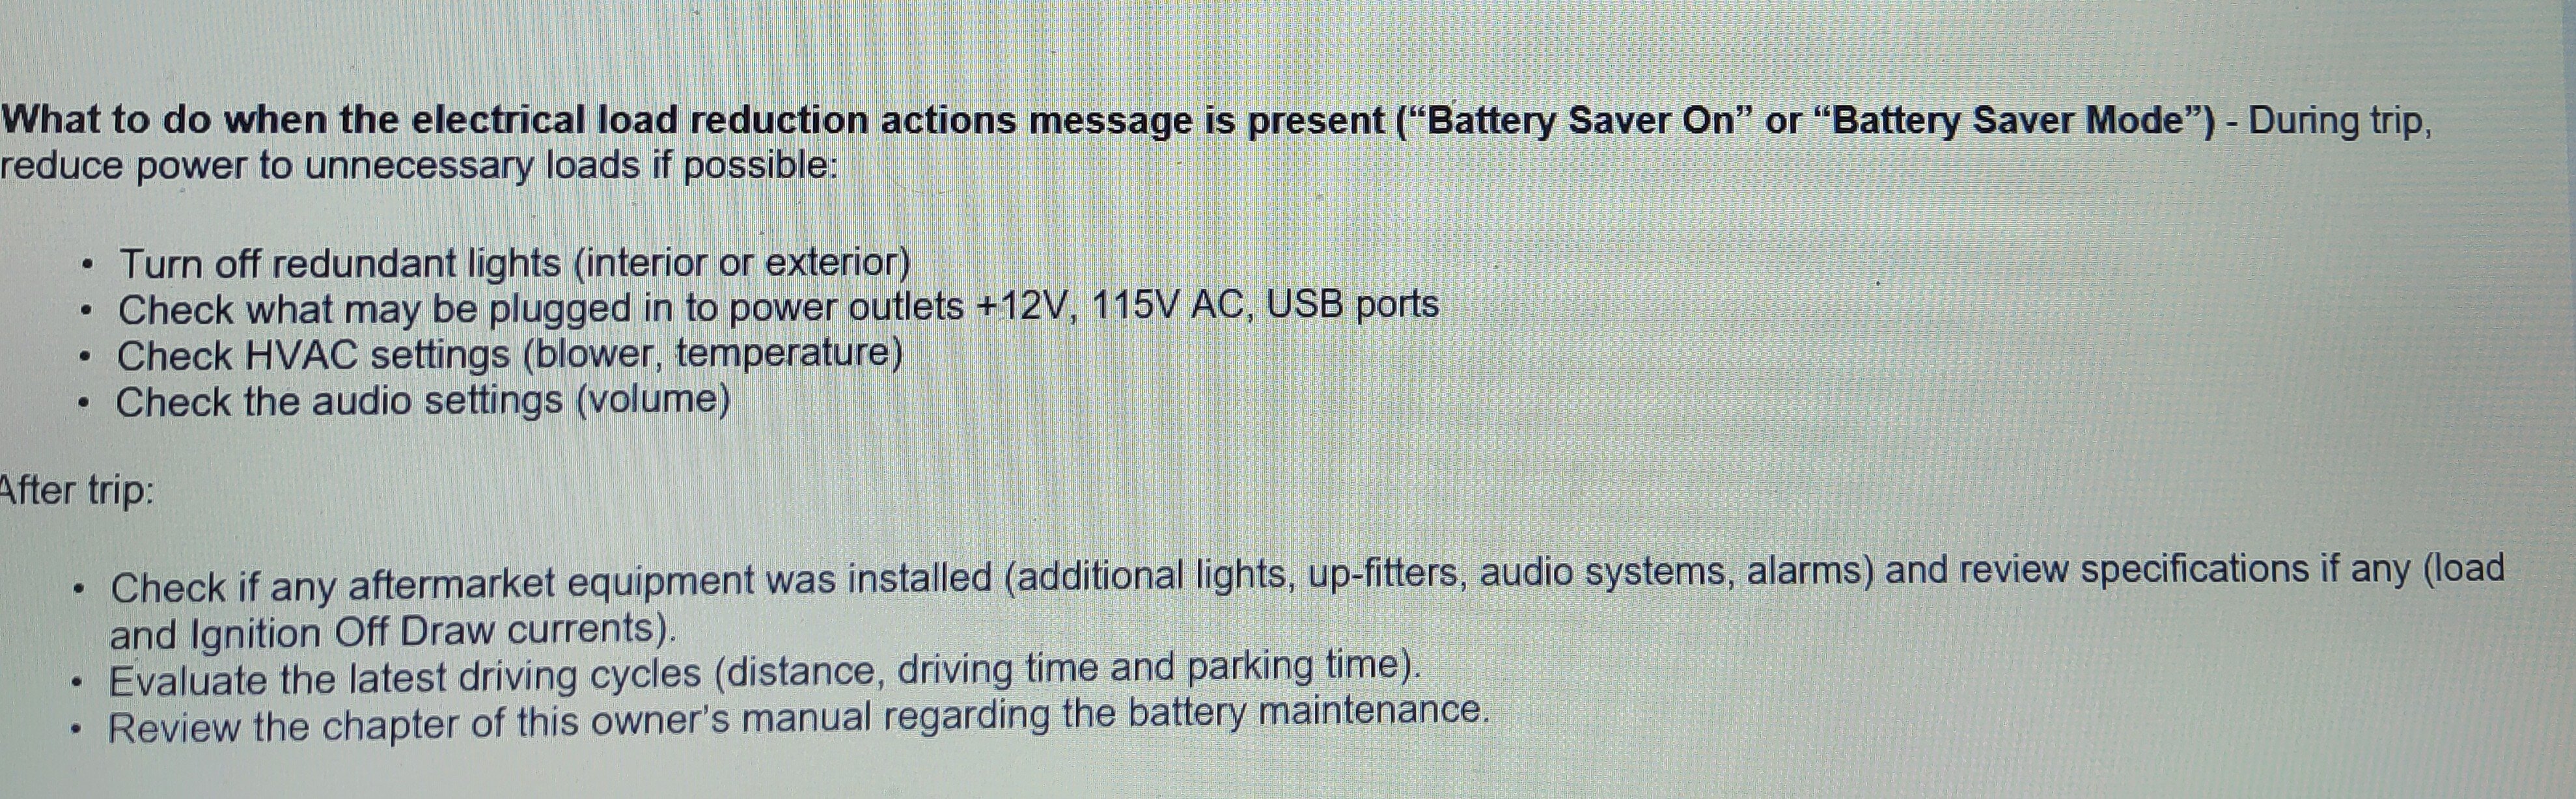
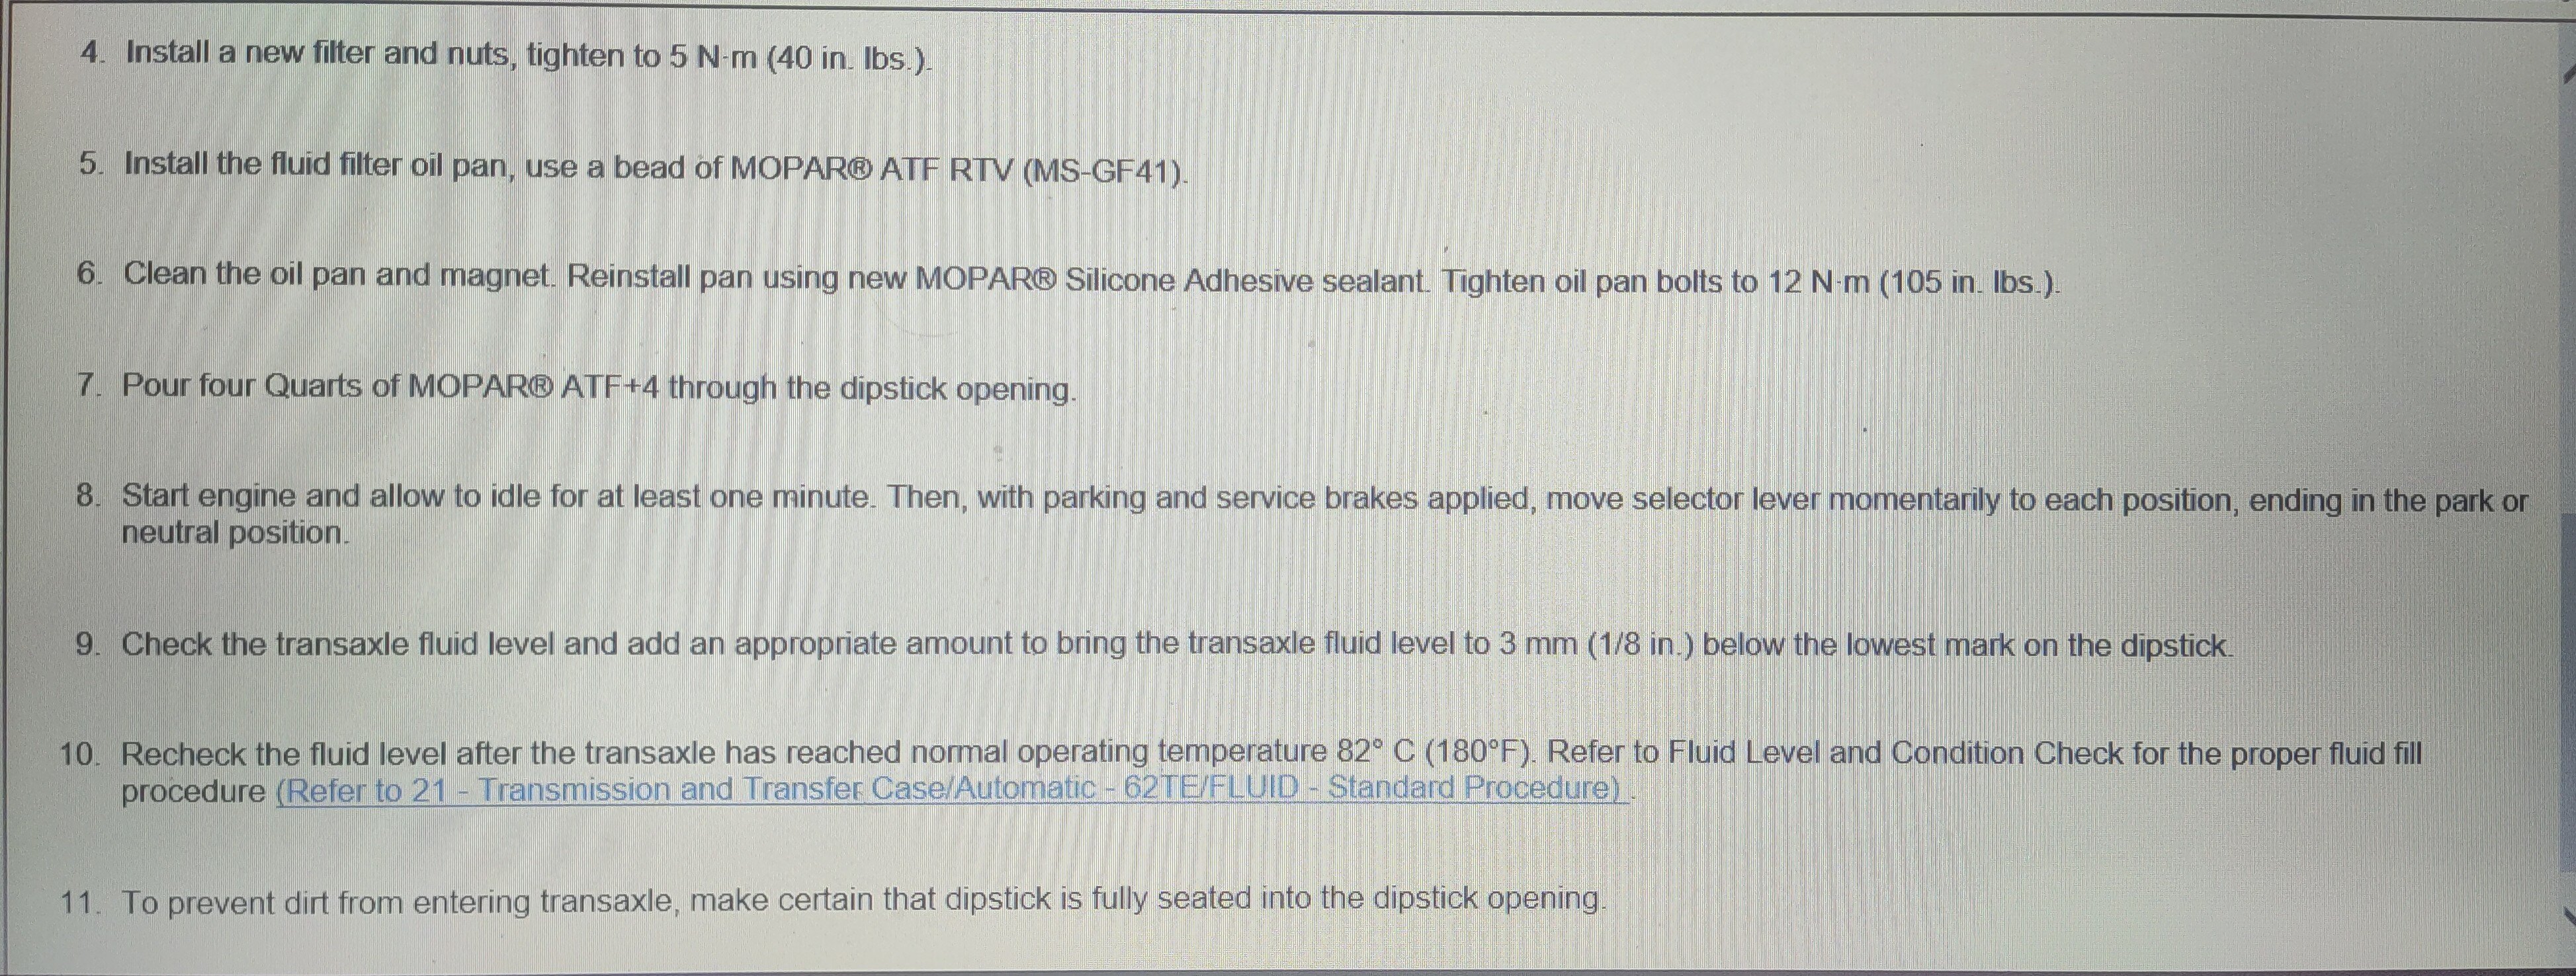
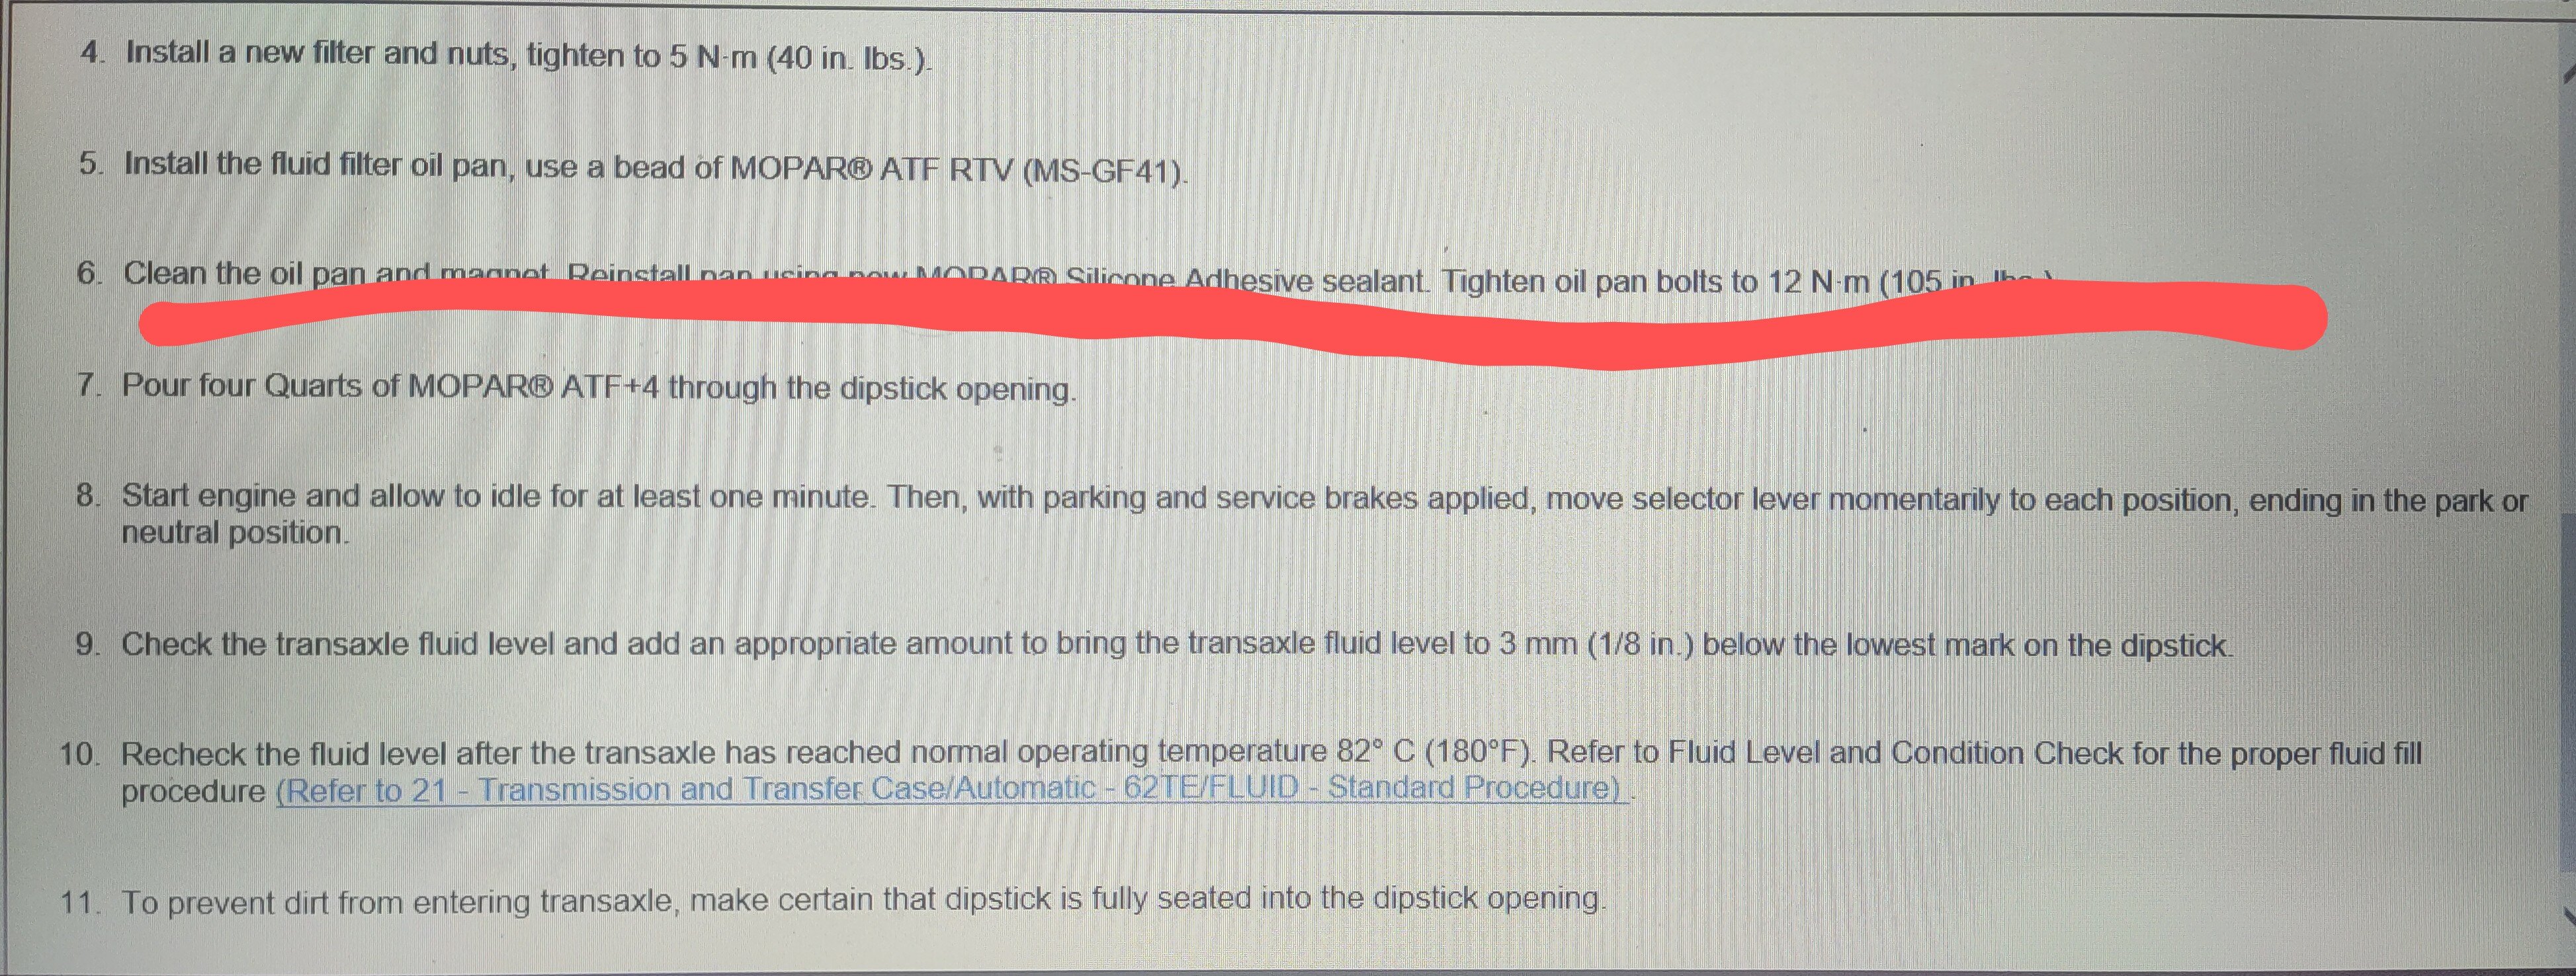
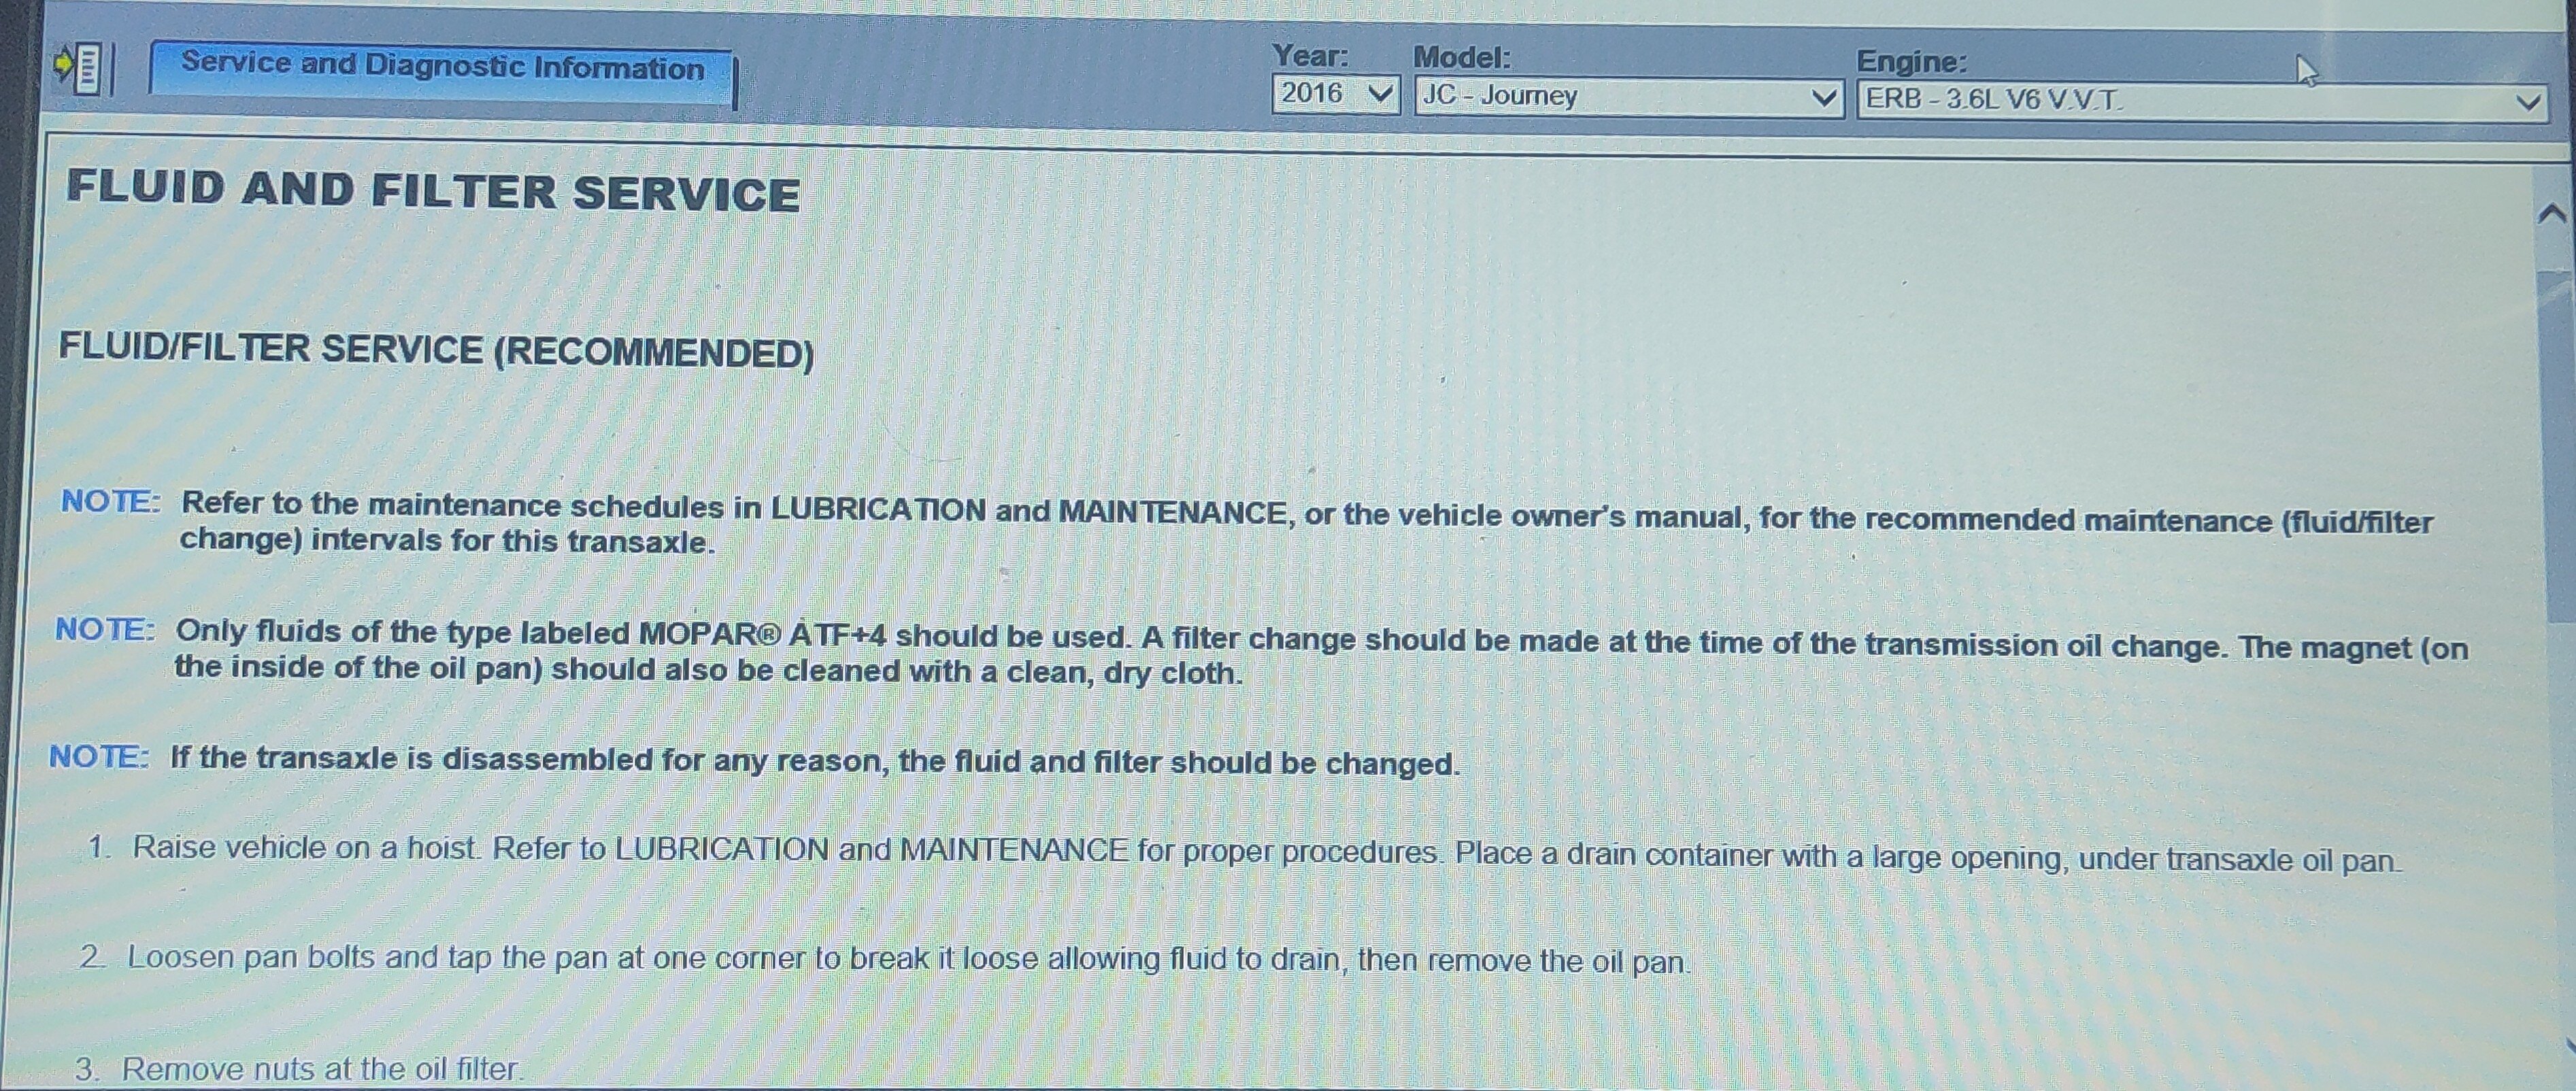
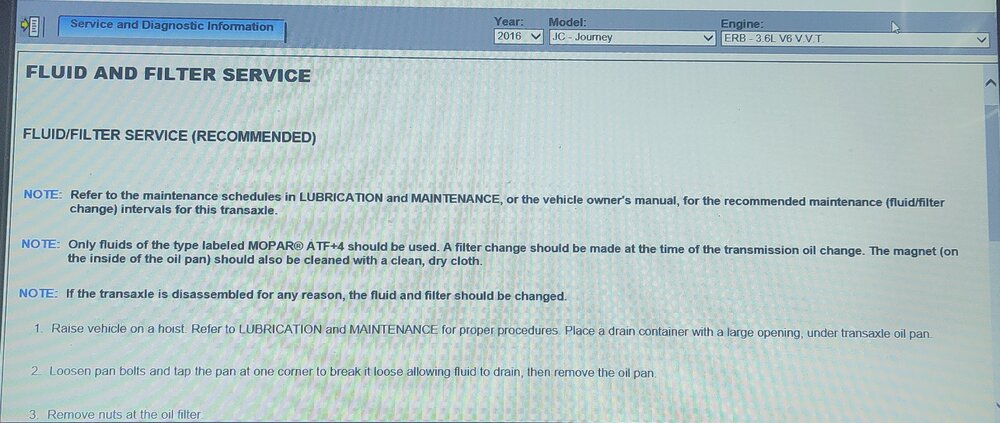
For mileage between fluid and filter changes. A forum member and auto technician recommended 60,000 miles. 2016 DJ owners manual, states filter and fluid change at 12 years or 120,000 miles. That's ridiculous!! The amount of metal on the trans pan magnet. In my DJ at 125K miles. I was lucky, I got service done, when I did. Otherwise, it would have been trans replacement for my DJ. So 60,000 miles. Sounds right on the money. It's just getting the word out to owners. To get this done before it's too late. Dean
-
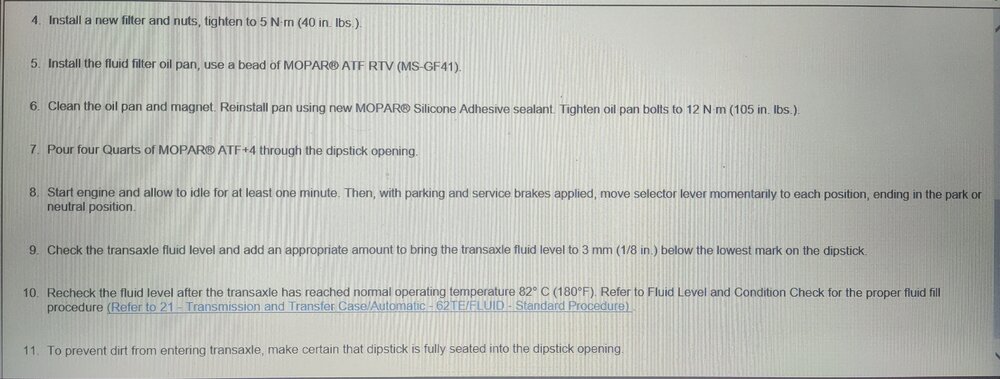
Here is the complete fluid and filter change directions:
-
transmission Replaced trans filter and now car won’t move.
Dean H replied to SWiener96's topic in Engine & Transmission
Read my post here- The second part is about checking the fluid. https://www.dodgejourneyforum.com/topic/18151-automatic-transmission-fyi-please-read/ -
transmission Replaced trans filter and now car won’t move.
Dean H replied to SWiener96's topic in Engine & Transmission
Recheck the fluid level- You need this transmission dipstick- https://a.co/d/iqlpIzm 2016 Dodge service chart

-
2016 Dodge Journey Alternator Not Charging
Dean H replied to bustjesus's topic in Electrical, Battery & Charging
Anyways, You should have the same voltage at the alternator stud as you do at the TIPM. Checked on my DJ. If you don't then you have a cable issue. Fix that and still have problems. I would replace the alternator. It worked for yyz read below. https://www.dodgejourneyforum.com/topic/18200-tipm-or-pcm/ Dean -
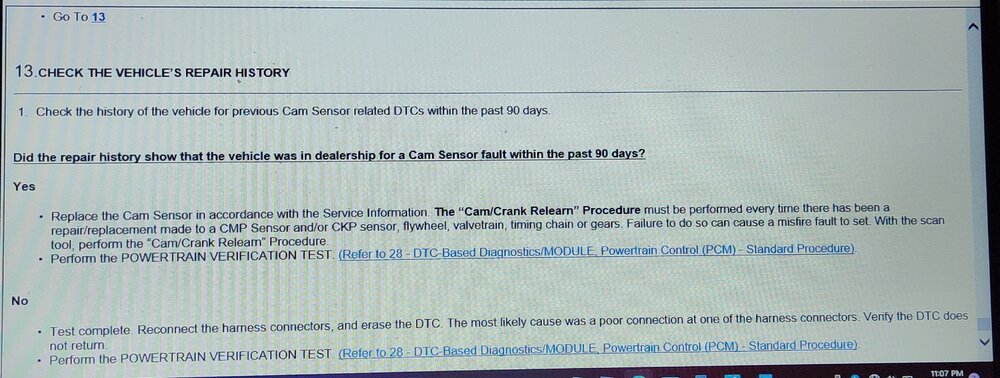
When you replace the gas pedal (APPS). There is scan tool relearn function required to be done. When you change the throttle body. There is a scan tool function ETC relearn required to be done. Ask the shop who did the work, if they did these relearn functions. Specifically, regarding the misfire what did they replace?
-
2016 Dodge Journey Alternator Not Charging
Dean H replied to bustjesus's topic in Electrical, Battery & Charging
First, Read this post by another forum member. He replaced the alternator. So far he hasn't any more problems. TIPM or PCM ? https://www.dodgejourneyforum.com/topic/18200-tipm-or-pcm/ So to simplify what John said. Leave the PCM alone. Engine off. Do this- check battery voltage, at the negative battery ground stud. Positive battery cable at the TIPM. Check battery voltage at the battery connection on the alternator large stud. Use the battery ground stud as your ground. Report back Battery voltage- Battery voltage at alternator- -
FYI, If your cabin filter is plugged up. Then you should check your engine air filter. It will be plugged up to. Mine was.
-
The armrest cover is this one from Amazon. I got one too and is a perfect fit. https://www.amazon.com/dp/B0B55TBPXZ/ref=cm_sw_r_apanp_mntVNjmFn6NPg
-
page 6 . Last page

-
page 5