DJDiggler
-
Posts
19 -
Joined
-
Last visited
-
Days Won
1
About DJDiggler
Recent Profile Visitors
1,675 profile views


-
Oops, my post notifications were going to spam... Thanks for the replies guys! I also found a few recommendations to try rebooting the computers but was not looking forward to digging out the damn battery. I ended up just trying to clean all contacts in the fobs with rubbing alcohol and putting and it still didn't work. Waited a few hours after I made the post and pushed the lock button from my kitchen and it worked! No idea what the glitch was but it's never happened again, everything has worked as it should since. Sorry I can't provide a fix or any help to anyone else with this issue, I honestly didn't do anything to fix it.
-
Hi bvanhooser, I have just ran into the same issue on my 2015 journey... The 2 Key fobs are decteted and still start vehicle and proximity unlock/lock at the door handle, but no buttons function! Just out of the blue, worked fine untill I tried just now. Fobs were not dropped or damaged, literally worked hours ago. Batteries in both fobs putting out 3V, no issues with fobs previously. Checked all doors, closed and lock/unlock properly. Starts normaly, car battery is plenty good. Did you ever solve this problem? Any help much appreciated!
-
 DJDiggler reacted to a post in a topic:
How much black goo on transmission magnet is too much?
DJDiggler reacted to a post in a topic:
How much black goo on transmission magnet is too much?
-
DJDiggler reacted to a post in a topic:
How much black goo on transmission magnet is too much?
-
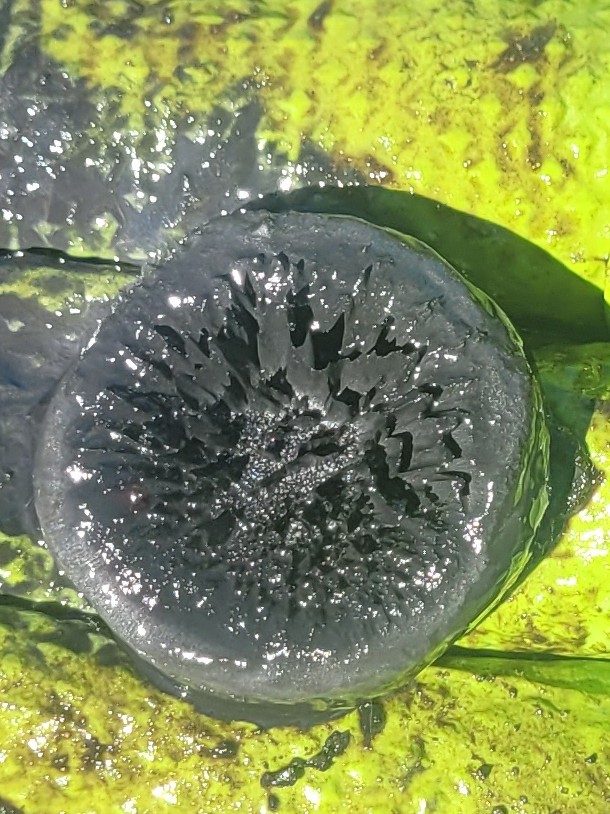
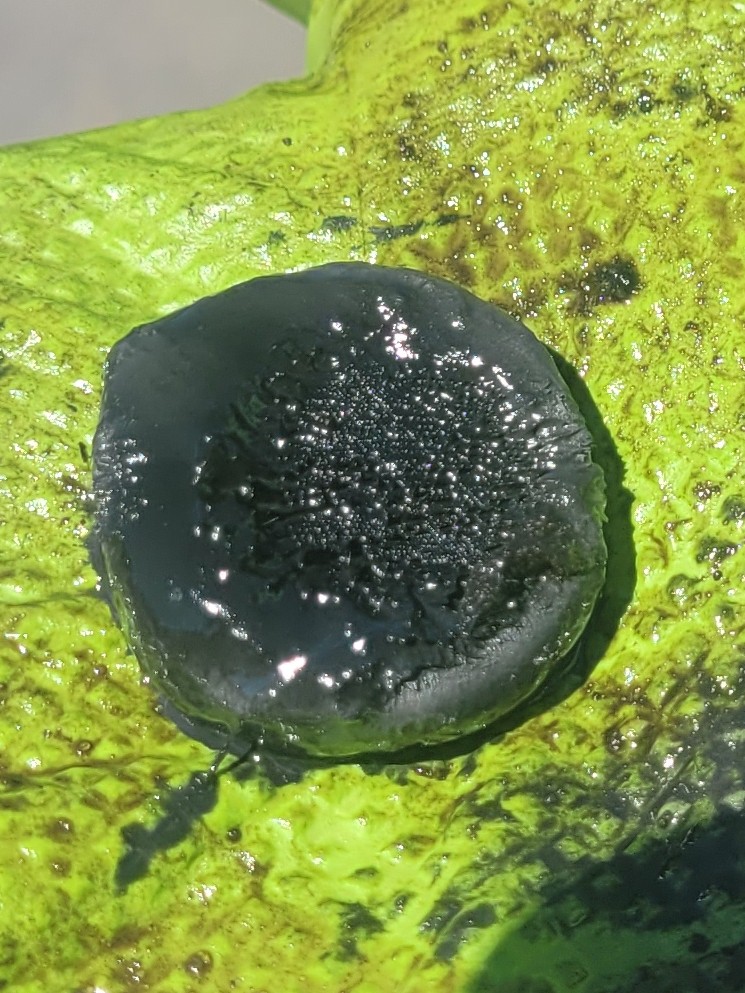
How much black goo on transmission magnet is too much?
DJDiggler replied to DJDiggler's topic in Engine & Transmission
We do tow a small utility trailer once in a while to haul our camping gear... and haul 2 kyacks and 3 kids around so the journey is usually pretty loaded up. I guess I should have done the service sooner. ☹️. Fluid didn't seem burnt but I think I will drain again as you recommend, fortunately I installed a pan with a drain plug so will be easy. I got about 5.5L out last time so one more drain should be good? Thanks for your help John! -
I finally did a transmission drain and filter change, (125000km/77600miles), and was a bit shocked to see a lot of black metal goo on the magnet. There are no metal shavings, just the fine black goo. Does this seem like a lot? Never had any shifting issues but 2 times over the years we had a P0868 low trans fluid pressure code. Both times on long trips, checked fliud levels ok, cleared code, drove fine and code never came back. Any thoughts appreciated!


-
Hi, I have a 2015 3.6L journey. I have a leak in the high pressure power steering hose from the pump to the rack, (not the commonly problematic, but easy to access return line). I'm hoping someone can suggest a tool or procedure to access the hard to reach high pressure power steering line connection at the pump. I bought a few tools (Crowfoot 18mm line wrench, a wobbly bit, and bunch of extensions), but can only just manage to get it on the end but can't really apply much torque. I've tried from above and below but am stumped. Is there a way to get that line off the pump without dismantling half the car? Any help is apreacated!
-
 JohnnyRevs reacted to a post in a topic:
New grill bought from ebay
JohnnyRevs reacted to a post in a topic:
New grill bought from ebay
-
Mark R. Monaco reacted to a post in a topic:
New grill bought from ebay
-
Possible to use Fog Lights as DRL?
DJDiggler replied to DJDiggler's topic in Glass, Lighting, Mirrors, Sun Roofs & Wipers
Hey guys sorry forgot to update the thread... I ended up putting in the hir bulbs but they were still to "yellowish" for my liking so I purchased a set of fanless led high beams from amazon. They were simple plug and play install and work fine in drl and high beam. They are a bit dimmer in drl mode as they should be. Fun fact, i was behind a buddys motorhome and he was confused as to why my headlights (drl's on) were flickering in his rear view camera, they must be pulsed at a certain frequency but its unnoticeable to the naked eye. On my phone now but can post the ones I got latter if anyones interested. I'm from canada so ordered from amazon.ca... Were $100 or less i think. -
BlindSquirrel reacted to a post in a topic:
New 20x8.5 +40mm offset Rims on 2015 R/T
-
Hey everyone, just thought I'd share my experience buying 20's for my 2015 Journey! I live in canada and even though I actually work at a tire shop it was near impossible to find decent 20" rims that would fit the Journey! I didn't want chrome and really wanted something different... so I found a set online in the US at a place that would actually ship 4 rims up here for a reasonable price and took the chance. They are Gianna Fanatic 20x8.5 40mm offset rims (Black with machined face). Tires are BFG Geforce Comp 2 245/45R20. Rims fit great, no rubbing or calliper issues at all. These are aparently show rims and the valve stems are actually on the inside edge of the rim, (just about lost my mind when I opened the box as I thought they drilled it wrong), but there is tons of clearance back there so it wasn't an issue. Haven't had to air up a tire yet though. They came with black plastic inserts so I purchased a spray can of color matched Journey Blue, (the paint requires a can of clear coat also), and painted them to match. Looks much better! They sent me an extra full set of inserts for some reason and I'd like to try getting them chromed... is it possible to chrome plastic at a shop somewhere? I know there is "chrome" spary paint but it's just glorified silver if you ask me. I bought them from www.discountedwheelwarehouse.com and they were very accomidating to someone ordering from Canada. They quoted me the total cost including shipping, duties, taxes, right up front in CDN dollars, and guaranteed no extra charges upon delivery. I ordered black lug nuts also and every freaking nut, (there were extras of those also), was individually packaged in it's own little baggie so it didn't get scratched. Rims were $234, shipping $150, Taxes/Duty $175 (US $). More than I wanted to spend on rims but I was already burning off my winter tires as we had a hot spring and I just couldnt find anything locally. ;(
- 1 reply
-
- 1
-
-
QuarterSwede reacted to a post in a topic:
How to remove Aux inputs on center console?
-
dhh3 reacted to a post in a topic:
2015 TPMS sensor... does direction of rotation matter?
-
dhh3 reacted to a post in a topic:
2015 TPMS sensor... does direction of rotation matter?
-
2015 TPMS sensor... does direction of rotation matter?
DJDiggler replied to DJDiggler's topic in Wheels & Tires
Actually modren tpms units have several advanced sensors and take several readings From Wikipedia: https://en.m.wikipedia.org/wiki/Direct_TPMS "The TPM sensors currently fitted to high volume production cars worldwide are battery-powered, self-contained units which periodically measure tire pressure, and often temperature and acceleration... The pressure, temperature and acceleration sensors generate analog signals which are converted to their digital equivalents using analog to digital converters. The acceleration sensor measures the centrifugal force generated when the wheel rotates. This force is proportional to the rotational speed. The acceleration sensor may be a simple switch rather than an analog transducer." Not sure how the system uses rotational direction from the sensor but apparently it does... Well I'll find out for sure if it does soon. -
2015 TPMS sensor... does direction of rotation matter?
DJDiggler replied to DJDiggler's topic in Wheels & Tires
Sorry guys mabye I just suck at explaining it my shop just talked to bartec tpms supply and they say it will work but the computer will just get mixed up and swap sides as I suspected... If it indicates a low tire on the left front it will actually be the right front. It might sound crazy but aparently its something to do with how the system works. I have the option of just installing them as is or getting a rim band and orienting them properly so it reads correctly. I dont want a band so when I finally get them installed I will update whether or not it actually does swap sides! -
2015 TPMS sensor... does direction of rotation matter?
DJDiggler replied to DJDiggler's topic in Wheels & Tires
Yep but from the sensor's perspective when it is on the drivers side normally it will be rotating to the right... Swap it to the inside lip and it will be rotating to the left, (like it would mounted normally on the passanger side). Obviously the sensor can go either way but will the system get "confused" with the sensors rotation swaped. Aparently they had issues with this on a couple cars... A porshe and a honda, (cant remember exactly), and it took a lot of back and forth with the tpms supplier to figure it out. They make rim bands to mount the sensor in the proper position but would like to avoid that if possible. -
Kind of an oddball issue here, hope someone can help me! Been trying to google for answers and it is infuriating as I just get results about tpms and rotating your tires... not my issue! I recently recieved my new 20" rims for the journey and was somewhat/incredibly surprised to find the valve stem mounts on the INSIDE edge of the wheel... and no it's not a drilling mistake, (which was my panicked/horrified thought at first), this is how they were designed according to the manufacturer and all the pictures I found online. So I figured, whatever, there is a ton of room and no clearance issues for the stem to be pointing in but my shop indicated there might be an issue with the tpms sensors. Because they are mounting on the opposite side of the rim they will be oriented "backwards" ie rotating in the opposite direction they would normally be. Will this confuse the computer or cause issues? I think the sensors are made to rotate in either direction but I'm not sure about how the computer detects the sensor positions. The worst I can think of is the computer will swap sides left to right. Any thoughts appreciated!
-
dhh3 reacted to a post in a topic:
Possible to use Fog Lights as DRL?
-
Possible to use Fog Lights as DRL?
DJDiggler replied to DJDiggler's topic in Glass, Lighting, Mirrors, Sun Roofs & Wipers
So I did some testing with my volt meter and with the car running there is 5.4V going to the high beam bulb even with the lights off... (bulbs not lit in the slightest). I thought that was kind of weird. With the high beam headlights on there is just under 14v going to the bulb as expected with the alternator running, and with just the drl on 11V. I was definitely expecting a larger drop as the lights are way dimmer/yellowish in drl mode vs hi beam. Not sure what I can do with this info... but it's there for anyone who might be wondering. -
SeanTacular reacted to a post in a topic:
New grill bought from ebay
-
Hello, I am wondering if anyone has tried to set up their fog lights as drl lights? I am in canada and DRL are required by law but by using the high beam lamp at low power is leaving nasty yellow deposits on my bulbs: I just ordered some new HIR high beam bulbs and would like to prevent this from happening to those... Is it possible to use a relay or something to switch the DRL to the fog lights? I plan on buying some led fogs from The Retrofit Source as well. As I understand the DRL system the car sends only 6v to the high beams in DRL mode, switching to 12v when you activate the highs... is this correct? There are only 2 wires going to my bulb (white/black), so there is definitly no separate "low voltage" wire. I was thinking of a relay that will only activate at 12v+, so anything under 12 will not turn on the high beam bulb would work to disable the current system (I dont think a dealer would disable it in the system as it's illegal not to have them here), but how would I go about wireing the fogs as drl lights? Thanks for any help!
-
Animal Mother reacted to a post in a topic:
New grill bought from ebay
-
Just thought I'd let you guys know about a few decent grill mods I found on ebay. I live in canada (far from border) so options were limited for places that would ship to me. I found these grill inserts on ebay and shipping was pretty reasonable. The blue cross nicely matches the blue on the journey, I've seen other colors I think but didn't really look as I wanted the blue. Blue cross piece http://www.ebay.ca/itm/Blue-steel-front-grille-vent-hole-frame-trim-cover-for-2013-2014-Dodge-Journey-/152058791149? Billet Chrome Upper & Lower Grill http://www.ebay.ca/itm/GTG-2011-2016-DODGE-JOURNEY-R-T-SXT-5pc-CHROME-UPPER-BUMPER-BILLET-GRILLE-/351706326150? The cross piece is attached with 3m tape (continuous line around the entire outside edge), the grill is actually just zip tied to the existing honeycomb grill. Kind of getto, I know, but it works and doesn't rattle... (and my wife forbids me to do much of anything involving tools to her new car). Sorry, the Journey badly needs a wash but I wanted to test fit everything ASAP
-
OhareFred reacted to a post in a topic:
How to remove Aux inputs on center console?
-
DJDiggler reacted to a post in a topic:
How to remove Aux inputs on center console?
-
DJDiggler reacted to a post in a topic:
How to remove Aux inputs on center console?
-
Hey guys, thanks for the help! I must have missed the email saying I had a reply as I forgot all about this thread until I decided today to take apart the journey. Thank you Milous... the pdf is exactly what I needed and it was fairly easy to get the console out. I was worried when I looked at the pictures of the aux unit, (thanks again for the part number), as it looked like a sealed unit. But the cover was easily removable by taking out 2 screws. Have a few pointers for anyone else who might dig up this thread: - To get the top trim off the center console its easiest to just use a butter knife from "inside" the console and pry up on the edges... the rest comes off easily once you get it started. - To get at the rear inputs I dont even think you need to remove the console at all... The whole rear part is held on with clips as you can see in the pictures and should be removable by prying out on the seam. Of course I figured this out AFTER I had the console ripped apart. - To avoid the problem I had with broken rca cables it would be easy to "relocate" the inputs... just unscrew them from the back pannel and run your cables under the edge of the console so they connect "inside". Just screw in a blank plastic plate or something over the aux input hole. Input unit with cover off... Broken RCA pins I pushed through laying inside. See where the rear panel just clips in the console... might be no need to remove console to get at the connections back there.