

Powerz69
-
Posts
121 -
Joined
-
Last visited
-
Days Won
1
Content Type
Profiles
Forums
Gallery
Everything posted by Powerz69
-
Do you have any pictures on how you did the resistor and what kind you used?
-
I did 2 retros on permaseal headlights one was a 06 F150 and the other was a 96 Caravan. I baked them open, each headlight took multiple bakes and around 1 hour of time to get them open. As long as you take your time knowing it will take awhile you can open them. The TYC butyl ones that I did one was easy to open 1 bake. The 2nd one was a bit tougher for some reason it took 2 bakes. Still around 70% easier then peraseal.
-
I used aftermarket TYC lights, they were butyl. I went with the aftermarket lights just because I didn't know if a retrofit with a MD2S projector was possible. Our lights should be able to fit any projector except for the LS460. All other projectors except for the MH1 will need to be sunk into the headlight bowl, with headlight surround cut to fit shroud. The shroud needs to be trimmed to fit the headlight bowl as well. More time is needed for these installs. The MH1 projector install is the easiest, remove headlight lens, install MH1 through bulb hole tighten up, install shroud you will probably need a shroud extender of some sort to touch the headlight bowl. Put lights back together, Align for even cutoff. I'm guessing very little cutting is needed if any with the MH1 install. Lobitz68 can explain how to do a MH1 retro better as that's what he used for his.
-
Yes! Uconnect will do the 1st update, then go to maps and it will do the map update.
-
Puddle light installation help
Powerz69 replied to SeoulJourney's topic in Glass, Lighting, Mirrors, Sun Roofs & Wipers
wires at the BCM was posted here. http://www.dodgejourneyforum.com/topic/3050-brake-controller-w-led-lights-help/?p=28371 It does say what the color for the dome light is at the BCM. DOMELIGHT SUPERVISION YELLOW/PURPLE (+) @ BCM, SEE NOTE #2 NOTE #2: The BCM is located Behind the GLOVE BOX -
RX350 projectors with STI clear lens and Osram CBI bulbs is the best setup. The RX350 is pretty much the same size as a MD2S 3.0 projector the kind I used for my retro. -RX350 with STI clear lens $225.00 -Osram D2S CBI bulbs 5500K $185.00 US funds + Shipping and tax.
-
Is this in the ECM flash that activates the tow lights?
-
Installing HID lights on your Journey (step by step)
Powerz69 replied to email4walker's topic in Accessories, Modifications
Make sure your wires match up. Remove the caps and plug the factory headlight plug into the relay harness, black to black or red to red I cannot remember. See if the relays stop buzzing. Install the cap again make sure the wires match up again if you can see them. You should really have the relay harness hooked up to the battery with an inline fuse. Does everything work with the DJ not running? If so double check the wires before the relay harness making sure they match up. -
http://www.dodgejourneyforum.com/topic/924-installing-hid-lights-on-your-journey-step-by-step/?p=38689 also post 97.
-
You will have a fun time with that! I'm thinking you will have to mount the projector from behind the fog housing. Even with matchbox projectors it will be tough as the fog housing is just so small. I used the XB led fog lamps and I like them. I like them so much that I'm taking out my matchbox fog retro in my F150 and will be installing the XB led for F150 when they come out early 2015.
-
THIS^^^ Hi Beam: 9005, 12.8V, 65W, 1700 lumens, 320 hours. Hi Beam ... HIR1(9011), 12.8V, 65W, 2530 lumens, 400 hours. Silverstar ultra: 9005, 12.8V, 65W, 1700 lumens, 100 hours. Lo Beam: 9006, 12.8V, 55W, 1006 lumens, 360 hours. Lo Beam ... HIR2(9012), 12.8V, 55W, 1875 lumens, 1000 hours. Silverstar ultra: 9006, 12.8V, 55W, 1000 lumens, 200 hours
-
The cutoff looked way better when I was aiming both lights together. Like you were saying the overlapping eliminated the flaws to where I was happy. These New bubs are way better then I was expecting. I bought the previous version and thought they were worse then the normal XB's. I was leery about these XB35 5500K bulbs but after seeing them in person yesterday I kind of wish I never spent the money on the CBI bulbs now. Bulbs had a run time of less then 5 minutes on them before I took the pictures, that fact alone is amazing.
-
Very nice!
-
Output pictures are now in my gallery. http://www.dodgejourneyforum.com/gallery/album/259-md2s-retrofit/
-
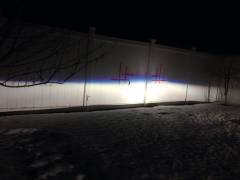
From the album: MD2S retrofit.
Close up of my failed attempt on cutoff tweaking. Headlight lens on. Fence is 65' away by 30' wide. Brand new XB35 5500k bulb, cheap Chinese ballast. -
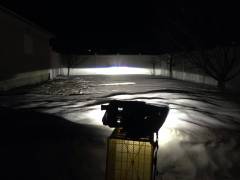
From the album: MD2S retrofit.
Behind the headlight. Headlight lens on. Fence is 65' away by 30' wide. Brand new XB35 5500k bulb, cheap Chinese ballast. -
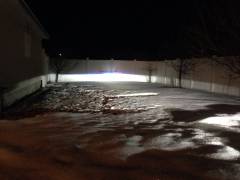
From the album: MD2S retrofit.
Headlight lens on. Fence is 65' away by 30' wide. Brand new XB35 5500k bulb, cheap Chinese ballast. -
Yes pretty much. 1. Make hole in bowl large enough for the back of projector to fit in and projector mounts touch bowl. 2. with projector fitted in bowl mark holes for screws, drill holes in bowl and use a course threaded screw to mount projector to bowl. Don't screw the projector on tight but just snug, all you want to do is align now. Just use common sense like if the projector need to go up loosen the lower screws and tighten the top screws same as left and right. You might also need to drill the projector mounting holes a bit bigger as this will allow a little rotational adjustment. DON'T FORGET YOUR HIGH BEAMS! Align the cutoff with your high beams if you plane to use them. I think my low part of the cutoff was 3 inches lower then middle of high beam. I never installed the lights yet so I cannot say it worked for me, but going off all the measurement I did it should work. 3. JB weld quick to hold the projector and the bowl together, I used the TYC lights and the bowls are weak for just screws alone. 4. Trim and sand the back of the shroud a bit to fit, mine was around 1/4 inch. 5. Trim the headlight surround to clear the projector shroud, I sanded it with a dremel it was very easy. 6. Everything should now clear and fit and headlight lens should be able to fully close. I'll take some pictures tonight. I'll be using crappy bulbs though as my Osram CBI's are still shipping. I had to mess with one projector shield as it was messed up when I got it, so the cutoff might not be straight like it should. It would have cost me more for shipping so I tried to fix it myself. I'm happy with it now but it would have been better new without any problems.
-
Thanks! I never tried these ones yet but they will be great for their size. I'll post some pictures when I get these things installed. I just have to mount the led halo, clean up the lights, seal them back up and install. It all depends on the quality of projectors, bulbs, ballasts that you used but need to know more on why you were dissatisfied. I'm still using the first FX-R 1.0 projector on a F-150 that I did 4 years ago and I'm still in awe. Thanks1 The 2 shrouds were placed over the sunken projector. The shrouds still had a 1/4 inch gap before clipping onto the projector. The right side of the Ocular would have just needed a little bit of sanding. The left side because of the way the bowl is would have been cut to fit in taking the top half off the left side. Also the headlight surround is sitting close to 1 inch higher then it should be. So with that said both shrouds have to come down 1/4 inch and the surround needs to be trimmed 3/4 inch so the headlight will close up. I'm so close but so far from being able to install them. I got slammed with work so I just need to find the time now.
-
 Thanks! I had white halos on my other retro and got board of them. Just something different for me.
 -
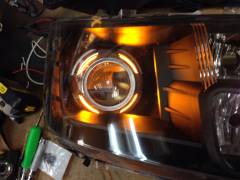
My MD2S projector retrofit with Apollo shrouds. Pictures in my gallery. http://www.dodgejourneyforum.com/gallery/album/259-md2s-retrofit/
-
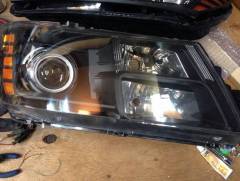
From the album: MD2S retrofit.
With headlight lens dry fitted. -
From the album: MD2S retrofit.
Close up of Amber halo. -

From the album: MD2S retrofit.
I decided to use a 100mm Amber led halo behind the shroud. -

From the album: MD2S retrofit.
Close up of the headlight surround trimmed.
