

bigunclejethro
-
Posts
99 -
Joined
-
Last visited
-
Days Won
1
Content Type
Profiles
Forums
Gallery
Posts posted by bigunclejethro
-
-
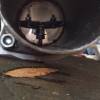
This is what my lights turned out to after trying to buff the VHT.
 I kept buffing until I got them to shine. I clearly did something wrong along the way and I wasn't able to get any shine until I was all the way through the tint. If I had to guess, I probably used an incompatible clear coat. You can see there are some spots on the two backup lights that didn't come off with buffing and I think it looks bad. I want to clean it all off and have them tinted with film instead.It sounds like mineral spirits are safe on plastic, so I'll give that a shot this weekend. Thanks for the feedback Lobitz68.
 -
I've read many different responses with varying warnings, but I'm looking for advice from people who have done this with their cars. My attempt with VHT Niteshades didn't go as planned. In fact, most of it came off when I tried to buff them after clear coat. I couldn't get any shine so I just kept going at it. There are a few dark spots that are clearly still tinted and I want a safe way to remove it without fogging up my lights or eating through the plastic. So far the best solutions I've read about are goof-off or mineral spirits. It sounds like mineral spirits may be safer with plastic, but may not be strong enough. I've watched many videos where goof-off was used, but the manufacturer does not condone use on plastic. I won't wet sand my lights, but I'm open for any suggestions/constructive feedback. I do not have easy access to a buffer, so any solutions that avoids this would be appreciated. Thanks all.
-
Resonator delete is the way to go. Deeper, more aggressive but somewhat raspier sound. I have flowmaster clones on my Journey with resonator delete and its a bit loud on the highway. I can't say it drones, at least not real bad, but I can see it getting annoying for more than a few hours of driving. I've heard magnaflows are much better at managing the drone, but are not as aggressive sounding as flowmaster. I'm thinking of switching mine out but only for the right price.
Have you noticed any vibrations inside the cabin? Like plastic pieces vibrating at certain RPM's? Maybe it's just my exhaust. I can't hear them anymore with the resonator removed but I certainly could before.
-
-
Anyone have striped on their DJ? I'm looking to add something but can't find many pictures out there so post em up if you have any!
-
I would only consider a centrifugal style supercharger as there should be plenty of room for that. Turbo would also be a lot of fun, but the 3.6 seems to make most of its power near the top of its RPM range, so a supercharger would really be the best to even out the torque curve. Who wants to take the plunge and show us how it's done?
-
Good call on the warranty dhh3. I will definitely look into that.
I would get a separate set of wheels and tires for winter but my other car seems to empty my pockets before I can do anything to my Journey. I've also been thinking about dipping them maybe clear just to protect from salt and chemicals for the winter.
-
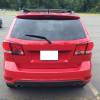
Here are some pictures of what I did.
This is what I started with. I removed the resonator a few months ago and clamped in a piece of straight pipe. I didn't know if I would like the noise or not so I filled all around the tube and clamps with a high temp liquid gasket (orange stuff) so I could put the resonator back if I wanted to.
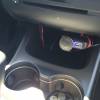
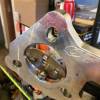
 I purchased a QTP 2.5" ECV with wireless controller, and wired them up through a cigarette lighter extension (so I didn't have to splice into the cars wiring). This way I could also easily remove everything if I decided to. I put the controller under the heater controls and hid the wiring behind the dash.
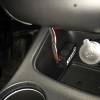
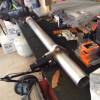
 I cut a section of straight pipe and welded flanges on to match the ECV (don't laugh at my welding, its a bit rough but I don't hear any leaks). This was the first test fit up.
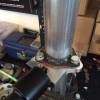
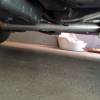
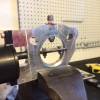
Because this is typically used as a cutout, it seals pretty darn good when it's fully shut. So I came up with a relatively simple way of keeping it cracked. I drilled and tapped for a 1/4-20 bolt in the bottom of the valve. I then put the assembly in the car and was able to tune how much restriction the valve caused by bringing the bolt up and down in the ECV housing. I found my happy medium, took the whole thing apart and thread locked and sealed all the threads. This is the result. Not the greatest looking but it can be refined later if needed.

I don't have a picture of it but there is one control wire that runs from the controller to the valve. I ran this out through a grommet behind the dash where I think the parking break cable goes, and under the heat shield all the way back to the valve. I'll take a picture of the setup under the car and get some videos in the next few days hopefully. Not a huge difference, but I get between 10 and 15 dB reduction across the board with the valve closed. Still makes a good noise but is much more bearable for long hauls. This will rarely be closed, so I don't expect to see any major differences in fuel economy.
Hopefully you can view these pictures, this is the first time I've tried to post any. If not, everything can be found in this album: -
-
The exhaust cutout has been installed and the results aren't as dramatic as I was expecting, but there is a reasonable reduction in cabin noise without a big drop in engine power. I will post images to explain what I've done. So if anyone is still paying attention, stay tuned!
-
The new tires will not be the same size as the old ones but it does look like they are rated for the same pressure as the stockers, so I suppose there is no concern. Thanks for the feedback anyway.
I found a good website (can't remember the name now) that spits out how far off the speedo would be at. I'm planning to go from 225/55/19's to 245/55/19's, and the speedometer difference at 60 would now be 64, which to me is not a big deal. You should be able to get whatever adjusted at the dealership though.
-
I'm planning to upgrade tires this fall and it just occurred to me that the pressure rating is higher than the stockers. Will this set off any alarms or cause problems with the tire pressure sensors?
-
Keeping you guys posted (if anyone is still interested), the wireless controller is installed and I have the switch hidden, but conveniently in reach from the drivers seat. I did not cut into the vehicles wiring, but got a cigarette lighter adapter with a remote extension, cut the extension off and connected the controller to that. This way, if I decide I don't want the valve or want to sell the car or whatever, it will all come out very easily.
I'm hoping this week to make up a few valve plates with varying blockages (planning anywhere from 25%-75%), and will have the valve installed hopefully this weekend. I'll report back soon with pictures and results!
-
Anyone else with powdercoated blacktop rims experience this? I never hear when it happens, but the next time I was my car I usually find another chip in my wheels. They look like steel wheels to me underneath and I'm afraid of them rusting. Even if they were aluminum, the roads are so covered in salt and sand in CT in the winter, they wouldn't stand a chance. Anyone have any quick fixes that aren't super obvious?
-
Sorry to bring this back from the dead, but Darkpaw mentions speaker wires available in the rear driver cargo space. Are these available on all models or just those with premium sound? I find with the windows open, I'm almost maxed out on volume, so I want to add two rear speakers. Anyone gone through the install or can point me to someone who has?
-
-
Bigtsr I believe that's the one. Feels like a lever inside the hole but I didn't want to pull it and find out.
I will look for this drain plug by the brake pedal. I also noticed behind the stereo down low there is also a grommet that brings out a cable just above the driveshaft. I'm thinking of using this one as it is right where I want to put the wireless controller. Either way, this project is a few weeks off still as I have to put some time and money into my other car at the moment. Thanks for the help
-
I will look into that. I would like to keep the controller in the console so I can keep an eye on its status but under the dash would work too.
I noticed there is a plastic snap in grommet on the inside front of the console. Any idea why that is there any where it goes to?
-
Similar concept I suppose. When I find the plate that works the best for me I don't intend on changing it out though.
Anyone have any good instructions for removing the center console? Or is there a good place to run the signal wire out for the cutout that I don't have to take anything apart for?
-
Well the valve came in yesterday and it should be pretty easy to hook everything up so I'm going to go for it. I'm going to make a few different valve plates with varying hole sizes, and start with the largest and see if I can find the right balance between noise and performance.
MAP sells a universal damper valve with just a 9/16 hole in it, but that seems way to small to me. I'd be afraid to overtake anyone on the highway with that. If anyone's interested, here's the link.
http://www.maperformance.com/map-universal-3-inline-exhaust-damper.html
Anyone have a simpler idea? The cost of the valve and controller is less than what my mufflers cost, so I'm not in a rush to take those out.
-
It wouldn't be any more restrictive than the stock muffler and resonator. I appreciate the comment but the back pressure debate is not what I was going for.
-
The resonator is gone, and in its place at the moment I have clamped a piece of straight pipe. What I plan to do is put the valve in where the pipe is. It's wont be tee'd off to anywhere so the exhaust will still go through the mufflers.
I found the resonator made the exhaust high pitched and ricery with the mufflers I picked, but taking it off really opens up the noise level and gives the tone I want. I'm just adding an adjustable obstruction in the exhaust line to keep the same tone but adjust the volume.
-
I recently installed a set of aftermarket mufflers and deleted the resonator. The car sounds awesome (especially for a V6) but it can be really obnoxious sometimes. I ordered an exhaust cutout valve from QTP with a wireless controller and am planning to stick it inline with my exhaust to silence it as much as I want whenever I want/need to. I'm thinking I will want to put some holes in the valve plate to not completely restrict the flow, but I've never used a cutout before and have no idea how large to drill. Thoughts anyone?
-
I have been thinking about niteshade but Im not to keen on sanding my lights and I don't want it to be too dark. I did have them plastidipped for a while, but am going to be taking some longer trips across the US and don't want to worry about cops pulling me over. That's why I was thinking of painting the inside. How easy is niteshade to remove and can it be applied without sanding?

Magnaflow exhaust install - before and after sounds
in Accessories, Modifications
Posted
Let us know how the aftermarket resonator works out. It is quite a bit louder without one, but removing the stock one gave it a much deeper and more aggressive tone. Finding a balance between noise and tone would be nice.