TheCarCzar
-
Posts
4 -
Joined
-
Last visited
-
Days Won
1
About TheCarCzar
-
 Ezpeezy15 reacted to a post in a topic:
Front Suspension Overhaul - Some Tips
Ezpeezy15 reacted to a post in a topic:
Front Suspension Overhaul - Some Tips
-
 Locosiete reacted to a post in a topic:
Front Suspension Overhaul - Some Tips
Locosiete reacted to a post in a topic:
Front Suspension Overhaul - Some Tips
-
 2late4u reacted to a post in a topic:
Front Suspension Overhaul - Some Tips
2late4u reacted to a post in a topic:
Front Suspension Overhaul - Some Tips
-
Front Suspension Overhaul - Some Tips
TheCarCzar replied to TheCarCzar's topic in Brake, Chassis & Suspension
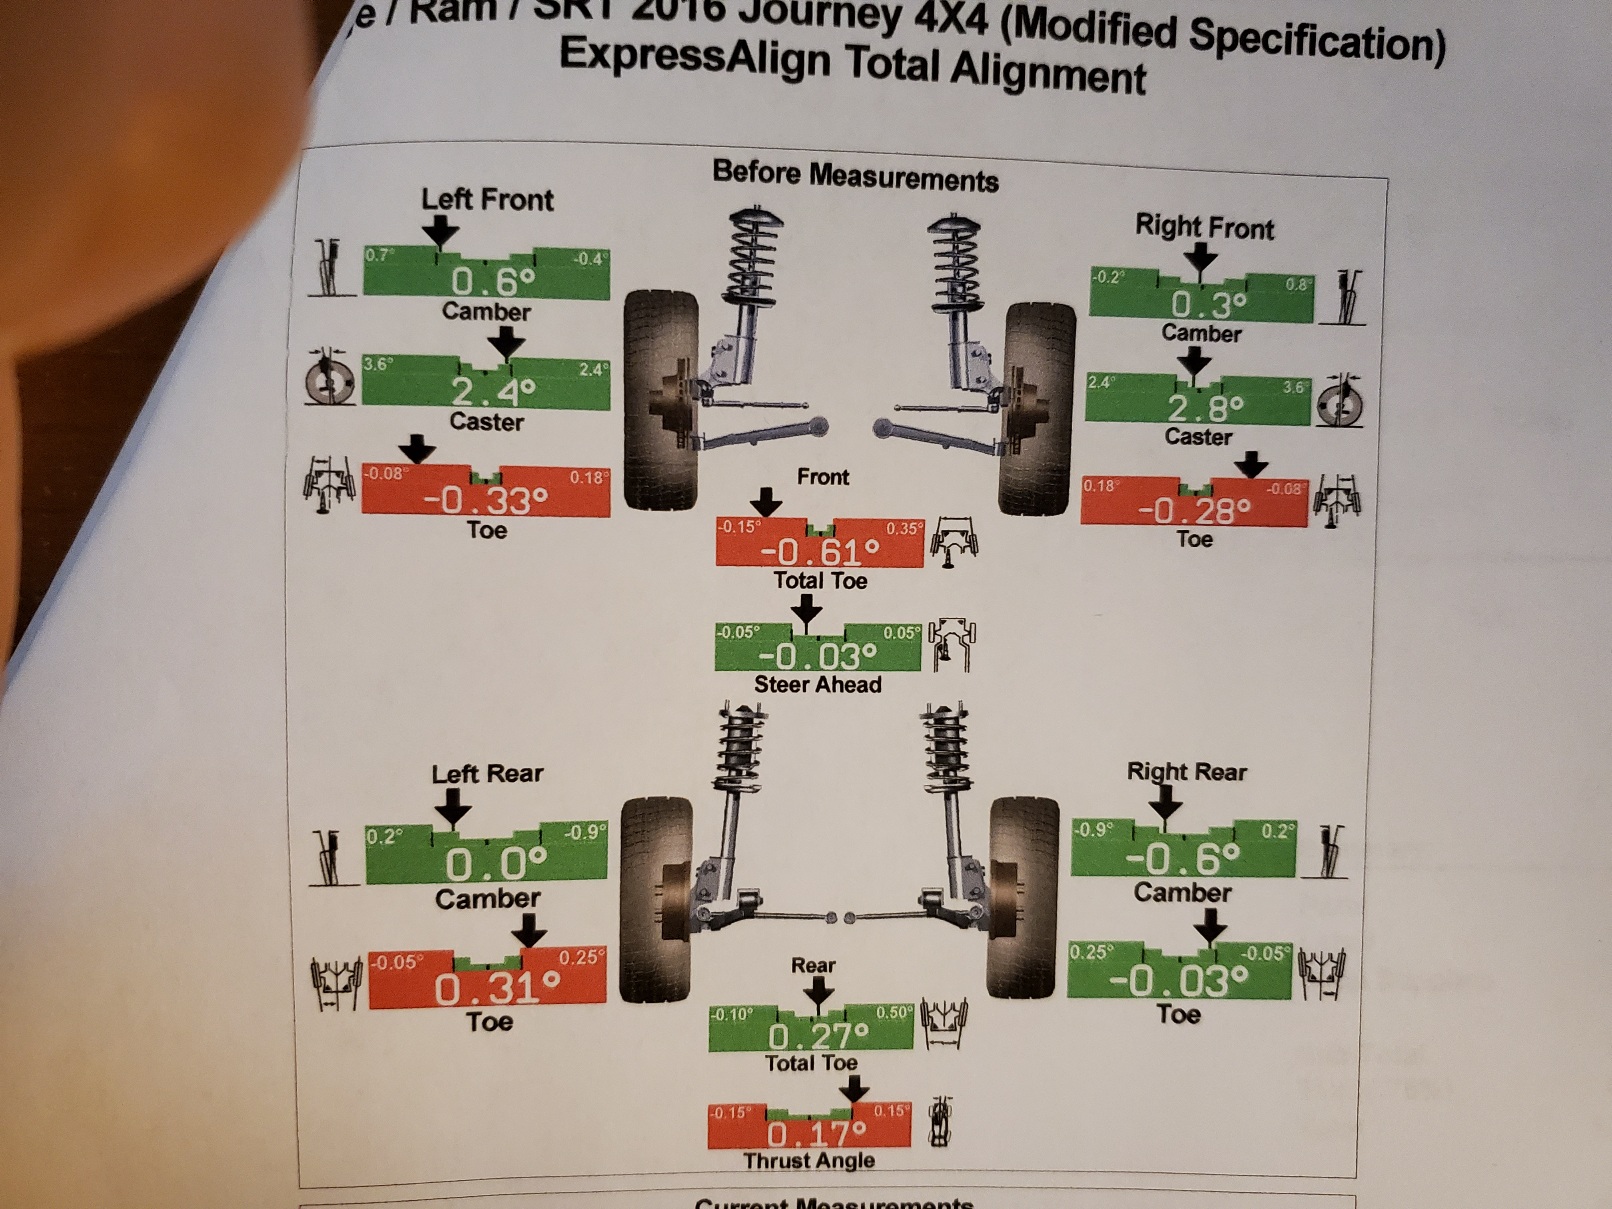
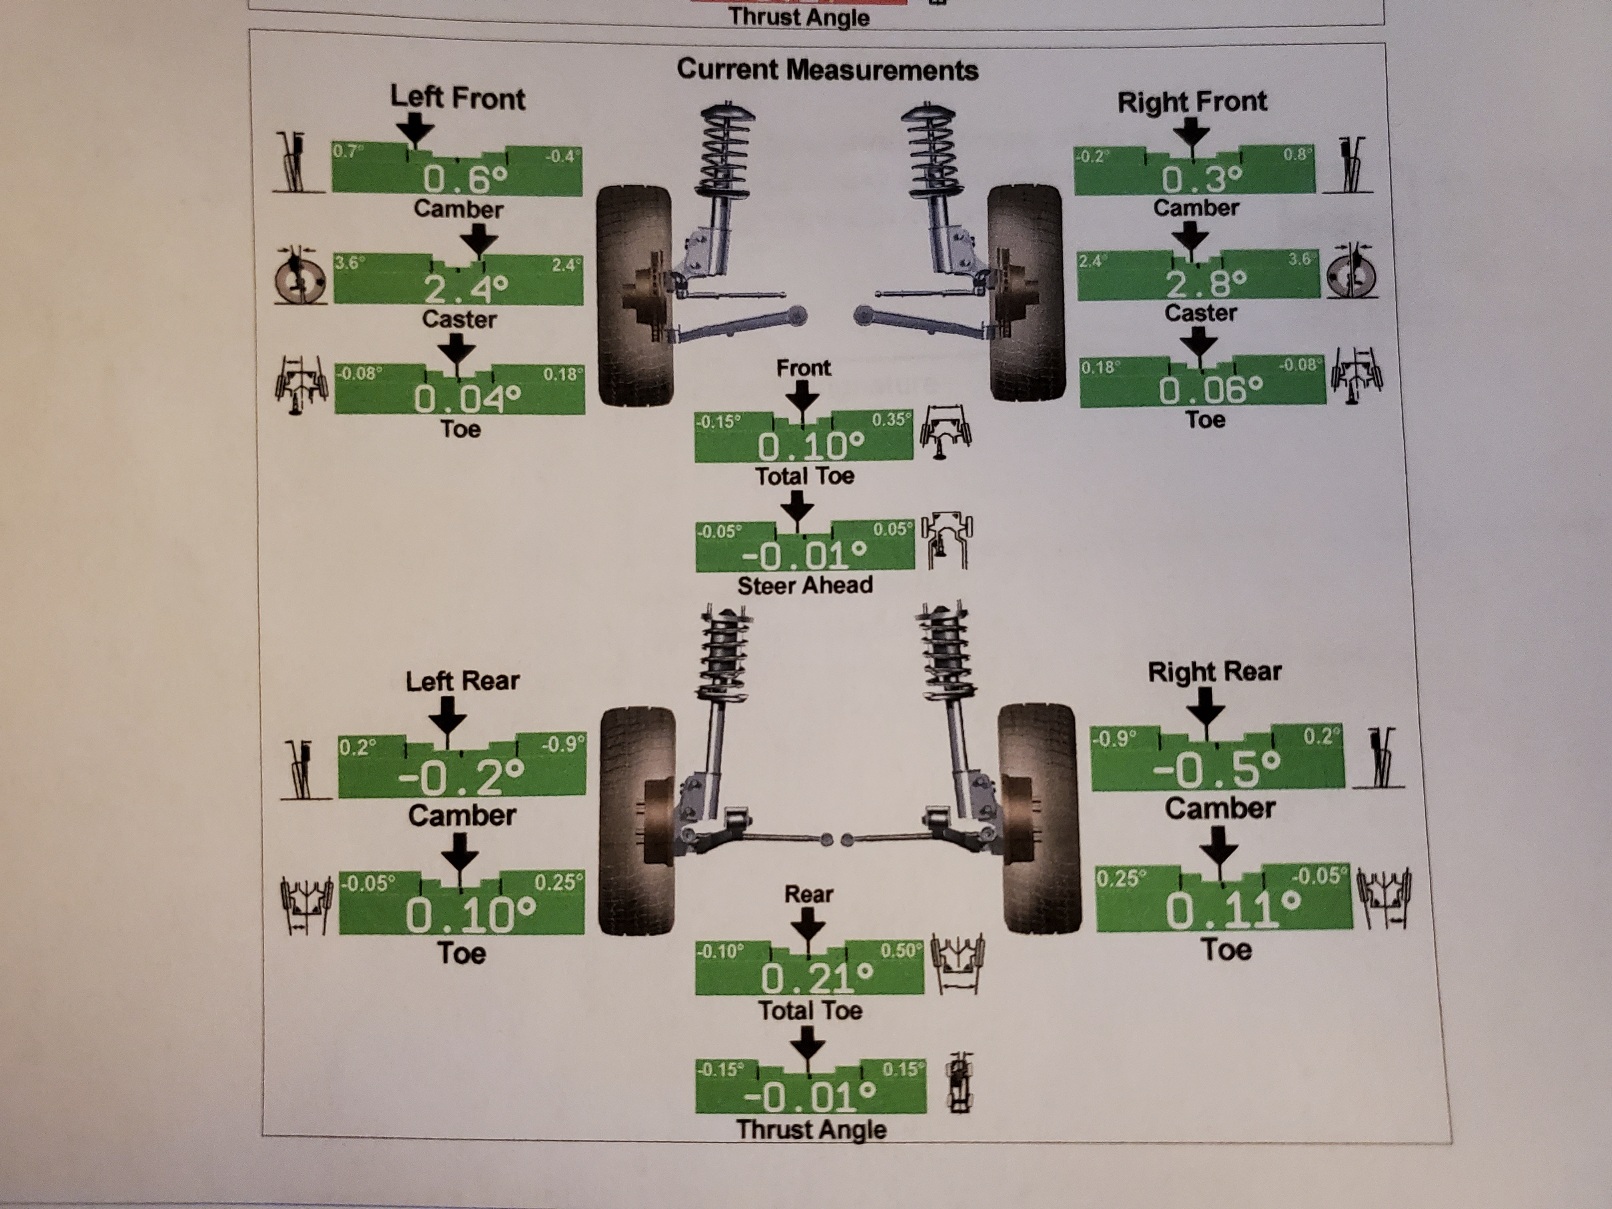
One last follow-up. Wife took the Journey in for tire rotation and alignment today. Buying quality parts and taking the time to align your strut-to-knuckle bolts how they came out pays off. Note the front camber/caster readings. Pretty sure the toe-ins were just due to time and driving - natural drift over time. Planning to change the outer tie rods at 100k whether they need it or not, so not worried.

-
TheCarCzar reacted to a post in a topic:
Front Suspension Overhaul - Some Tips
-
Shawn855 reacted to a post in a topic:
Front Suspension Overhaul - Some Tips
-
 OhareFred reacted to a post in a topic:
Front Suspension Overhaul - Some Tips
OhareFred reacted to a post in a topic:
Front Suspension Overhaul - Some Tips
-
5rebel9 reacted to a post in a topic:
Front Suspension Overhaul - Some Tips
-
2late4u reacted to a post in a topic:
Front Suspension Overhaul - Some Tips
-
2late4u reacted to a post in a topic:
Front Suspension Overhaul - Some Tips
-
Front Suspension Overhaul - Some Tips
TheCarCzar replied to TheCarCzar's topic in Brake, Chassis & Suspension
I wanted to mention one other thing. That specialty kit I obtained to finish the ball joint portion of the job is absolutely A+, and if I'd known how useful it was in tight spaces I'd have probably bought it years ago. It's plenty beefy enough to tackle just about any other ball joint job too. It's biggest detriment is it's sparse assortment of adapter cups and pusher blanks. I plan to eventually buy a kit of those as well, at which point I'll be set for all future ball joint changes (and it does other things too, if you're creative and know the limits). -
Front Suspension Overhaul - Some Tips
TheCarCzar replied to TheCarCzar's topic in Brake, Chassis & Suspension
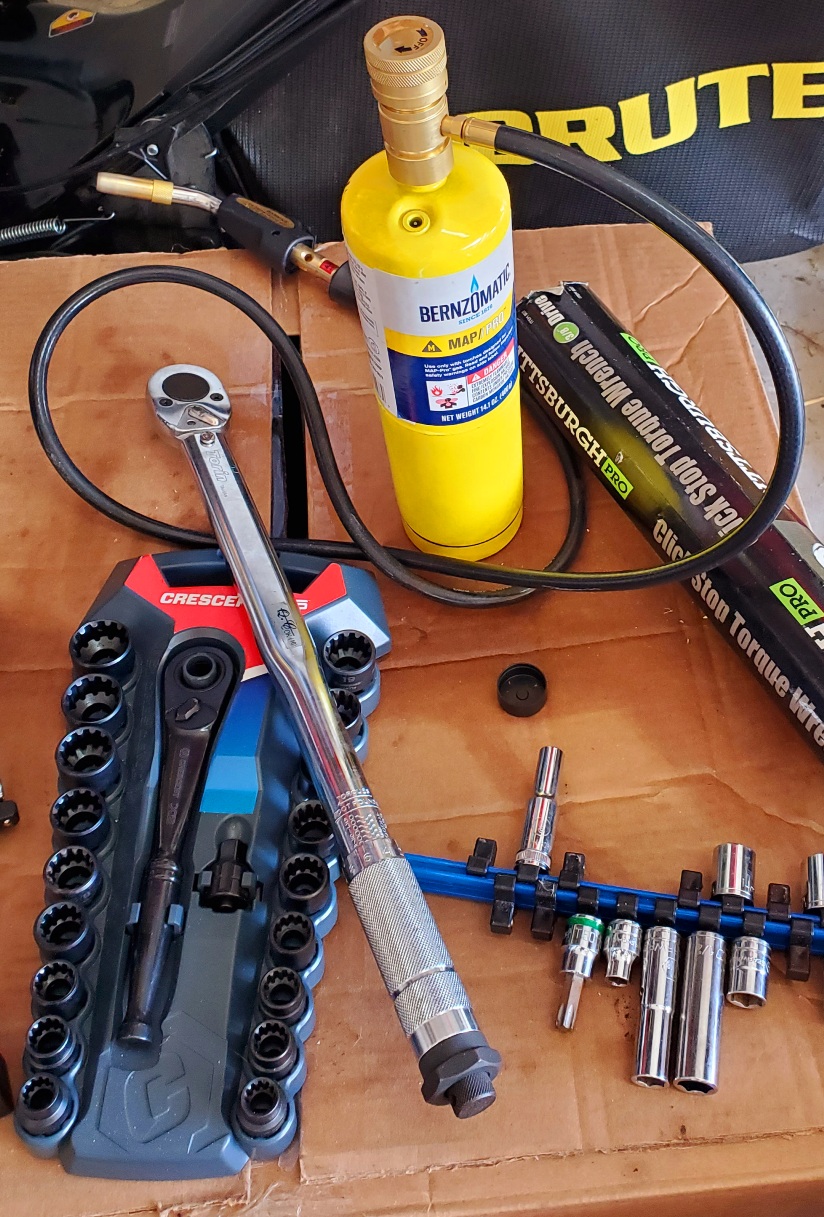
Thanks all. Def hope the info helps someone now or down the road. Mileage on the Journey is 60k, and as mentioned it's a 2016. We bought it used in early 2018, must've been a leased car because it was immaculate. Runs great, no issues, all systems work, and I used a hack module to activate the (factory-deactivated) DRLs. Works great. I did the work because of the struts. Passenger side was going bad - top mount and bearings were clicking and grinding around turns, she was making shuddering noises, and the ridefeel was deteriorating. Last fall, the passenger-front wheel bearing went bad (classic signs, groaning on left turns, humming at speed, and clicking when manually turned). Not sure why it went bad, car had about 45k at that point. But it did, and to get the damn hub/bearing outta the knuckle, I beat the snot out of it for over an HOUR with a 5-lb slide hammer. Used propane, used Kroil, used side whacks with an 18oz hammer - NOTHING. Finally, a neighbor who also works on cars (sometimes for cash) brought over his propane and a 5lb mini sledge, and we just went to town on the knuckle for another 30 minutes and finally got the bearing out. Pretty sure that ordeal started the strut on a slow path to decline. It's not meant to suffer those kinds of blows in that way. I noticed a different ride quality within a month or so (though at least the new bearing was working great). That's why, when I decided to change the struts (replace in pairs, esp with 60k on the clock) I also decided to tackle the driver's side wheel bearing. With my luck, I'd get 5,000 miles down the road and that one would crap out on me, necessitating another suspension beatdown session. So I just took the plunge and did it now, beating on components that were bound to follow the bearing to the scrap heap anyway. I threw in the ball joints, body bushings, and end links just for kicks, and because they were very inexpensive additions. I still would've done it all knowing what I know now. Really the only part made easier with my current knowledge would be the ball joints (I'd have the right tool stack from the get-go). Struts themselves are easy, the wheel bearing is just a slugfest with metal (the job is worth it just for the chance to say "How dare you defy the son of Odin!" like you mean it), and the sway bar stuff is a lot of hand wrenching and tight spaces no matter what. I guess there's probably some power or air tools to make it easier, but I just have a nice Ryobi 18v drill and driver set - and a good assortment of hand tools. Had things gotten really bad in some parts (like not being able to grip the flats while removing the nuts from the sway bar links), I've got angle grinders and stuff too - I probably could have welded a nut to use as a flat onto the link spindle if I truly had to, or thought it would make things that much easier. In fact, I considered drilling, grinding, and welding together some kind of makeshift cup receiver during the ball joint saga, and I also considered just grinding down the Powerbuilt C-clamp to fit. It would have meant buying the tool - obviously - but it also would have gotten the job done while being an extra pain in the ass. Fortunately for me, I have a kickass wife that not only helped quite a bit, but also made a run for a larger ball joint kit, and then a second run to obtain that specialized kit (which is a nice addition to my collection) when the job hit the wall. Of course, that gave me time to rest my hands, legs, eyes, and fingers too. And eat. As for the follow up, the ride is much improved, the noises are gone (a little squeaking from the control arm bushings, but they're in overall good shape - checked them thoroughly during the job), and the handling/turning are as good as new. The struts were FCS brand - got 'em from the rock and I've used their equipment on 4 other struts/shocks in the past, always been impressed. -
2late4u reacted to a post in a topic:
Front Suspension Overhaul - Some Tips
-
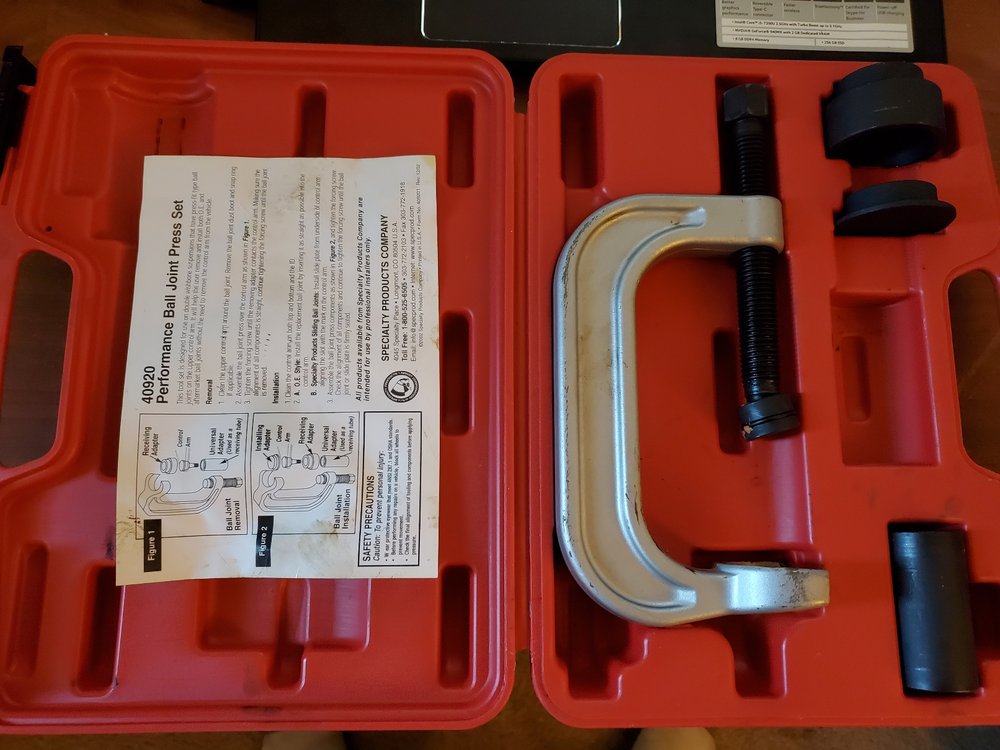
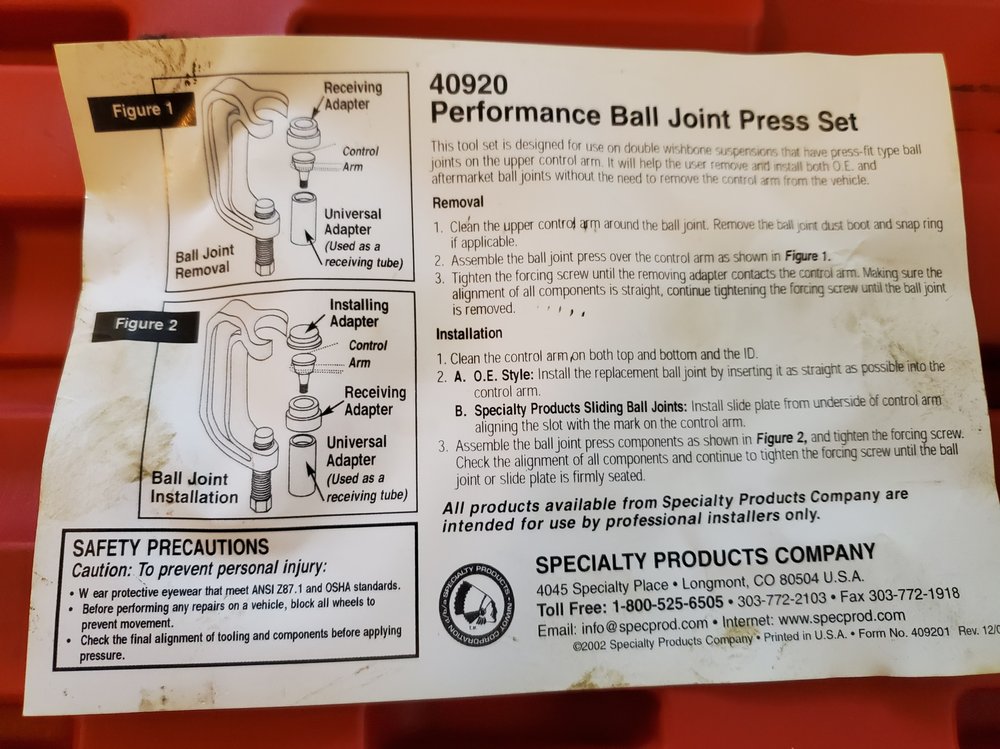
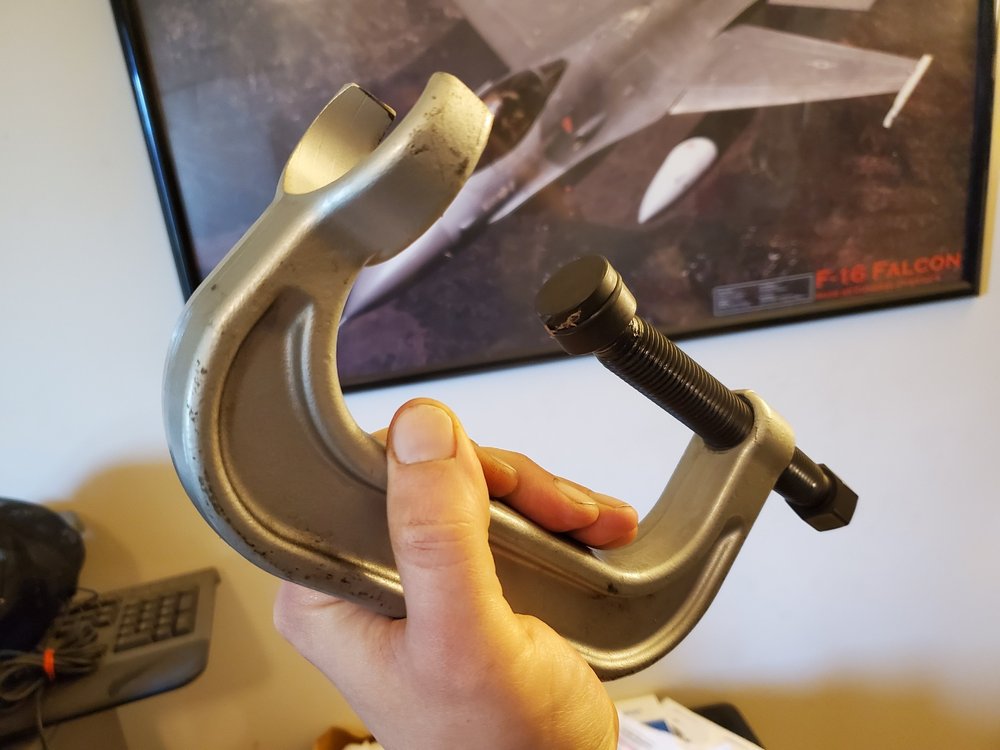
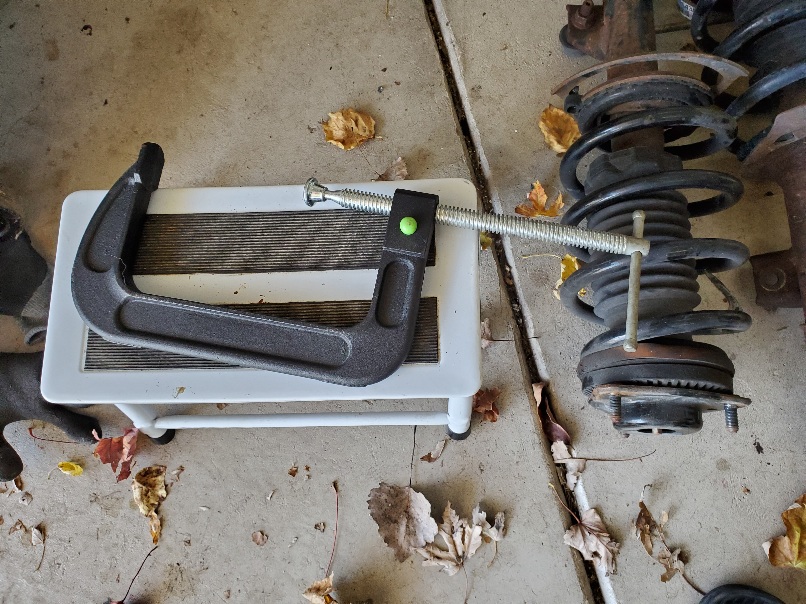
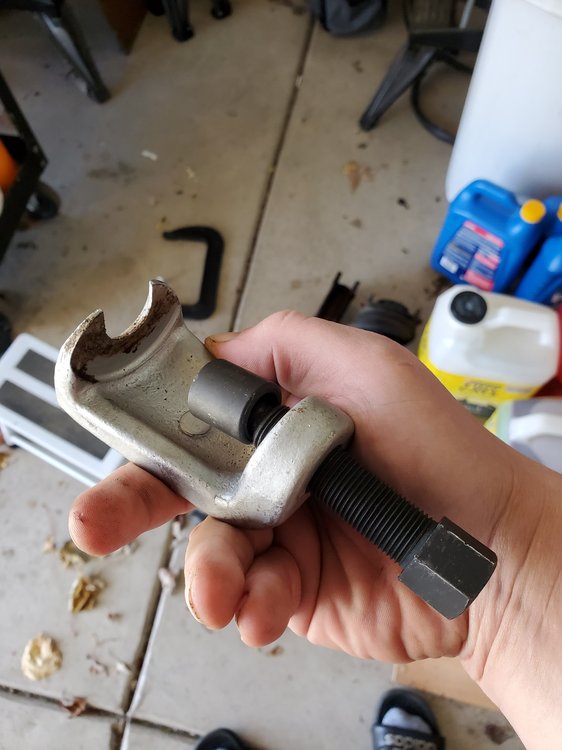
Just finished a front suspension overhaul on my wife's 2016 Dodge Journey R/T AWD (3-row). It was hell. We changed both front struts, both ball joints, both sway bar links, both body bushings, and the driver side wheel bearing (passenger side went bad last year, early failure, so I decided to just go for it "while we were in there"). My wife helped some on the wrenching and passed me tools so my fat ass didn't have to do the up-down shuffle a million times. Here's what we learned . . . (BTW - this is not the exact order of operations, that can be pretty fluid depending on what your total replacement scope includes). Ball Joints (This is First for a Reason) Mopar knuckle design sucks hairy taint. Took combined adapters from 3 tool sets (two rented, one bought) to get them out and back into the knuckle. Getting them out took receiving cups from the two Powerbuilt kits carried by Advance Auto (one big, 23 pieces, and one small, 10-14 pieces I think, don't remember. The small kit is model 04057# (the # is either a 9 or an 8, can't tell from the one blurry photo it's in on my phone). The removal also required one of the forcing blanks from the big kit (basically a circular metal slug that gives the C-clamp extra push thru the knuckle bore to finish the extraction. Speaking of the C-clamp, the big beefy one that MOST auto parts stores carry in their rental kits (it's identical between the big and small Powerbuilt kits) will NOT finish the removal. For that I needed a regular 8" C-clamp (pictured with the green quick release button). The forcing knuckle on the Powerbuilt kit C-clamp is TOO BIG to fit into the recess of the steering knuckle on the car with the forcing blank, and the screw-drive knuckle can't be made to align to push it out with the C-clamp reversed (tried, and failed, YMMV). However, I used the C-clamp from the kit, along with a stack of receiving adapters, to get the ball joint most of the way out, and then switched to my 8" C-clamp (continuing to use the receiving adapters) to finish the removal. I will say that removing the snap-ring from the ball joint (prior to extraction) was a sinch. Use a thin but sturdy punch and a hammer (of whatever kind, doesn't need to be huge), and soak the snap-ring and groove in Kroil or PB Blaster about 5 minutes before you go at it. Took me all of 2 minutes per side, including sitting my ass down and gathering the tools. You'll need to remove the brake rotor and dust shield to get at the clip thru the little slot in the knuckle below the hub, but you MIGHT be able to grip it with locking pliers and just yank it off from the inboard side of the knuckle - I have my doubts, but it could be possible. To remove the taper spindle of the ball joint from the end of the lower control arm, you can use heat and a hammer (heat and hit the control arm end itself to shock the taper bore apart from the taper spindle), or use a puller. I used a small puller that's really meant for built-in ball joints and tie rod ends, but I used to to put tension on the taper spindle and then hammered the control arm end until it shocked the tapers apart with a loud bang. Either way you do it, that's how you know it worked. Make sure to remove the nut first (I almost forgot). Installation was a crap show. For this, you have basically three options Option one, use the C-clamp from the Powerbuilt kit, with installation cup adapters, to force the ball joint about 60% of the way in, and then hammer it the rest of the way. 5/10, would not recommend if I were you. If you HAVE to resort to this method, use a SOFT HAMMER - rubber mallet or deadblow hammer, not a hard steel hammer. Go slow, and use a little grease in the bore (just a little). If you lift the car high enough, you can do this all on the car. The reason you need to finish with a hammer is that the Powerbuilt kit C-clamps (which are identical to the kits used by Autozone and ORiellys) cannot fit into the knuckle with a receiving cup, and the ball joint sticks through the interior of the knuckle about 1cm when fully seated, which means you NEED the receiving cup to give it space to fit. Option two would be to remove the knuckle entirely and put it in a jig, in a shop press (need at least 15" of clearance), and press the ball joint in that way. You'll need the jig to hold the knuckle straight, and installation cups to press on the rim around the ball joint to seat it. Option 3, buy the Mopar ball joint C-clamp kit for $500. Just kidding. The REAL OPTION 3, which is what I did, was to find an aftermarket kit that emulates the Mopar kit, and use that. The kit that I bought (okay, actually my wife bought it after I sent her out to find the right kit once both Powerbuilt rental kits had failed) has a wide, open ended forcing knuckle that is juuuuuust big enough to accept the butt end of the ball joint as it comes into the knuckle. The only issue is the kit didn't come with the correct installation cup adapters (for the tapered end of the ball joint), so I used the ones from the Powerbuilt kits that I'd rented. Ideally, you could buy this kit (pics included below), along with a set of adapter cups/tubes, and you'd be set. The kit was about $130, and you can get adapter cup sets for cheap - sometimes as low as $30 or $40. The aftermarket, Mopar-lite kit that I used for ball joint installation is #40920 by Specialty Products Corp, and my wife tracked it down at O'Reilly's Auto Parts. Nobody else, that we can tell, carries it. Oh, and finally, installing the snap ring once you're done is a breeze. I was able to do it by hand, no tools or tapping required. You can either just push it right into the groove from behind, or get one end in and work the rest into the groove along it's circumference. Wheel Bearing This was my second front wheel bearing/hub job on the Journey. Both were a huge PITA. The bearings on ours were super-seized and resisted all attempts by slide-hammer to extract. I used both my own 5-lb slide hammer (which has successfully removed bearing/hub combos from other vehicles with no heat and only minor lubrication), and an 8-lb rented slide hammer. Neither worked. What ended up working was copious Kroil application, MAP/PRO heat (out of the yellow bottle), and a 5-lb sledge working from one back edge of the hub to the other, alternating sides and working it out. Even to get it started took about 20 minutes of effort (some of that with the slide hammers, which as noted did not budge the thing at all), and getting it out took another 10. I will say I was being reserved because this was towards the beginning of what promised to be a long job, but just go in expecting to fight. I also used a punch and chisel at times to encourage separation - this is fine, and does not damage the mating surface of the knuckle. I had the bright idea to see if I could get the bearing to spin in the knuckle first, before attempting to pull, but this did not work. Maybe I could have hit it harder to try spinning it, but I don't know. All I know is get yourself a 5-lb mini sledge if you go at this job, because if you're using a slide hammer and it's not working, with every strike you're also damaging the hub, so you won't wanna be driving on it until the new hub is installed. Speaking of, make sure you clean the bore thoroughly before installing the new bearing/hub. There is a small sealing shim ring that goes between the hub and the splined drive spindle, don't forget about that It'll fall of or otherwise make itself known once you've gotten the old hub out. I put the bearing into the (cleaned and lightly greased) knuckle bore as far as I could by hand, which was about 8 or so millimeters (make sure to keep the drive spindle aligned with the splined interior hole or it can bind, forcing you to pull back out and restart). From there, I used the bolts to draw the mating surfaces of the hub and knuckle together, a little at a time, using all 4 bolts in a criss-cross pattern (think of lug nut tightening). Unless you remove the knuckle entirely and put it on a press, this is the only viable solution. Using bolts to draw surfaces together and pull a press-fit is a time-honored hack tradition, and guess what folks - it works. Go slow, alternate bolts, pre-apply LocTite, and you'll be FINE. If you insist on being a perfectionist, have 4 new bolts on hand and swap 'em out once the unit is pressed together. Or you can be a man and roll with it. The TIGHTENING torque of the bolts is WAY higher than the torques it took to get the surfaces mated as a unit, so I am not worried in the slightest about bolt stretch. I know it's a real thing, but it doesn't apply here. Body Bushings The sway bar body bushings were easy, but still a PITA because of the tight spaces involved. Luckily I had a set of offset box-end wrenches, and pass-thru sockets, that worked great for the passenger side. Driver side was accessible with a flex-head ratchet all around, but other methods exist. For the rear bolt on the passenger side bushing bracket, get ready to spend a good twenty minutes on the ground, going 12.5 degrees at a time on a bolt that will seem absurdly long by the time you're through. The heat/debris shield for the steering gear kinda-sorta extends over the bushing bracket and limits your hand space. My hands are medium sized, and I had almost no room to use my fingers once the bolt was loose enough to make it possible. My wife attempted to go at it from under the car, the inboard side, but that didn't pan out. I do think the right combo of attachments on a ratchet might have made that method possible, and I do have a full set of u-joint extensions, but I don't like them much and didn't bother getting them out. If they work for you and are less of a pain than slowly inching a bolt out one eighth of a turn at a time, then congrats and I'm happy for you. Sway Bar End Links These suck. They just suck. Broke two star bit heads in the spindle ends trying to hold the ball-joints stationary while spinning the nuts off. Ended up needing to use an 18mm open end on the joint-side flats while using a socket to spin the nut off the spindle end. It's a simple process but it sucks because of the rust and the "forced-round" nuts that these components use (the hole in the nut is slightly oval and is forced into a circular shape by the spindle on the end of the ball-joint. The new ones come the same way, so get ready for the same fun - in R-E-V-E-R-S-E!!! We saved this for last, and my arms and hands were toast afterwards. Struts Easiest part of the job. The strut-to-knuckle nuts are tight and rusty, but you've got all the space in the world to use a long-handle and get supreme leverage. Make sure to mark the bolt heads (not the nuts) of the bolts so you know how they go back in for the best alignment. You WILL NEED TO GET AN ALIGNMENT after doing this job, but if you can get it close on reassembly you can wait a couple days - its not super urgent. We used a simple vertical line with dots to mark the top of the line, and extra markings for the bolt that goes on top (it matters). Aside from that, just make sure to keep the speed sensor cables and brake hose out of the way when you're removing and installing, and you're golden. You do have to remove BOTH plastic cowls, both front wiper arms, and a steel crossmember in the engine compartment to properly get at and torque the topside nuts holding the strut to the body, but that's easy - just take pictures and keep the plastic rivets organized so you know where they go back. We did have a minor fight with the wiper arms, but we used a tie-rod puller (pictured) to get them off and it worked great. That is the same puller I used on the ball joint taper spindle, mentioned in the first section. It is a common tool and can be had for like $15-30 on Amazon or Ebay. Okay, my hands hurt too much to keep typing. Forgive any typos, they're also shaky from yesterday's effort. Hope this helps someone. Next spring we'll be replacing both front lower control arms, so there may be more coming.