

SeoulJourney
-
Posts
40 -
Joined
-
Last visited
Content Type
Profiles
Forums
Gallery
Posts posted by SeoulJourney
-
-
@Jkeaton I saw in your post on dodge forums you asked this question exactly. http://dodgeforum.com/forum/3rd-gen-dakota/260260-interior-dome-light-wiring.html
I wonder if the location is the same because I'm going for the same effect. I think I need to tap directly into the dome light and not the supervision wire to get the right effect.
-
@PowerZ69 Thanks for the link. You posted the wiring diagram for the 2011. I searched and found the one for my 2010. http://www.commandocaralarms.com/wiring/2009-2010/dodge/journey/628.html
It looks like I can go through either the driver's A-pillar or TPIM in the engine bay. I'll test with a multimeter before I splice any wires. Hope I don't blow anything!
-
I haven't be able to find a wiring diagram anywhere. I'd hate to do some probing without some sort of guide.
I'm going to install the lights underneath the side skirt and hook it up to the dome lighting. That way, when you unlock the doors, the ground lights up as well. It's the poor man's version of what you see on the higher trim Mercedes GL SUVs.
-
Does anyone know where I would tap into the the dome lights to install puddle lights on my 2009 SXT? I'm familiar with the general installation procedures (like those on youtube) but none are specific to the Journey.
Here's a link to the puddle lamps for more info: http://store.ijdmtoy.com/Brabus-VIP-Style-LED-Puddle-Undercar-Lighting-p/50-068.htm
-
Honestly, this is not a bad deal considering that you get LED running lights, angel eyes, and projectors all in a custom built headlight housing. It is possible to get it done yourself with higher quality projectors, however, they will likely use a proprietary HID bulb and not a standard bulb like the H7 they have listed. The Retrofit source has bi-xenons for $270 and the cheapest headlight housings on amazon are $220. That's almost $500 without any angel eyes or the install. The quality remains to be seen but if the price drops then it might be hard to resist. I'll be watching this one.
-
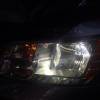
Can you take a picture of a wall around 30 feet away? I just want to see how much light scatter there is above the cutoff.
As requested:
 I did take it out for a long drive and the lights did not seem to be pointed in anyone's eyes. Definitely could see much better than the factory halogens. Obviously a projector retrofit is better but this is a vast improvement.
 -
-deleted duplicate post (mobile browser)-
-
Not a lot of problems, just one. I haven't taken a look at DDM's ballast, but I opened the OPT7 ballast up and inside they are properly silicon sealed. This is typically indicative of a higher end ballast. Although the one i received was defective, this is likely outside the norm.
-
Can you take a picture of a wall around 30 feet away? I just want to see how much light scatter there is above the cutoff.
I'll try to find a good spot. We have a long weekend coming up.
-
So you're running a 55w ballast on one side and a 35w ballast on the other? Is there a noticeable difference in output from the drivers seat?
Correct. It was either that or put the halogens back in (never again). From the driver's seat and up close, you can tell a slight difference in color. The 55W ballast produces a whiter light. Ironically, using the 35W ballast produces a slighty bluer light. I'm sure this affects luminosity but from a drivability perspective you don't really notice it.
-
Are those remotes built into the Soundstream amp? I don't think my wife would like me putting in a 12" Solobaric in her car and a 1000w amp, but my car needs to upgraded past my existing 200w Infinity Basslink. The best part about the Basslink is the remote amp control. How is yours set up?
-
Finally got them in and installed! It was not fun. I'll try to share my experience so others can benefit and decide to install them for themselves. Here goes...
Box arrived and it was professionally packaged in one OPT7 box. Nothing fancy, but everything was secured. I'll save you the unboxing pics but you can see it on the link I provided earlier. This is what EXACTLY came in the box.
2 x ballast
2 x bulbs / wires
2 x capacitors
2 x mounting brackets
6 x small white zip ties
4 x small nut/bolts
1 x capacitor instruction sheet
1 x instruction sheet for general install
Missing:
1 x relay
After reading through the comments it seems that they don't include the relay but if you ask they will send it free of charge. Not good to find out when I'm receiving the goods overseas.
 I won't give you a step-by-step on the install. I'll just highlight some of the key points. First, I tested the battery side first (as the instructions tell you to do) w/ out the capacitor. The instructions tell you that you must have the correct polarity on the capacitor or you will blow it. Previous installs using car audio capacitors verified this statement.
 Key point # 1: The OEM headlight harness needs to be installed in reverse. The harness will not CLIP onto the ballast. You will need to secure with electrical tape. (It even says to do this in the troubleshooting steps. Anyway I hit unlock on the keyfob, a little flicker, and BAM it's on!
  This verify's what HIDextra's website (which incidently, is referred to in the OPT7 manual) says about not needing capacitors in 09-13 Dodge Journeys.Anyway, I started it up and turned on the headlights....
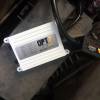
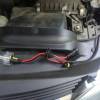
 Nope. Welcome to CAN-BUS. But contrary to popular belief there was no light out message on my dash. I might add that I don't have the EVIC option on my SXT. Keypoint #2: You need to install capacitors or the lights won't turn on when the engine is on. Keypoint #3: Black is ALWAYS NEGATIVE! We don't have any red wires when installing the capacitors, but as long as you match up black to black, then you should be ok.Next problem: I received a defective ballast. I troubleshot this by switching everthing but the ballast, and tried on both sides. Definitely dead. Fortunately, I had a Kensun 35W digital ballast laying around. It did the trick until OPT7 mails me my replacement.
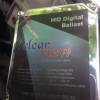 Here's what it looks like installed. I used the double sided tape and put some more duct tape to secure it to the side of the headlight housing.
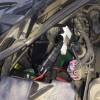 And the temp install until I get my replacement ballast.
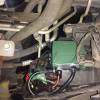
And here they are on and the cutoff:
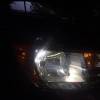
Not a bad upgrade. I haven't driven it yet, but viewing them from the outside at night (sorry no pic) I have to say that they are BRIGHT AS HECK! I definitely would not recommend these in places where you actually can get pulled over by police.
Hopefully this helps some of you out. Please let me know if you want more details.
-
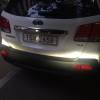
The backup camera on my 2010 offers limited visibilty to the rear bumper edges. Had these aftermarket sensors professionally installed and wanted to share. Link to my album: http://www.dodgejourneyforum.com/gallery/album/223-backup-sensors/
-
By "Blind Spot Sensors" I'm thinking he means on the sides of the vehicle, for lane changes...
Ah, my mistake. That's a new feature I've heard about.
-
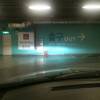
I had something like this installed here in Seoul. Basically they installed four color-matched proximity sensors into the rear bumper and a small heads-up display on the dash. As you back up the beeping tone get quicker and you get a visual display of near you are to an object. I have the factory-installed backup camera but it sucks when parking it tight spaces (as are all spots in Korea). I'm sure there is an equivalent product on your side of the globe.
I've been meaning on posting pictures. More to follow.
-
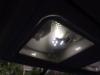
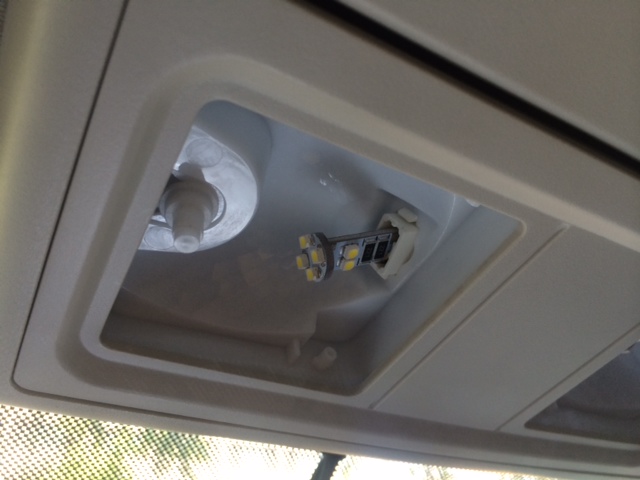
I posted a how-to on my map light install (apparently in the wrong forum (hey it said lighting)). Anyway, I got CANBUS bulbs and they worked.
-
I brought mine to the dealership today and they are ordering replacement lifters covered under the warranty. I hope it fixes the noise. I had a Nissan with 150k miles with noisy lifters, but it didn't affect the engine too much. The engine is only noisy after a cold start, that why I think the lifters are to blame. When I took the car to the dealership they couldn't identify the problem. Luckily I video taped the cold start.
It looks like the previous owner didn't care much about maintanence. The car had low coolant and oil. But since it was still covered under warranty and the mileage was low, it was a hard offer to turn down. Can I add videos to these posts?
-
I wish it was that easy to upgrade the 2012 DJ map lights. The stock ones on my vehicle are already LED, but too dim of an LED for my tastes. I looked at them to see what bulb type they were so I could replace them. Turns out they're some wierd integrated panel...looks like I'd have to solder in a new set of bulbs if I wanted to upgrade.
What about the rest of the lights? I'm going to install the the cargo lamps in the next day or so. It should help brighten up the interior.
-
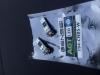
First set of LEDs came in the mail. Wanted to share with everyone to show how simple it is.
First the link to the bulbs on Amazon: http://www.amazon.com/gp/product/B005DHXSSQ/ref=as_li_tl?ie=UTF8&camp=1789&creative=9325&creativeASIN=B005DHXSSQ&linkCode=as2&tag=kinsrev0a-20&linkId=QRKRGQDOXEFN4YL7
Next, here is what I received:
To install the new bulbs, you will need just a small flat head screw drive and gloves (unless you don't mind hot bulbs on your fingers).
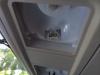
If you look at the image of the removed cover,
 there are two hinges that control the pivot of the map light cover (which also serves as the switch). Use the flat head screwdriver to slowly ease the hinges out. As you can see, they are really delicate. Should pop out easily.
Here is the old bulb. My owner's manual says 578s. Looks like 194 to me.
 Should pull out easily.
Add your new bulbs.
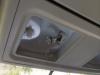 Activate the switch to make sure it works. If not, switch the polarity by installing the bulb the other way.
Viola!
-
If you look around some of the other members have posted on the Triton V3 switchbacks. Pricey, but they look good.
I wonder how that Ford had those switchbacks installed without the hyperflashing. From what I understand, we will need the resistors on the Journey. After I finish my HID upgrade, I'll look into this...
-
Decided to pass on this install for the time being. HID install coming up though. See my new post.
-
Yesterday, I drove my wife's 2010 SXT for the first time at night and in the rain. I have to say I was thoroughly disappointed. Just want to say, this is not my first time buying HIDs. Over the years I've probably bought and installed about 10-20 pairs for myself and friends. Projectors, non-projectors, retrofit, motorcycle, bi-xenon, plug and play, relays, no relays, 3000K-12000K, analog/digitial/digital slim/ 35w/55w, capacitors, etc. You guys get the picture. I know the debate lines. I know HIR, I know about CANBUS.
First, allow me to caveat my choice with a little background, as I drive a US spec vehicle in S. Korea. If you've never driven in Seoul, let me tell you that the rules of the road are only suggestions. Getting blinded by headlights is the least of your concerns. Since this is my wife's daily driver, I needed something less flashy and more practical. I pulled the trigger and went with these: http://www.amazon.com/gp/product/B00CF280LM/?ie=UTF8&camp=1789&creative=9325&linkCode=ur2&psc=1&tag=kinsrev0a-20&linkId=MYGZ5D2RPKWNFFXT
The factory cutoffs are good enough, and compared to the light output on my other car, this is very pedestrian. This is my first upgrade in her car so I guess we'll find out if/how/when this vehicle will react. I went with the 55W ballast so hopefully the power draw is the same. I believe this kit comes with capacitors to help with flickering as well as the relays in case I decide to wire them directly to the battery.
I know that wiring the relay harness directly to the battery is the best option, but I have a feeling that this combination will work directly with plug and play. Just need to wait 10 days for it to arrive...
-
I purchased these for my other vehicle:
Outstanding... But I like the way that these covers are integrated into the body work.
DTSGuy, where did you read the review?
-
New DJ owner here. I tried searching to see if anyone has installed these: http://www.amazon.com/gp/product/B00J65YYA2/ref=s9_wish_co_d4_g263_i2?ie=UTF8&colid=3KHFBJO66L4N3&coliid=IY0QYU6EF6O6H&pf_rd_m=ATVPDKIKX0DER&pf_rd_s=typ-top-left-1&pf_rd_r=1JJPDJ2W6SE1JQN209TV&pf_rd_t=3201&pf_rd_p=1780082482&pf_rd_i=typ01
I imagine it would be a simple install (and I wouldn't have to mess with the CANBUS system). I'm willing to be the guinea pig (and post pics as well).


Puddle light installation help
in Glass, Lighting, Mirrors, Sun Roofs & Wipers
Posted
Not going with the dome supervisory wire, I don't think I'll get the "fade effect" I'm looking for.
After doing a cursory inspection today, I see airbags in both the A and B pillars. Without a diagram, I don't want to just start popping off panels because of the airbags. Anyone know where to start popping the panels off?
I think this weekend I'll pop out one of the dome light brackets and see what direction the wiring goes. It's a start...