2009journey
-
Posts
13 -
Joined
-
Last visited
About 2009journey
Recent Profile Visitors
761 profile views

-
Reset the "Oil Change Required" warning....HOW?
2009journey replied to Xphyle's topic in Engine & Transmission
I had the same problem, was driving me crazy..... then depressed accelerator 4 times instead of 3 out of desperation and it worked!!!! -
Homelink not programming
2009journey replied to nelsonclan's topic in Audio, Infotainment Navigation, MyGig, UConnect, etc.
I believe for a rolling code craftsmen (what my garage door is) you do have to use the "learn" button... at least I did. I also programmed a second button in the Journey for my mother-in-laws garage door which is not a rolling code remote and it was easy, just hold the transmitter up to the visor, press the buttons as per the instructions and the journey learned the code. However, for my rolling code model I had a bit of difficulty also. To be honest I cannot remember exactly how I did it but it took a fair number of tries. Basically I think first I had to teach the journey the code from a current rolling code transmitter and then I had to use the learn button the garage door to "sync" with the Journey. It was much more difficult then my mother-in-laws door which did not require the use of the learn button on the garage door. I think in the end I actually followed the instructions exactly in the Journey manual ignoring what was written on my garage door opener and it worked. I was side tracked somewhat by trying to follow some of the step by step direction that are written on my garage door opener. -
Towing package bought, but lose wires in trunk??
2009journey replied to Steven's topic in Hauling & Towing
That is funny because that is just what I asked!!! Mine has the oil cooler installed (oh, I checked just in case) but the wiring was loose. -
Towing package bought, but lose wires in trunk??
2009journey replied to Steven's topic in Hauling & Towing
I totally agree! However, arguing with my dealer about it got me no where. The dealer stated it is a "prep" pack, no hitch and no installed wiring. -
Towing package bought, but lose wires in trunk??
2009journey replied to Steven's topic in Hauling & Towing
My dealer told me that it was extra cost to install the wiring, "just like the dodge rams", he told me. Anyway I searched the internet and found most dealers did not install but there are some that did. It is definitely not consistent. There was a lot of confusion initially whether they should or should not install. Anyway, it should only take you 30 minutes to install. Here is how... The factory wiring just ties into the signal lights. Open the hatch and pull out the two pins on each signal/brake light. You pull out the inner pin with a screw driver and then the larger outer piece pulls out. Pull out the whole light assembly, with the two pins removed it just falls out. Now, unplug the signal light connection. One end of the harness plugs into the light and the other into the existing wiring. Basically it connects in-between the wiring connection to the signal light. Drop the wiring down the gap under the signal light and run to the other side. One side (I think it was the drivers?) has TWO connecters. One connects to the lower and one to the upper connections on the signal light assembly. If this not on the correct side the trailer lighting will be backwards. Then use the already installed clips to attach to the frame. It is literally a 1/2 hour job for someone with basic skills. The worse part is you will have to lay under the vehicle so you may get a little dirty. -
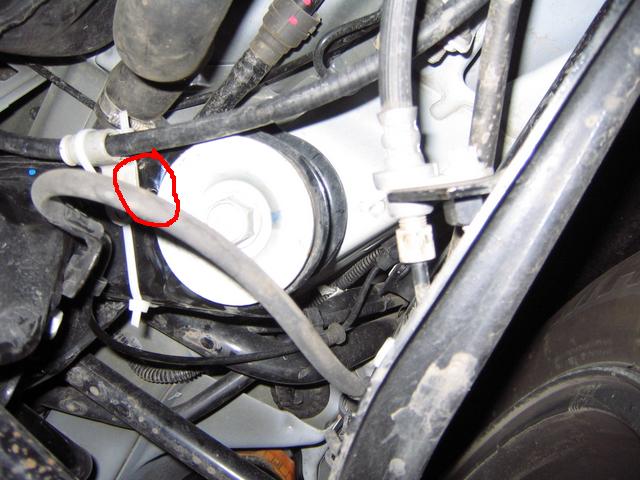
I found the squeak (creak) last night. It has gotten progressively worse, so this made the job of locating much easier. On the driver's side (and passenger) there is a large bolt and huge washer attaching the frame and the entire suspension, in between is a layer of rubber to isolate the two. Next to the huge washer is a small bolt holding a clip that holds the brake line in place. In my Journey the huge washer and small bolt were rubbing together. As the isolating rubber compressed the washer would contact the bolt and make a loud creaking noise. I removed the brake line clip retaining bolt and I am now squeak free. If I look at the passenger side there is a good 1/2 to one inch gap between the washer and the bolt. I am not sure why on the drivers side the two are so close. In the attached photo I have put a red circle around the washer and the original bolt hole. You can also see my temporary zip-tie solution.
-
Yes, that is correct. I have a AWD R/T with Convenience Group II, and no pressure display. I thought that maybe it only worked if the pressure was low so I let the air out of one of my tires. The idiot light came on but no pressure display.
-
I have and R/T with the EVIC and I still only have the idiot light! I have no idea what options get you an actual pressure display as I assumed I would have it.
-
I too had the smell. Couple weeks old now and the smell is gone.
-
My two week old R/T has a squeak that seems to be coming from the driver side rear area when I hit certain bumps. (Not all bumps, and not necessarily only the big bumps, just certain bumps!?). If I sit in the third row it seems to come from the drivers rear wheel well. However, it is quite loud in the third row so I am not sure if it is coming from outside or inside. All I know is it is driving me crazy!!! I will have the dealer look at it the next time I take it in, I just don't want to take it in for a squeak alone. Anyone one else have this issue? And better yet did you fix it!?
-
My Journey (R/T, AWD, 3rd row, trailering and convenience package) was ordered March 10th. April 4th status changed to "E" meaning being built in framing. Ship date from factory was scheduled for April 7th. The next Tuesday, April 15th, it was in Texarkana, Arkansas, with a estimated delivery date of April 24th. Then on April 22nd it was in Minnesota somewhere (the dealer left a message and I never caught the city), delivery date slipped to April 29th. Then on April 29th the status was on a truck in Edmonton, AB to be delivered that day. I am not sure what happened but it was not delivered by truck to the dealer until May 1st.
-
I have a AWD R/T (leather) and I do not have any hooks on the 3rd row....
-
My Journey (R/T, AWD, 3rd row, trailering and convenience package) was ordered March 10th. Dealer checked status this morning, April 4th, it is now an "E" meaning being built in framing. Ship date from factory is scheduled for April 7th. Just info for those trying to guess timing of their order. John