

Scotty in NZ
-
Posts
9 -
Joined
-
Last visited
Content Type
Profiles
Forums
Gallery
Posts posted by Scotty in NZ
-
-
-
May I ask what YEAR manufacture and Trim Level you have?
-
On 3/14/2017 at 4:09 PM, Lerky said:
Do you know where I can get entire Australian Dodge Journey RT 2009 keys at an affordable price? Dodge/FCA Australia want $600 for one. Apparently the much cheaper North American ones or cheap Chinese knock offs wont work or use a different frequency.
Hi Lerky,
Here in New Zealand, my FOBIK buttons (both remotes) had failed. Both transponders still start the vehicle, but the remotes are not transmitting, hence no central locking or security system function.
Following the YouTube videos on Fobik repair, I cleaned the copper contacts and tried the "short-out" method (jump both inner & outer contact rings together).
I was able to get the Fobik to briefly transmit a frequency - 433MHz, using an RF Counter tool. (See link to RF Counter below).
Sadly, cleaning the circuit board contact rings and button contacts did not make my transmitters operational.Dodge Dealer here wanted NZD$800 to supply & program 1 x FOBIK, which is ridiculous.
So, I purchased 2 x Fobik Transmitters (433MHz) from Ebay @ NZD $13ea. (NB: don't order Fobik keys online unless you are certain of your frequency).
Probably a fluke that the transponder chips matched our original keys
")
Although my original Fobiks have only 2 buttons (Lock/Unlock), I purchased Fobiks with the additional red Panic button (which is not applicable to my vehicle).
Note: Be careful - there are 2 types of Fobik shells, with different battery compartments (1st type has a removable battery compartment on the back, allowing a new battery to slide in. The 2nd type requires the two shell halves to be separated, to replace battery). The shell, Slider Button, battery assembly and frequency MUST match your current Fobik smart key. Having extra buttons on the Fobik will not matter, as your vehicle will only operate the buttons which apply to that vehicle.
Self-programming of additional Keys (using 2 valid keys) does not apply on Journey vehicles (2010 onwards) here, due to the updated WIN modules.
There was also a WIN Module recall on earlier models, which makes self-programming now impossible.
Some earlier Chrysler vehicles (which weren't affected by the WIN recall) may still have the ability for self programming of new keys (with 2 valid keys). Worth trying before contacting Locksmith or Dealer.
A maximum of 8 x FOBIK Keys can be programmed into the Journey IMMO Security Module.
The Dodge Service Dept would NOT supply my local Locksmith with the vehicle IMMO 4-digit PIN Security number, as they want the business instead.
Dealer made up a story about them having a "special" procedure which gives them a 1-hour window to access Chrysler's Dealer Network to obtain PIN codes...blah...blah...blah...
Fortunately, our Wellington mobile locksmith recently obtained a new "Xtool Ps90" OBD device two months ago (see link below), which can access USA vehicle IMMO security PIN details and quickly program new keys. Recommend you shop around for a locksmith with the appropriate OBD diagnostic equipment.
So, the mobile locksmith arrived to our home:
No lie - took the Locksmith about 30 seconds to extract the Security PIN number.
Then another 30 seconds to "add" my new smart key to the security module....VOILA !
We now have 2 x new keys which start the vehicle and have remote central lock/security function.
Plus our 2 original keys which start the vehicle only.
Locksmith fee for home callout and programming of 2 x keys (supplied by me) = NZD$120 + gst
Total saving of NZD$1,400 Dealer Cost (2 x working Fobiks)
Link to NZD$15 Frequency counter tool: https://goo.gl/7fXY2n
Link to All-in-One 'Xtool Ps90' OBD tool: https://goo.gl/EQUAqt (price varies depending on supplier)
Cheers,
Scotty in NZ
-
Hi there,
We have the same issue...
Can you please explain how you did the backflush?
How many times?
And... at what intervals did it need doing, before the heat came back? -
On 12/22/2014 at 6:12 PM, Sparkyssxt said:
OK. So I purchased a new mirror to replace my destroyed driver side. Had a few issues and had to swap parts, mainly the painted panel as well as the plastic trim piece at the door. (painted piece was black, my DJ is white, trim piece was broken at the leading edge) So I disassemble the connector, taking pictures as well as matching it to the old part, pull apart the swivel assembly(pita but if anyone needs to know how, let me know and I'll make a write up) swap all of my parts, modify studs where needed for proper fit...
Hi Sparky,
I have the same issue.
Original mirror has silver body, so I want to swap it to the new mirror.Can you explain how you did it?
-
Looks like there are Front (A Pillar?) & Rear (C Pillar) drain hoses.
1) Remove Headliner...
2) Front Hoses
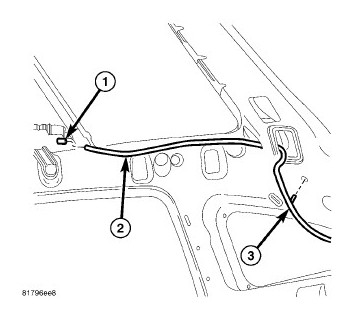
- Disconnect the front hoses (2) from the sunroof assembly (1)
- Release the support clips (3) and disconnect the lower grommet and remove the hose. 3) Remove Rear Hoses
- Disconnect the rear hoses (2) from the sunroof assembly (1) and release the support clips (3). 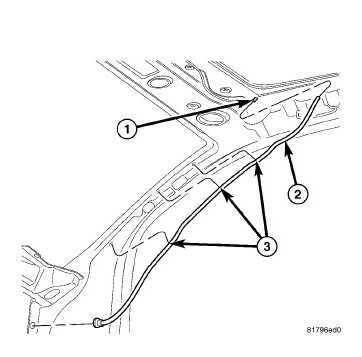
-
Hi there,
We're looking to replace a side mirror on our 2010 Journey (broken at the base).
Our mirror is colour coded (same as the body colour), so I want to transfer our existing mirror casing onto the new mirror to save having to paint it.
By any chance does someone know how to 'dismantle' the outer casing of the side mirrors?
If yes, could you please post some instructions?
(refer to attached photo with red outline as reference)
Thanks in advance.
Scotty
.jpg.c96bc29bb1c2de6297c4a784ef02691b.jpg)
-
Any update on this?
Does your Fobik still start the car? If yes, then maybe you just need to repair your remote?
")

No heat
in Climate Control
Posted
@dodgpwr
Any chance you could explain the process in more detail?
Any diagrams or photos?9